


Below is the uncorrected machine-read text of this chapter, intended to provide our own search engines and external engines with highly rich, chapter-representative searchable text of each book. Because it is UNCORRECTED material, please consider the following text as a useful but insufficient proxy for the authoritative book pages.
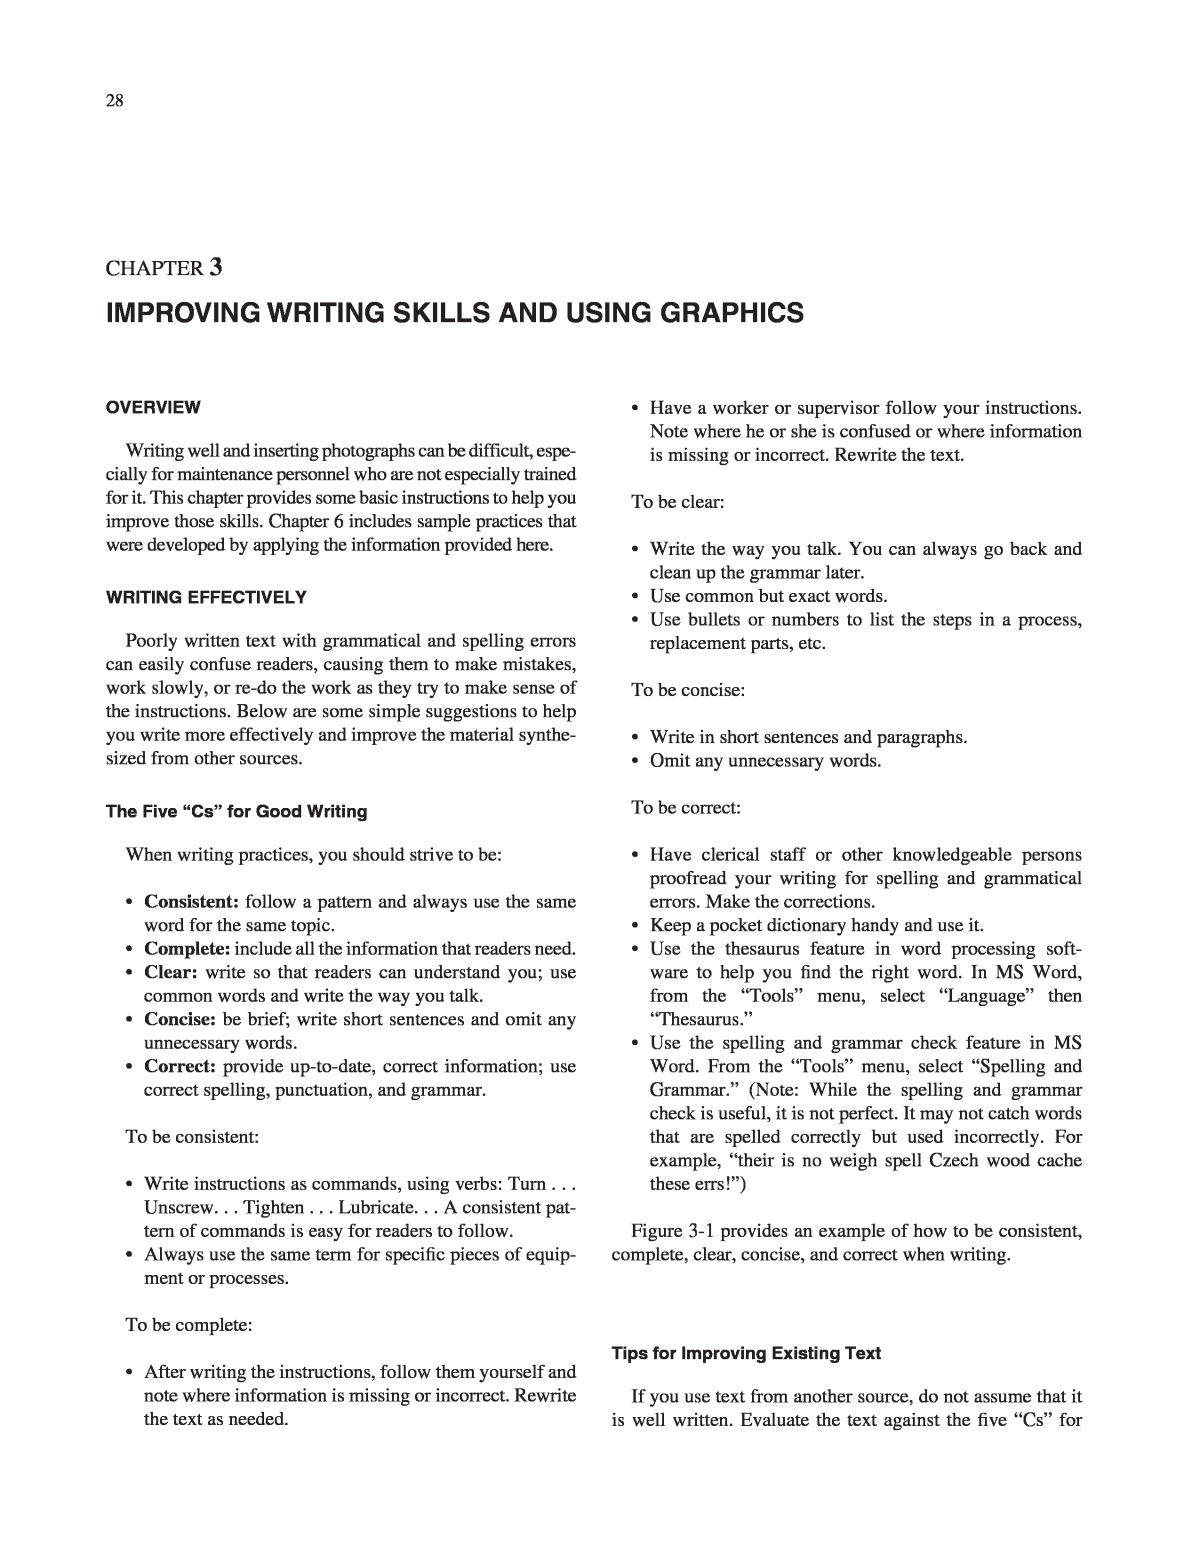
CHAPTER 3 IMPROVING WRITING SKILLS AND USING GRAPHICS OVERVIEW Writing well and inserting photographs can be difficult, espe- cially for maintenance personnel who are not especially trained for it. This chapter provides some basic instructions to help you improve those skills. Chapter 6 includes sample practices that were developed by applying the information provided here. WRITING EFFECTIVELY Poorly written text with grammatical and spelling errors can easily confuse readers, causing them to make mistakes, work slowly, or re-do the work as they try to make sense of the instructions. Below are some simple suggestions to help you write more effectively and improve the material synthe- sized from other sources. The Five âCsâ for Good Writing When writing practices, you should strive to be: ⢠Consistent: follow a pattern and always use the same word for the same topic. ⢠Complete: include all the information that readers need. ⢠Clear: write so that readers can understand you; use common words and write the way you talk. ⢠Concise: be brief; write short sentences and omit any unnecessary words. ⢠Correct: provide up-to-date, correct information; use correct spelling, punctuation, and grammar. To be consistent: ⢠Write instructions as commands, using verbs: Turn . . . Unscrew. . . Tighten . . . Lubricate. . . A consistent pat- tern of commands is easy for readers to follow. ⢠Always use the same term for specific pieces of equip- ment or processes. To be complete: ⢠After writing the instructions, follow them yourself and note where information is missing or incorrect. Rewrite the text as needed. 28 ⢠Have a worker or supervisor follow your instructions. Note where he or she is confused or where information is missing or incorrect. Rewrite the text. To be clear: ⢠Write the way you talk. You can always go back and clean up the grammar later. ⢠Use common but exact words. ⢠Use bullets or numbers to list the steps in a process, replacement parts, etc. To be concise: ⢠Write in short sentences and paragraphs. ⢠Omit any unnecessary words. To be correct: ⢠Have clerical staff or other knowledgeable persons proofread your writing for spelling and grammatical errors. Make the corrections. ⢠Keep a pocket dictionary handy and use it. ⢠Use the thesaurus feature in word processing soft- ware to help you find the right word. In MS Word, from the âToolsâ menu, select âLanguageâ then âThesaurus.â ⢠Use the spelling and grammar check feature in MS Word. From the âToolsâ menu, select âSpelling and Grammar.â (Note: While the spelling and grammar check is useful, it is not perfect. It may not catch words that are spelled correctly but used incorrectly. For example, âtheir is no weigh spell Czech wood cache these errs!â) Figure 3-1 provides an example of how to be consistent, complete, clear, concise, and correct when writing. Tips for Improving Existing Text If you use text from another source, do not assume that it is well written. Evaluate the text against the five âCsâ for
29 Figure 3-1. The five âCsâ for good writing. good writing and improve the text where needed. Most of all, edit for consistency, completeness, and correctness. ⢠Make sure the text always uses the same term for the same thing or concept. Revise step-by-step instructions so they follow the same sentence structure (preferably one that starts with a command). ⢠Make sure no information is missing. ⢠Make sure the information is correct for your shop. Writing Resources Online The following resources are available online to assist with spelling, grammar, and punctuation: ⢠Purdue Universityâs Online Writing Lab (OWL) at http:// owl.english.purdue.edu/handouts/grammar/index.html
provides clear, straightforward instructions for correct grammar, spelling, and punctuation. ⢠Get It Write Tips at www.getitwriteonline.com/ archive/tips.htm provides an archive of grammar tips provided by a private writing consultant. ⢠Study Guides and Strategies at www.studygs.net/ spelling.htm provides basic spelling rules, including a list of commonly misspelled words, and links to online dictionaries. Books Ask an associate at your local library or bookstore for books that provide brief, basic advice for writing effectively. USING PHOTOGRAPHS AND GRAPHICS Overview This section describes how to add photographs and graphics (referred to here as âpicturesâ) to your mainte- nance practices. The information assumes that a computer will be used. Those without a computer will need to take photocopies of pictures and paste them into the document. This section also assumes that MS Word will be used, although other word processing software programs have similar capabilities. Different versions of Word may handle pictures in slightly different ways from those described here. Remember to read the Legal Considera- tions section of Chapter 2 and Appendix A before using pictures other than your own. Like so many computer applications, adding pictures will take some getting used to for those trying it for the first time. While this section is by no means a definitive guide, it contains enough information to get you started. You will need to experiment with pictures and possibly seek additional guid- ance from other sources or people more familiar with the process. For those using the Word template, space is provided to insert pictures next to each job instruction where appropriate. Basic rules of thumb are as follows: ⢠Review the information provided in Table 3-1. ⢠Manipulate photos (e.g., crop and adjust the file size) before inserting them into the practice. ⢠Insert pictures into your Word file after you have fin- ished writing the text. ⢠If you are going to print your maintenance practices, use pictures with high enough resolution to print clearly. ⢠Be prepared to experiment. Funny things can happen with pictures in electronic documents. ⢠Use manuals with pictures that you find to be particu- larly helpful as a template for your own work. 30 To use pictures effectively: ⢠Use pictures to help readers understand the text or per- form an instruction correctly. ⢠Use pictures only when necessary. Not every step in the practice, especially basic ones such as âopen engine access doors,â require pictures. Pictures for such basic steps will only clutter the practice. ⢠Use pictures that exactly depict your maintenance situ- ation or equipment. ⢠Place pictures close to the corresponding text descrip- tion. (Note: the Word template will do this for you). ⢠Add arrows and labels to point out a specific piece of equipment or procedure shown in the picture. ⢠Trim (i.e., crop) photos to focus on a specific piece of equipment or procedure. ⢠Use color images only if color makes the image clearer. ⢠Do not use unfocused or confusing pictures. Acquiring Electronic Picture Files Obtain pictures from the Internet or from reference material only if you are sure you are not infringing on a copyright. (See Chapter 2, Part 1, and Appendix A, Legal Considerations.) To download pictures from the Internet: 1. Right click on the image. 2. Select âSave Image As.â 3. Give the file a meaningful name; retain the file exten- sion (e.g., jpg). 4. Browse the directories on your computer for the correct directory in which to save the file; click âSave.â Storing Files To develop and follow a system for naming and storing pictures on your computer: ⢠Give files meaningful names; include the extension. For example: insert_brake_pads_10 x 12mm.jpg. ⢠Store all picture files in one directory, or store all pic- tures for a specific maintenance practice in a directory with the appropriate Word file. Inserting Pictures into a Word File To insert pictures into a Word file: 1. Click on where you want to insert the picture. 2. From the toolbar, go to âInsert,â then âPicture,â then âFrom File.â 3. Locate the picture you want to insert. (Browse your directories.) 4. Double-click the picture you want to insert.
31 Term Definition Why Itâs Important Picture file type File type, or format, is determined by the way information is stored in a file. File type is indicated by the file name extension (e.g., .tif). You can insert the following picture file types into Word documents: ⢠Graphics Interchange Format (.gif) (usually low- resolution; small file size) ⢠Joint Photographic Experts Group (.jpg) (usually low-resolution; small file size) ⢠Tagged Image File Format (.tif or .tiff) (usually high- resolution; large file size) ⢠Microsoft Windows Bitmap (.bmp) ⢠Windows Metafile Graphics (.wmf) ⢠Encapsulated PostScript (.eps) (usually high- resolution; medium file size) ⢠Portable Network Graphics (.png) ⢠Enhanced Metafile (.emf) Raster picture A raster picture is made from thousands of tiny dots. Scanned pictures and .bmp and .tif files are raster. When enlarged in a Word document, raster pictures become less sharp, and the dots that make up the picture may become visible. Vector picture A vector, or drawn, picture is made from lines, curves, rectangles, and other objects. Word AutoShapes and .eps and .wmf files are vector files. When enlarged in a Word document, vector pictures retain their sharpness. File size Electronic file size is expressed in terms of kilobytes (kb). (âSizeâ here doesnât refer to dimensions. It refers to how much space it takes up on your computer.) Inserting pictures into Word files increases the Word file size. The program may react more slowly and print time may increase. Picture resolution Resolution is the quality of a picture in terms of the number of dots or pixels that make up the picture. Resolution of electronic photo files is expressed as pixels per inch (ppi). A pictureâs resolution affects two things: ⢠Its size (e.g., 300 ppi = 1,373 kb; 72 ppi = 82 kb). Inserting high-resolution pictures will greatly increase the size of a Word file. ⢠Its print quality. Minimum picture resolution for sharp printing is generally about 200 ppi. With picture resolution, you have to find a balance between file size and print quality. Files of type .jpg and .gif are typically 72 ppi and may not print sharply. Exception: A low-resolution picture with large dimensions (e.g., 23 à 12 inches). Reducing the pictureâs dimensions in Word improves its sharpness. Embedded picture When you embed a picture, a copy of it becomes part of the Word file. (Embedding is MS Wordâs default treatment for pictures.) Embedded pictures increase Word file size. Still, if you plan to share Word maintenance practices or upload them to the TRB Web Board, you must embed the pictures. Linked picture When you link a picture (instead of embedding it), the picture does not become part of the Word document. Linking pictures helps keep the size of your Word file small. However, copies of the Word file that you share with someone or upload to the TRB Web Board will not include the linked pictures. TABLE 3-1 Making sense of picture jargon
Moving Pictures Around on the Page To move pictures around on the page: 1. Click on the picture and hold. (The cursor will become a four-directional arrow.) 2. Drag the image to the correct location and release. 3. If the image will not move, or if it will not stay in the correct location, try the troubleshooting remedies at the end of this section. Enlarging or Reducing Picture Dimensions To enlarge or reduce picture dimensions: 1. Click on the image to select it. 2. Move the cursor over the âanchorâ at any corner of the image; the cursor will become a double arrow. 3. Click on the double arrow and hold; move the cursor to enlarge or reduce the image. Note: Enlarging pictures in a Word document can make them fuzzy when you print the document. Reducing the dimen- sions tends to make them sharper. Cropping Pictures Sometimes it helps readers if you trim or crop a picture to focus on the most important part of the image. To crop a picture: 1. Double-click on the picture. 2. Select the âPictureâ menu. 3. Under âCrop From,â type in the width of text to cut from the left, right, top, and/or bottom of the picture. 4. Select âOK.â Deleting Pictures To delete a picture: 1. Click on the image to select it. 2. Hit the âDeleteâ key. Adding Arrows, Circles, and Labels Help readers get the full value of a picture by using arrows. You can use an arrow on its own if the instructions make it obvious where the arrow is pointing, or add a text box to point from descriptive text (e.g., âadd oil hereâ) to an exact reference in a picture (e.g., the oil fill location). To add an arrow (Figure 3-2): 32 1. Go to the âDrawingâ toolbar and select the arrow shape. 2. Place the cursor where you want the arrow to begin, drag, and release. 3. Move and resize the arrow as needed. To add a circle to highlight part of a picture (Figure 3-3): 1. Go to the âDrawingâ toolbar and select the circle shape. 2. Place the cursor where you want the circle to begin, drag, and release. 3. Move and resize the circle as needed. 4. You can format the circle in many ways. Go to the âDrawingâ toolbar and select the appropriate tool. (The bucket icon allows you to select âfill colorâ if you want to highlight the circle in color, the paintbrush icon allows you to select âline color,â and the column of lines icon allows you to select line heaviness. However, do not use color in your picture if you plan to print in black and white.) To add a label (i.e., caption) to a picture (Figure 3-4): 1. Go to the âInsertâ menu; select âText Box.â 2. Click and hold your curser where you want the label to begin, drag, and release. An empty text box will appear. Figure 3-2. Arrow. Figure 3-3. Circle.
3. Type the caption in the text box and add an arrow to it. 4. Move and size the text box as described above. 5. You can format the text box in many ways (e.g., delete the border around the text). To do so, go to âFormatâ menu, and select âText Box.â Note: You can move, size, and format âText Boxesâ like âPictures.â Reducing the Size of Word Files When you insert pictures, Word automatically embeds these pictures into the file. The picture becomes part of the Word file and increases the fileâs size, which can slow down your Word document. Below are two options to help reduce file sizes. Also included are instructions for reducing the overall size of documents that contain photos, making it eas- ier to post practices on the Web Board. Option One To minimize Word file size, link pictures instead of embedding them: 1. Click where you want to insert the picture. 2. Go to the âInsertâ menu, select âPicture,â then âFrom File.â 3. Locate the picture you want to insert. (Browse the directories on your computer.) 4. Single-click on the picture. 5. Click the arrow to the right of the âInsertâ button, then âLink to File.â Note: If you plan to share your Word files with other agen- cies, embed pictures; do not link them (see Table 3-1). Option Two Reduce photo file sizes (i.e., bytes) before inserting them in Word. To do this, you need photo manipulation software like MS Photo Editor, which comes with later versions of Word. With MS Photo Editor, there are two ways to reduce the size of a photo file: ⢠Reduce the photoâs dimensions (length and width). Under âEdit/Resize,â enter the physical dimensions you want. (For example, the original dimensions may be 12 33 inches by 8 inches; edit the first dimension to 5 inches, and the other will adjust proportionally.) ⢠Reduce the fileâs resolution (pixels per inch). Under âFile/Properties,â enter the desired resolution in pixels per inch (ppi). (For example, the original may be 300 ppi; reduce it to 150.) Note that reducing the resolution also reduces the print quality. Do not go too low! Also note that you must reduce the size of photo files before you insert them into a Word document. Adjusting photo dimensions after you have inserted the photo in Word has no effect on the file size. Reducing Photo File Size for Web Board Posting Once you are comfortable with the resolution and file size of the photos contained in your practice, you can compresses the entire practice file using another toolbar feature in Word. Before doing so, however, you should give the file another name to distinguish it from the version you will print for internal agency use (e.g., add âWeb Boardâ or âWBâ to end of the file name). To compress a Word document with pho- tos in it, select âViewâ at the top of the screen, and then âToolbars.â Select âPictureâ and then click on the âCompress Picture Icon,â which is the tenth icon from the left in newer Word versions and looks like a box with arrows pointing in from each of its four corners. Troubleshooting Pictures in electronic documents can have minds of their own. If you experience problems, double-click the picture and experiment with the settings. To find specific Word trou- bleshooting tips: 1. Go to the âHelpâ menu and select âMicrosoft Word Help.â 2. Type in âTroubleshoot Graphics.â 3. Select a topic from the list of possibilities. Following are some common occurrences. A Picture Covers (i.e., Goes Over) the Written Text To force text to wrap around the picture: 1. Double-click on the picture. 2. Select âLayoutâ from the menu. 3. Select âIn line,â âSquare,â or âTightâ (depending on how you want the text to wrap). 4. Select âOK.â Figure 3-4. Caption.
A Picture Does Not Move with the Text To force a picture to move with the text: 1. Double-click on the picture. 2. Select âLayoutâ from the menu. 3. Click on âAdvanced.â 4. Select âPicture Position.â 5. Select âMove Object With Text.â 6. Select âOK.â 34 A Picture Jumps to Another Page or to the Edge of a Page Try a couple of remedies: ⢠Instead of dragging the picture, cut and paste it to the correct location. ⢠Reduce the size of the picture; it may be too large for the space you want to place it in.
