


Below is the uncorrected machine-read text of this chapter, intended to provide our own search engines and external engines with highly rich, chapter-representative searchable text of each book. Because it is UNCORRECTED material, please consider the following text as a useful but insufficient proxy for the authoritative book pages.
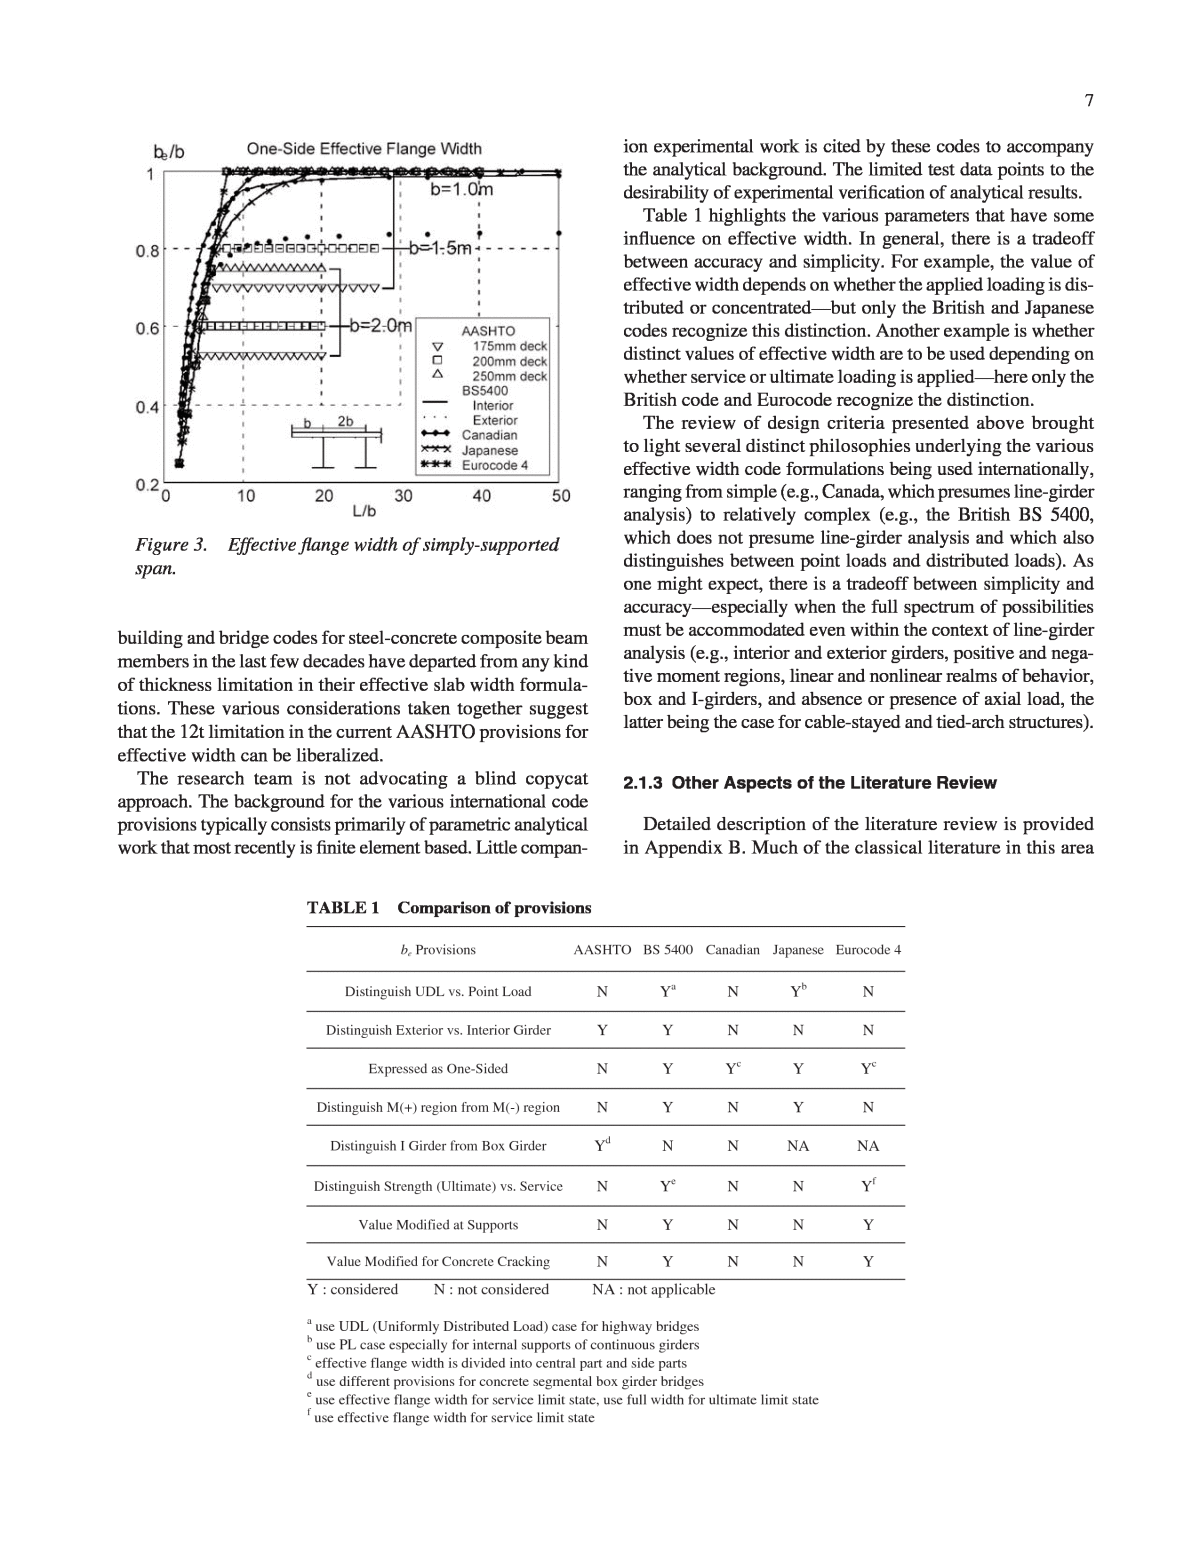
6CHAPTER 2 FINDINGS This chapter is organized as follows. The survey sent to gather information from various bridge-owning jurisdictions is described. Insights from the literature review that are par- ticularly relevant to study of effective width are summarized, including comparison of several codes in use on the interna- tional scene. New definitions of effective width developed in this research are summarized, as are verifications of the finite element modeling approach employed. The Finite Ele- ment Method (FEM) based parametric study is at the heart of the research conducted herein, and its principal features and results are summarized along with those of âspecial caseâ bridges, which are beyond the limits of the parametric study. Key experimental results and their role in corroborating the FEM-based parametric study are provided as well. 2.1 SURVEY AND LITERATURE REVIEW FINDINGS 2.1.1 Survey Results A survey was distributed in the summer of 2001 to the state bridge engineers and TRB representatives in all 50 states. Replies were received from approximately 40 of these states. The replies are tallied in Appendix A along with a copy of the survey form itself. Replies indicate no leads regarding other studies investigating effective slab width. A few replies indicate a few recently constructed bridges with large girder spacings. Where maximum girder spacing policies are explic- itly stated, they are generally conservative, with a 3 to 3.6 m (10 to 12 ft) limit being common. In some cases, the stated reason for this limit is to facilitate eventual deck replacement. Where more liberal limits are stated, those limits are based on, for example, maximum spans of stay-in-place forms (approx- imately 4.6 m = 15 ft) or maximum girder spacings allowed for the use of empirical deck design (4.1 m = 13.5 ft). Personal contacts in Europe (Switzerland, France, and the U.K.) and Japan were consulted. European and Japanese lim- its on girder spacing are more liberal than those in the United States, as described later in this chapter. In Japan, for exam- ple, girder spacings are permitted up to 6 m when supporting prestressed decks (although no known field test results on bridges with girder spacings larger than 3 m are available). The literature review confirmed the need to examine neg- ative moment regions specifically, given the little previous research on the subject. Criteria originally developed for the positive moment region were co-opted for use in the negative moment region without explicit study of the unique aspects of negative moment region behavior as regards effective width. This is a key reason for the negative moment region subassemblage experiments described later in this chapter and in Appendix F. 2.1.2 Comparisons of International Code Provisions for Effective Width Other findings of interest from the literature review con- cerned the various codes and specifications for effective width in use internationally (Ahn et al., 2004). Figure 3 shows a comparison of various international codes in graph form, while Table 1 provides a complementary view of the simi- larities and differences of these codes. Most have a limitation on effective width based on span length. Given that a span length parameter is present, the notion of âeffective span lengthâ was invented to enable such criteria originally devel- oped for positive moment regions to be co-opted for appli- cation in negative moment regions. This redefinition of span length is one example of issues that have arisen in applying positive moment criteria to a region where those criteria were not originally even intended to apply. Figure 4 shows how several international codes define the notion of âeffective span length.â The historical review presented in Appendix B and Appen- dix C indicates that the 12t limitation in the AASHTO effec- tive width formulation (AASHTO LRFD S4.6.2.6, AASHTO Standard Specs 10.38.3.1) has been in AASHTO (then AASHO) since the 1940s, the early days of composite beams. Even that formulation is based on empirical research pub- lished in the World War I eraâlong predating composite beams. That research was for reinforced concrete T-beams, not steel beams with composite concrete decks. Also in those days, highway vehicle loads were small, bridge decks were not mandated to be a minimum of 175 mm (7 in.) thick, and bridge floor systems had closely spaced longitudinal stringers. Design and construction practices obviously have changed significantly since then. For example, almost all international
7building and bridge codes for steel-concrete composite beam members in the last few decades have departed from any kind of thickness limitation in their effective slab width formula- tions. These various considerations taken together suggest that the 12t limitation in the current AASHTO provisions for effective width can be liberalized. The research team is not advocating a blind copycat approach. The background for the various international code provisions typically consists primarily of parametric analytical work that most recently is finite element based. Little compan- ion experimental work is cited by these codes to accompany the analytical background. The limited test data points to the desirability of experimental verification of analytical results. Table 1 highlights the various parameters that have some influence on effective width. In general, there is a tradeoff between accuracy and simplicity. For example, the value of effective width depends on whether the applied loading is dis- tributed or concentratedâbut only the British and Japanese codes recognize this distinction. Another example is whether distinct values of effective width are to be used depending on whether service or ultimate loading is appliedâhere only the British code and Eurocode recognize the distinction. The review of design criteria presented above brought to light several distinct philosophies underlying the various effective width code formulations being used internationally, ranging from simple (e.g., Canada, which presumes line-girder analysis) to relatively complex (e.g., the British BS 5400, which does not presume line-girder analysis and which also distinguishes between point loads and distributed loads). As one might expect, there is a tradeoff between simplicity and accuracyâespecially when the full spectrum of possibilities must be accommodated even within the context of line-girder analysis (e.g., interior and exterior girders, positive and nega- tive moment regions, linear and nonlinear realms of behavior, box and I-girders, and absence or presence of axial load, the latter being the case for cable-stayed and tied-arch structures). 2.1.3 Other Aspects of the Literature Review Detailed description of the literature review is provided in Appendix B. Much of the classical literature in this area Figure 3. Effective flange width of simply-supported span. be Provisions AASHTO BS 5400 Canadian Japanese Eurocode 4 Distinguish UDL vs. Point Load N Ya N Yb N Distinguish Exterior vs. Interior Girder Y Y N N N Expressed as One-Sided N Y Yc Y Yc Distinguish M(+) region from M(-) region N Y N Y N Distinguish I Girder from Box Girder Yd N N NA NA Distinguish Strength (Ultimate) vs. Service N Ye N N Yf Value Modified at Supports N Y N N Y Value Modified for Concrete Cracking N Y N N Y Y : considered N : not considered NA : not applicable a use UDL (Uniformly Distributed Load) case for highway bridges b use PL case especially for internal supports of continuous girders c effective flange width is divided into central part and side parts d use different provisions for concrete segmental box girder bridges e use effective flange width for service limit state, use full width for ultimate limit state f use effective flange width for service limit state TABLE 1 Comparison of provisions
8predates modern computer analysis. Assumptions need to be made in order to make the closed-form analytical problem tractable. With modern day approaches such as the Finite Element Method, however, many of those classical assump- tions do not need to be made. Nor do the same classical def- initions of effective flange width need to be used. 2.2 NEW DEFINITION FOR EFFECTIVE WIDTH The review of literature revealed that the classical defini- tion of effective width was more suited to a stiffened plate than to a composite girder-deck system undergoing flexure. In the latter, the deck (plate) is sufficiently thick for stress variation through the thickness to be an important considera- tion. Thus, a new definition of effective width was developed. The new definition (Chiewanichakorn et al., 2004) enforced two conditions that the traditional definition does not: ⢠Enforce the same moment in the idealized Bernoulli- Euler line girder as in the 3-D FEM slab-girder system (the classical definition requires only the same force), and ⢠Enforce moment equilibrium as well as force equilibrium. This new definition is applied according to the following procedure in a positive moment section. Step 1: Calculate total compressive force in the slab Compute the total or resultant compressive force in the slab by summing up all element forces in the slab using Equation 1. Equation 1 where Cslab = total or resultant compressive force in the slab Ï = element longitudinal stress Area = element cross-sectional area i = element number C Areaslab i i i n = â = âÏ 1 Step 2: Define the centroidal location of the total compres- sive force in the slab Determine the vertical location of the resultant compres- sive force using statics. The distance from the top of the slab to this centroidal location is defined as zo (see Figure 1). In order to enforce both assumptions, both Cslab and zo must remain unchanged. Step 3: Determination of maximum longitudinal stress in the slab Extract the maximum longitudinal stress (Ïmax) in the slab directly from the finite element analysis results. For instance, the maximum slab longitudinal stress is located at the extreme compression fiber in the elastic response (see Figure 1). Step 4: Calculate minimum longitudinal stress of the slab The term âminimum longitudinal stress (Ïmin)â of the slab in Figure 1 can also be described as an equivalent longitudi- nal stress at the bottom of the slab. Because of a linear vari- ation in the strain profile, simple beam theory assumes a lin- ear variation in the stress profile for the elastic response, that is, a trapezoidal shape. In order to satisfy the two assumptions, the centroidal location of the resultant compressive force must be the same for both finite element analysis and simple beam theory. With the pre-determined values of Ïmax and zo, compute the minimum longitudinal stress (Ïmin) of the slab such that the conditions of total force and resultant location are similar to those obtained from finite element analysis. Step 5: Computation of âeffective slab widthâ After the value of Ïmin is obtained from Step 4, calculate the equivalent compressive block (area of the trapezoid) and determine the effective slab width using Equation 2: Equation 2 where beff = effective slab width b C A C teff slab slab slab = = â â +( )0 5. max minÏ Ï Figure 4. Effective span length ratios.
Cslab = total or resultant compressive force of the slab from Equation 1 A = area of an equivalent compressive block for simple beam theory tslab = total structural slab thickness Ïmax = maximum compressive stress at the extreme com- pression fiber of slab Ïmin = minimum compressive stress at the bottom of the slab Elastic section properties such as second moment of iner- tia (Ixx) and elastic section modulus (S) can be determined using the effective slab width (beff). The maximum compres- sive stress at the extreme compression fiber can be calculated by simple beam theory using the total bending moment for the specific section obtained from the finite element analysis as shown in Equation 3: Equation 3 where Ïmax,°Beam Theory = maximum compressive stress at extreme compression fiber MFEM = bending moment at the specific section (Condition #1 holds) Ïmax, , Ë Ë BeamTheory FEM top BeamTheory M S = Stop, Beam Theory = elastic section modulus for the extreme compression fiber This procedure can require an iterative process, unless the values of the maximum compressive stress at the extreme compression fiber obtained from the simple beam theory (Equation 3) are comparatively close to the extreme fiber stresses resulting from the finite element analysis. Initially developed with the positive moment region in mind as shown in Figure 1 and illustrated above, the same princi- ples were applied to the negative moment region as shown in Figure 5. Further details of the derivation and resulting expres- sions for effective width are provided in Appendix C. The new definitions exploit the expressive power afforded by the use of four layers of three-dimensional (3-D) brick finite ele- ments through the deck thickness and âsmearedâ modeling of the top and bottom mats of rebar in the deck. 2.3 FINITE ELEMENT MODELING AND VERIFICATION 2.3.1 Finite Element Modeling A suitable finite element modeling methodology was sys- tematically established for use during the parametric study. 9 (a) Slab Tensile Stresses (b) Rebar Tensile Stresses (c) Combined Tensile Stresses (d) Detail Figure 5. Effective width for the negative moment section.
10 This methodology is outlined briefly in this section and doc- umented more fully in Appendix D. 2.3.1.1 Structural Element Modeling Solid (also known as continuum) elements were used in ABAQUS to model both steel girder and concrete slab in this research. The element type used is a 3-D eight-noded element with a reduced integration formulation (element C3D8R). Reduced integration provides accurate results while signifi- cantly reducing computation time. Steel reinforcing bars in the deck slab are modeled using the *REBAR function as a smeared property in ABAQUS. The rebars in the 3-D con- tinuum elements are thus defined as layers lying in surfaces with respect to the isoparametrically mapped cube of the 3-D elements. The stiffness of the reinforcement layer is superposed onto the stiffness of the continuum element in which the rebar resides. The stud shear connector is modeled using a type of con- nector element called a âFlexible Joint Elementâ or JOINTC element. The JOINTC elements are composed of transla- tional and rotational springs and parallel dashpots in a local, rotational coordinate system. This type of element was used to model the interaction between two nodes that are (almost) coincident geometrically so that the second node of the joint can displace and rotate slightly with respect to the first node. The JOINTC elements that represent the stud shear connec- tors consist of three nonlinear springs in each of the transla- tional coordinate directions. Figure 6 shows the finite element modeling scheme employed. 2.3.1.2 Material Models Concrete. The concrete model employed in this investiga- tion is based on classical 3-D plasticity (ANATECH, 1997). Figure 6. Element modeling scheme employed.
An advanced concrete model called ANAMAT takes into con- sideration many critical aspects of concrete material behavior. The ANAMAT concrete constitutive model is based on the smearedcracking methodology developed by Rashid (1968) and a Drucker-Prager modified J2-plasticity theory. In the ANAMAT concrete model, a crack is a mechanism that transforms the material behavior from isotropic to ortho- tropic, where the material stiffness normal to the crack sur- face becomes zero while the full stiffness parallel to the crack is maintained. The cracks can follow independent histories. In this smeared-crack model, a smooth crack should close and all the material stiffness in the normal direction is recovered. Given that crack surfaces are typically rough and irregu- lar, ANAMAT takes into consideration the mechanism of shear transfer in cracked concrete by retaining a reduced shear modulus in the stress-strain matrix. Tension stiffening of cracked concrete, which is the ability of cracked concrete to share the tensile load with the reinforcement, is also con- sidered in the ANAMAT concrete model. The addition of tension stiffening to the smeared-crack model improves the numerical stability of the solution. The ANAMAT concrete material model was implemented using the UMAT subrou- tine available in the general-purpose finite element program ABAQUS. Steel. The steel constitutive model used in the girders is based on the incremental theory of plasticity in which the total plas- tic strain is obtained by summing the plastic strain increments. Ordinary reinforcing bars are modeled as elastic-perfectly plastic. A bilinear stress-strain relationship is used. Because of the monotonic nature of the loading, the reduction in the yield stress of the steel due to cyclic loading, that is, the Bauschinger effect, is not considered. Steel-Concrete Interface (Shear Connectors). The shear connection is modeled based on Oehlers and Coughlan (1986), which proposed a simple mathematical formulation that incor- porates the beneficial effects of friction. The shear connec- tion is modeled using two orthogonal spring elements to sim- ulate the shear stiffness of stud shear connectors between the steel-concrete interface and the stiffness normal to the inter- face. A bilinear rigid-elastic relationship is used to model the steel-concrete interfacial behaviors of the composite bridge girders, as described further in Appendix G. 2.3.1.3 Management of the Parametric Study The pre-processing package called MSC/PATRAN is employed with this modeling procedure. Hence, every model will have the same level of consistency and accuracy in terms of ⢠Node numbering, ⢠Element numbering and orientation, and ⢠Reinforcing steel location. A procedure for post-processing was prepared in such a way that all relevant information can be systematically extracted from a large data file (.dat file from ABAQUS) and post- processed in order to achieve the following: ⢠Comparing FEM and lab experimental results and ⢠Formulating the âEffective Flange Widthâ criteria. For extracting the data from the .dat file, FORTRAN 77 routines were developed for the different data groups (i.e., Load vs. Displacement, Load vs. Girder Strain, Load vs. Concrete Strain, and Load vs. Rebar Strains). Before starting the parametric study, systematic studies were performed to verify the correctness of the behavior of the material models, geometric and boundary condition mod- eling in both the linear (elastic) and nonlinear (inelastic- cracking and crushing) realms of material behavior. Initially, other researchersâ results on steel-concrete composite bridges were used for this purpose, as documented in further detail in Appendix D. Appendix D also includes further specifics about the material models and other aspects of the finite element for- mulations and modeling. 2.3.1.4 A Question about Barriers Another FEM modeling question that arises regards barri- ers that may be cast with the deck. A study of the barrier effect under the applied load on the exterior girder was divided into three parts: (1) load-displacement, (2) strain profile, and (3) effective slab width. The purpose of this study was to evaluate the significance of the barrier on the structural behav- ior and to determine whether it can be ignored. Three differ- ent barrier-modeling schemes were considered: ⢠Beam element, ⢠Solid element, and ⢠No-barrier. A typical âNew Jersey Barrierâ used in the OPIS software was used. Section properties of the barrier were computed and used in the finite element modeling. From this investigation, it was concluded that the barriers in the parametric study cases can be ignored for the follow- ing reasons: ⢠By not considering barriers, shear-lag would be more pronounced. Hence, the effective slab width would be smaller, which is more conservative. ⢠Practically, barriers are sometimes placed after the con- crete is poured and cured without connecting to the slab or with expansion joints that eliminate full continuity. Therefore, they should not always be considered as struc- tural components for design and rating purposes. It is for these purposes, after all, that effective width will be used. 11
12 2.3.2 Verification Based on Experiments by Others The finite element modeling scheme described above was verified for use in conducting the parametric study by com- paring the results obtained from ABAQUS/ANAMAT with those of full-scale and model-scale laboratory experimental results by others. These included a full-scale concrete deck on steel superstructure bridge experiment conducted by the Nebraska Department of Roads (Kathol et al., 1995) and a continuous composite beam test conducted at Lehigh Uni- versity (Daniels and Fisher, 1967). As documented further in Appendix D, suitable agreement was found between those experiments and the FEM-based predictions, even well into the nonlinear range of behavior. 2.3.3 Verification Based on Experiments by the Authors The literature survey produced little information related specifically to experimental investigation of the negative moment regions of multi-girder bridge specimens. Much of the research has focused on composite beams alone and not necessarily on bridge superstructure systems. Also, many of the bridge experiments encountered in the review focus on positive moment region alone or do not provide strain data in the negative moment region. There is little detail to be found in the literature about deck instrumentation methods for those that included instrumentation in the negative moment region. Furthermore, very little presentation of composite behavior is not explicitly intentional (i.e., composite behavior in the negative moment region due to friction and interface bond or due to longitudinal deck rebar anchored at the ends but with- out shear connectors along the length). This lack of data moti- vates the experimental research discussed in this report, which is documented more fully in Appendixes E and F. The experiments performed as part of the NCHRP Project 12-58 work provided an additional source of verification data for the FEM-based parametric study. The specimens built were based on a prototype bridge. 2.3.3.1 Prototype Description The prototype bridge on which the laboratory specimens are based is a two-span continuous plate-girder bridge with a cast- in-place reinforced concrete deck. The AASHTO LRFD Bridge Design Specifications (1998, with Interims through 2001) were used to design the prototype bridge in accordance with the HL-93 notional live load. Material properties used for the design are shown in Table 2. The bridge is 13.68 m (45 ft) wide, and each span has a length of 24.4 m (80 ft). As seen in Figure 7, the four girders are spaced at 3.8 m (12 ft, 51/2 in.), and there is a deck overhang of 1.14 m (3 ft, 9 in.) at the exte- rior girders. An elevation view of a typical girder is illustrated in Figure 8, and Figure 9 shows the framing plan. The Tradi- tional method (Section 5.7.3 of The Code) was used to design the reinforced concrete deck, and the reinforcement details are provided in Figure 10 in addition to Figure 7. Shear studs are used to connect the concrete deck to the steel girders thus form- ing an intentionally composite structure. The shear stud pitch of the intentionally composite prototype is designed according to Section 9.7.3 of The Code and is shown in Figure 11. This prototype bridge served as the basis for experimental studies carried out as part of the NCHRP Project 12-58 effort. The quarter-scale two-span continuous specimen is called 4GQTCOM. The two half-scale negative moment region sub- assemblage specimens are called 4GHFCOM and 4GHFNON. In these specimens, instrumentation is placed with a number of factors considered. Such factors include providing insight regarding specimen behavior and furnishing a practical data Figure 7. Cross section of prototype bridge. Flanges 345 [50] Web 345 [50] Bearing 345 [50] Intermediate 345 [50] Stud Connector 345 [50] Weld *550 [80ksi] Reinforcement 420 [60ksi] Concrete 28 [4ksi] *f u Girder Stiffeners (transverse) Components f y in MPa [ksi] f' c in MPa [ksi] TABLE 2 Prototype material properties 1140mm (45in) 3800mm (150in) (150in) 3800mm 3800mm (150in) 1140mm (45in) No. 16 @ 200mm (7.87in) 24mm (0.9in) CoverNo. 16 @ 200mm (7.87in)200m m (8in) 50mm (2in) CoverNo. 16 @ 200mm (7.87in)No. 16 @ 200mm (7.87in) REINFORCEMENT DETAIL
13 Figure 8. Girder elevation of four-girder prototype. (118.1n) 3000mm 12200mm (480.3in) 18300mm (720in) 24mm (0.9in) x 400mm (15.7in) 2 4mm (0.9in) x 400mm (15.7in)36mm (1.4in) x 400mm (15.7in) Span 1 Span 2C.L. Bearing Pier C.L. Bearing C.L. Flange Bottom Spacing Cross-frame 20mm (.787in) x 160mm (6.3in) Bearing Stiff. Each Side Each Side Bearing Stiff. 160mm (6.3in) 20mm (.787in) x Cross-frame Connection Plate (Typical) Each Side Bearing Stiff. 168mm (7.1in) 40mm (1.57in) x (Typical) Connection Plate Cross-frame 400mm (15.7in) 24mm (0.9in) x 12200mm (480.3in) 18300mm (720in) 24mm (0.9in) x 340mm (13.4in) 18300mm (720in)Top Flange 24mm (0.9in) x 340mm (13.4in) Web 18300mm (720in) 16mm (0.63in) x 940mm (37in) 18300mm (720in)12200mm (480.3in) 16mm (0.63in) x 16mm (0.63in) x 940mm (37in) 940mm (37in) 24400mm (960.6in)24400mm (960.6in) 3000mm 7100mm7200mm 18300mm (720in) (283.5in) (279.5in) (279.5in) 7100mm (283.5in) 7200mm7100mm (279.5in) 7100mm (279.5in) (118.1n) Figure 9. Framing plan of four-girder prototype. 3000mm (118.1n) C.L. C.L. Pier BearingBearing C.L. Span 2Span 1 3@ 3800m m (150in) Cross-frame (Typical) (Typical) C.L of Girder Cross-frame Spacing 24400mm (960.6in) 24400mm (960.6in) 7100mm (279.5in)(279.5in)(283.5in) 7200mm 7100mm 3000mm (118.1n) (279.5in) 7100mm (279.5in) 7100mm 7200mm (283.5in)
14 set for comparing experimental test results with the FEM analysis. Findings from these studies are described next. 2.3.3.2 Quarter-Scale Specimen and Instrumentation The four-girder, quarter-scale composite I-beam specimen consists of two continuous 6.1 m (20 ft) spans. Girder spac- ing is 0.95 m (3 ft, 1 in.), transversely connected by cross- frames along the span length. The geometric parameters of the composite specimen are shown in Figures 12 and 13. The specimen was designed to enable study of the behavior within the positive and negative moment regions of continu- ous span bridge girders. The girders were designed using Grade 345 (50 ksi) steel, with compact flanges to develop full plastic moment capacity and lateral bracing close enough to avoid lateral buckling. Webs were designed to be compact Figure 10. Deck reinforcement plan in prototype. Span 1 S pan 2C.L. Bearing BearingPier C.L.C.L. 24400mm (960.6in)24400mm (960.6in) 50mm (2in) No. 16 (#5) @ 200mm (7.87in) (Top) No. 16 (#5) @ 200mm (7.87in) (Bottom) N o . 16 (#5) @ 200m m (7 .87in) (T op) N o. 16 (#5) @ 200 m m (7 .87in) (Bottom) Figure 11. Prototype shear stud pitch. 2.0L 1.8L 1.6L 1.4L 1.0L 1.2L 0.8L 0.6L 0.4L 0.2L 0.0L Span 2 C.L. Pier C.L. Bearing Span 1 C.L. Bearing 24400mm [960.6in] 24400mm [960.6in] 2440mm [96.1in] 4880mm [192.1in] 7320mm [288.2in] 2440mm [96.1in] 4880mm [192.1in] 2440mm [96.1in] 80mm [3.15in] 100mm [3.94in] 120mm [4.72in] 280mm [11in] 260mm [10.23in] 100mm [3.94in] (Sym. about CL Pier) (Typ)
and unstiffened. Typical cross sections through the positive and negative moment regions can be seen in Figure 14. The maximum aggregate size was chosen as 9.5 mm (3/8 in.) to prevent any large voids in the deck. The slab reinforcement was isotropically laid out in the reinforced concrete deck with a thickness of 50 mm (2 in.) and the double-layers of 4 mm (.157 in.) diameter reinforcing steel placed at 50 mm (2 in.) spacing, transversely and longitudinally. A modified design truck was recommended for the experi- mental study. Two different loading conditions were consid- ered: (1) complete 6-wheel design truck portion of the HL-93 loading and (2) 4-wheel loading representing the two rear axles of the design truck. Analysis results using SAP2000 show variations less than 1 percent in the high-stress regions and less then 10 percent in the low-stress regions. Based on 15 this observation, a two rear-axle loading configuration was applied to the test specimen. For the service limit state, five loading positions were used to test the positive moment region and eight loading posi- tions were used to test the negative moment region. Positive moment tests were performed at 0.4L and negative moment tests performed at 0.6L. The design truck was located at 0.4L and 0.6L for the positive and negative moment tests, respec- tively. For the ultimate loading tests, a re-configuration of the design truck was used which allowed loads to be applied over each girder line. For the negative strength test, each girder was loaded at 0.6L on Spans 1 and 2 until failure. Strain and deflection measurements were recorded during the testing process. Displacement transducers were used for the deflection measurements along the bridge. 2.3.3.3 Selected Experimental Results from the Quarter-Scale Specimen The purpose of the experiments was to establish a basis for confidence in the finite element modeling scheme employed in the parametric studies of this research. Two experimental loading cases were the focus of the results presented herein for the experiments conducted on the four-girder, quarter- scale, two-span continuous slab-on-girder bridge specimen: ⢠The âPositive Service Yield Case,â loading one span to just reach yield of the bottom flanges in the positive moment region, and ⢠The âNegative Strength Case,â loading both spans to maximize negative moment at the support and form a plastic collapse mechanism in the specimen. Positive Service Yield Case Results. Primarily positive moment region results are presented here because the nega- tive-moment region subassemblages reported in the follow- ing sections and Appendix F provided much better negative moment region data, with strain-gaged longitudinal rebars, etc. Sufficient agreement was obtained between experimen- tal results and FEM predictions that the originally planned fourth experimental specimen (2GQTCOM) was deleted from the scope of work for this project. Figure 15 shows the position of loading for the Positive Ser- vice Yield Case. Deflections of an exterior (G1) and interior (G2) girder were compared with FEM results. Figure 16 com- pares recorded deflections of exterior girder G1 and interior girder G2 versus FEM results and line girder (LG) predictions. Line girder deflections were computed using predicted values Center Abutment West Abutment East Abutment 1.3L 0.7L 6.1m (20 ft) 6.1m (20 ft) G1 G2 G3 G4 Span 2 Span 1 G1 G2 G3 G4 950 mm (37.5 in) 950 mm (37.5 in) 950 mm (37.5 in)286 mm (11.25 in) 286 mm (11.25 in) Figure 12. Plan view of four-girder specimen. Figure 13. Cross-section view of four-girder specimen.
16 of beff, which included full width (beff = S) in the positive moment region and 0.9 â full width (beff = 0.9 â S) in the neg- ative moment region. The FEM used the value of the load cell to provide the direct comparison noted earlier. The values having box symbols on the graph correspond to problematic gages. Clamps were placed at the end supports of Span 2 to prevent the bridge from any lift-off that might have otherwise occurred during testing. This clamping process introduced unintended rotational restraint, which affected the deflection of G1 (Figure 16) at a distance of 10,800 mm (425 in.) from the end where a slight reverse in curvature is evident. G2 (Figure 16) and FEM show a good correlation in Span 1 and 2. The Positive Service Yield Case was designed to capture the elastic response of the experimental model at yield load levels for comparison with FEM. The various comparative plots show reasonable accuracy in the positive moment region. The experimental results (i.e., deflections and strains) were consistent throughout the test. Deflections that exceeded FEM values were accompanied by corresponding high strain val- ues. Strains through the depth of the cross section remained plane throughout the test for nearly all the specified locations (neglecting problematic gages). The FEM adequately pre- dicted the observed behavior of the experimental specimen throughout the Positive Service Yield Case. Further testing was performed beyond yield and is presented next. Negative Strength Case Results. Figure 17 identifies the points of load application during the Negative Strength Case. Next, Figure 18 shows values at two loading stages, one at 360kN (81kips) and the other at 453kN (102kips), the maxi- mum loading achieved. Figure 18 compares the experimen- tal and FEM-predicted deflections of G1 and G2. Under both loading conditions, the experimental results were consistent with the FEM results. The Negative Strength Case showed significant cracking in the negative moment region, as was to be expected with the continuous specimen. Although the results between the FEM and experimental specimen differed slightly, the results were generally consistent and thus verified FEM results for the positive moment region. Discussion of Test Results. These experiments consisted of various serviceability level loads followed by tests to failure. The major cracking occurred in the negative moment region, which was expected and can be seen in Figure 19. The cracks shown in Figure 19 carried across the specimen transversely. Figure 15. General layout and load location for positive service yield case. Figure 14. Typical cross sections in quarter-scale specimen. Positive Moment Region Negative Moment Region 68 mm (2.7 in) 68 mm (2.7 in) 50 mm (2 in) 12.5 mm (.5 in) 254 mm (10 in) 4.76 mm (.1875 in) 10 mm (.4 in) 260 mm (10.2 in) 12.5 mm (.5 in) 50 mm (2 in) 68 mm (2.7 in) 100 mm (4 in) G4G3G2G1 0.4L Span 2 Span 1 Load Location 1.4L
17 Figure 20 shows the specimen after the testing was com- pleted. At 0.6L, after the positive strength case, a significant amount of rotation occurred along with a permanent displace- ment confirming a high level of ductile behavior from the specimen. The other service and strength cases demonstrated that the FEM and experimental behavior were consistent and accurate in the positive moment region. The experimental behavior was predicted reasonably accurately by FEM. As mentioned above, a crack check was performed after each test, and each crack was outlined and dated. This pro- vided enough information to create the drawings shown in Figures 21 and 22. Many of the gages in the negative moment region on the concrete deck were lost because of severe cracking as shown in Figure 22. 2.3.3.4 Half-Scale Specimens and Instrumentation Two half-scale bridge specimens were produced based on the negative moment region of the prototype bridge described in Section 2.3.3.1. The specimens represented a portion of the prototype that included two of the four girders and ranged from 0.70L to 1.3L, where the parameter L represented one span length. Figure 23 illustrates the portion of the proto- type that was represented by the specimens. Additional cross- frames are shown within the specimen portion of the bridge at 0.75L and 1.25L. Although these additional cross-frames were not in the prototype, they were required for stability because the specimens were loaded at those locations. Tie-down and loading at 0.75L and 1.25L (respectively) simulated shear forces at the permanent load inflection points of the prototype while the pier of the prototype was directly represented by a central support in the specimen at 1.0L. The bridge specimens were composed of two continuous homogeneous girders 7220 mm (284 in.) long and a 110-mm (4.375-in.) thick reinforced concrete deck. The girders were Figure 16. G1 and G2 deflection for positive yield case. Deflection (G2) -20.00 -15.00 -10.00 -5.00 0.00 5.00 10.00 0 1525 3050 4575 6100 7625 9150 10675 12200 Distance (mm) D ef le ct io n (m m ) -0.79 -0.59 -0.39 -0.20 0.00 0.20 0.39 0 60 120 180 240 300 360 420 480 Distance (in) D ef le ct io n (in ) EXP FEM LG zero 0.4L 0.6L 0.9L 0.95L 1.05L 1.4L 6.1m (20 ft) 6.1m (20 ft) G1 G2 G3 G4 Span 2 Span 1 Load Location 0.13L 0.07L *Note: Max load: 453kN (102kips) Span 1 and 2 Figure 17. General layout and load location for negative strength case.
18 490 mm (19.25 in.) deep and had a spacing of 1900 mm (75 in.), while the overhang was 570 mm (22.5 in.). Cross- frames were constructed from L3 Ã 3 Ã 3/8 stock and welded in place in an X configuration. Specimen geometry is depicted in Figures 24 through 27. The main difference between the two bridge specimens was the layout of the shear connectors. Many states use shear con- nectors in the negative moment region of composite bridges while for others it is less common. Effective width criteria are based on composite behavior. Composite behavior that is unintentional (i.e., which results only from friction and steel- to-concrete interface bond strength and not the presence of dis- crete mechanical connectors) is not something that designers typically will rely on. Furthermore, the AASHTO LRFD Bridge Design Specifications appear to be inconsistent with regard to composite action in the negative moment region. âArticle S6.10.7.4.3 states that âWhere composite girders are noncomposite for negative flexure, additional shear connec- tors shall be provided in the region of points of permanent load contraflexureâ. However, the commentary to that article states that âThe purpose of the additional connectors is to develop the reinforcing bars used as part of the negative flexural compos- ite section.â Is it composite or noncomposite?âthe code is confusing on this pointâ (Chen et al., 2001). In any event, AASHTO LRFD Bridge Design Specifications were used to design the shear connectors for both specimens. Deflection (G1) -80.00 -60.00 -40.00 -20.00 0.00 20.00 40.00 0 1525 3050 4575 6100 7625 9150 10675 12200 Distance (mm) D ef le ct io n (m m ) -3.15 -2.36 -1.57 -0.79 0.00 0.79 1.57 0 60 120 180 240 300 360 420 480 Distance (in) D ef le ct io n (in ) EXP 453kN (102kips) FEM 453kN (102kips) EXP 360kN (81kips) FEM 360kN (81kips) Deflection (G2) -80.00 -60.00 -40.00 -20.00 0.00 20.00 40.00 0 1525 3050 4575 6100 7625 9150 10675 12200 Distance (mm) D ef le ct io n (m m) -3.15 -2.36 -1.57 -0.79 0.00 0.79 1.57 0 60 120 180 240 300 360 420 480 Distance (in) D ef le ct io n (in ) EXP 453kN (102kips) FEM 453kN (102kips) EXP 360kN (81kips) FEM 360kN (81kips) Figure 18. G1 and G2 deflection for negative strength case.
The intentionally composite bridge was designated as 4GHFCOM because it was based on a four-girder prototype at half scale. Similarly, the noncomposite specimen was desig- nated as 4GHFNON. The shear studs used for both specimens are 10 mm [3/8 in.] in diameter and have a length of 80 mm [3.1 in.]. As shown in Figure 25, studs are placed in two rows at 75 mm [3 in.] in the vicinity of the permanent load inflec- tion point and at 300 mm [12 in.] elsewhere on 4GHFCOM, resulting in 128 shear connectors per beam. The ânoncom- positeâ specimen, 4GHFNON, has clusters of shear studs in the vicinity of the permanent load inflection point to develop longitudinal rebar as The Code specifies. Instrumentation was placed not only for the reasons listed above but also to generate data that might be useful in com- paring the intentionally composite behavior of specimen 4GHFCOM with the behavior of specimen 4GHFCOM, which was noncomposite but had longitudinal rebar anchored at the ends. Strain gages were placed on the rebar embedded 19 in concrete as well as on the deck and girders. In addition to direct strain measurements, displacement transducers such as Temposonics, Linear Variable Displacement Transducers (LVDTs), and potentiometers were used to measure quanti- ties such as displacement, slip, plastic hinge rotation, and smeared values of strain. The strain gages placed on the rebar included regular and backup gages placed on both longitudinal layers (top and bot- tom) of rebar. A significant number of gages were placed near the pier because one objective of this experiment was to investigate behavior near the interior support. A denser con- centration of gages near the pier might be desired but was not fully provided because of equipment limitations and because protective coating and wires in the vicinity of the gage might slightly reduce the volume of concrete and, therefore, the amount of concrete in contact with the bars in the immediate vicinity of the gages. This reduction of concrete volume and contact area was not expected to be significant, however, given that the gages were reasonably spaced across the width of the deck. A significant number of gages were placed along Girder 1 as well in order to provide information for comparing Figure 19. Cracking at G3 over the center support. Figure 20. Final curvature after testing. 0.4L 0.6L 0.9L 0.95L 1.05L 1.4L G1 G2 G3 G4 Span 2 Span 1 0.8L 1.2L 1.3L Figure 21. Cracking due to service loading.
the composite action of 4GHFCOM with that of 4GHFNON. In addition to those near the pier, another transverse line of rebar strain gages was placed along 0.85L. This location was chosen because it was expected to be far enough away from the point of loading (0.75L) such that local effects from the loading were not a concern. Other rebar gages were placed to provide data points to plot the strain profile through the com- posite section. Backup gages were provided in case some gages were damaged during deck casting. The line of backup gages on Bar 10 was supplied to replace the gages along Bar 8 if the state of stress near the shear studs was complex enough to corrupt the readings along Bar 8. They also served as backup for other gages in their vicinity. Strain gages on the girders and on the concrete deck girder line were positioned to give information about the strain pro- file within a section. These gages corresponded to the rebar gages mentioned earlier for the same purpose. Other concrete deck gages were placed to provide information about the strain variation in plan across the width of the deck. Further information about instrumentation is provided in Appendix F. 20 2.3.3.5 Selected Experimental Results: Half-Scale Specimens Figures 28 and 29 show deck cracking results for the 0.95 â yield case and the post-yield case, respectively. Fig- ure 30 shows the force displacement relationships for both 4GHFCOM and 4GHFNON on the same plot. The load levels used for FEM comparison are also depicted. The 4GHFNON specimen deviated from the FEM curve sooner than the 4GHFCOM specimen. This was probably the result of at least partial loss of composite action. The plots indicate that the forces were similar in the ultimate limit state, thus indicat- ing that overall behavior of the noncomposite specimen with developed longitudinal rebar was similar to that of the 0.4L 0.6L 0.9L 0.95L 1.05L 1.4L G1 G2 G3 G4 Span 2 Span 1 0.8L 1.2L 1.3L Figure 22. Cracking due to ultimate loading. 2.0L 1.8L 1.6L 1.4L 1.2L 0.8L 1.0L 0.6L 0.4L 0.0L 0.2L 14 64 0m m [5 76 .4i n] 24 40 m m [9 6.1 in] 6080mm [239.4in] 1140mm [44.9in] 3800mm [149.6in] 1140mm [44.9in] Specimen Portion Figure 23. Specimen portion of prototype.
intentionally composite one. Comparative deflection pro- files shown in Figure 31 generally confirmed this behavior as well, although deviation from linear behavior began slightly sooner for the noncomposite specimen. The findings from the negative moment region subassem- blage experiments may be summarized as follows: 21 1. There is a good correlation between the FEM and line- girder (LG) predicted results for much of the experi- mental data. Before the specimensâ girders buckled, their load displacement curves followed very near the FEM curve. These specimens were designed to have barely compact webs (based on the current 12t-limited Figure 24. Specimen framing plan. Cross-Frame Spacing 1525mm [60.0in] 1525mm [60.0in] 1525mm [60.0in] 3050mm [120.0in] Span 1 Point of Inflection 3050mm [120.0in] Span 2C.L. Pier Point of Inflection 1900m m [74.8in] C.L. Girder 1 C.L. Girder 2 560mm [22.0in] 560mm [22.0in] Cross-Fram e (Typ.) 1525mm [60.0in] 19mm x 178mm [3/4in x 7in] 6100mm [240.0in] 8mm x 457mm [5/16in x 18in] 13mm x 178mm [1/2in x 7in] 6100mm [240.0in] 6100mm [240.0in] 3050mm [120.0in] C.L. Pier 1525mm [60.0in] [3in] 2/Row @ 75mm 560mm [22.0in] 25mm x 76mm [1in x 3in] Bearing Stiffener/ Cross-frame Connection Plate Each Side (Typ.) Bottom Flange Cross-Frame Spacing 560mm [22.0in] Shear Stud 1525mm [60.0in] 3050mm [120.0in] Point of Inflection Top Flange Web 5/16 1525mm [60.0in] Span 1 5/16 560mm [22.0in] 2/Row @ 75mm 560mm [22.0in] 1525mm [60.0in] Span 2 Point of Inflection 5/16 [3in] 6100mm [240.0in] 2/Row @ 300mm [12in] Figure 25. 4GHFCOM girder elevation.
definition of effective width) in order to develop a plas- tic hinge and investigate experimentally the cracked- deck effective width at plastic hinge conditions. But in doing so, it was overlooked that full (not 12t-limited) effective width would raise the neutral axis, thereby rendering the web noncompact. Such a web would be expected to buckle before full plastification, which is precisely what occurred in the experiment. Attempts to 22 model the geometric nonlinearity of web buckling com- bined with the material nonlinearity of yielding in the FEM model were unsuccessful. Thus, the plotted FEM model results neglected web buckling. Even after buck- ling, however, the general shape of the load displace- ment curve mimics the shape of that predicted by FEM modeling. It is therefore reasonable to assume that, had the section been fully compact, it might have continued Figure 26. 4GHFNON girder elevation. Cross-Frame Spacing 560mm [22.0in] 1525mm [60.0in] 3050mm [120.0in] Span 1 3050mm [120.0in] 1525mm [60.0in] Point of Inflection C.L. Pier 1525mm [60.0in] Span 2 560mm [22.0in] Point of Inflection 6100mm [240.0in] 1525mm [60.0in] 6100mm [240.0in] 400mm [15.75in]400mm [15.75in] 6100mm [240.0in] Bottom Flange Shear Stud 3/Row @ 57mm Web Top Flange 13mm x 178mm [1/2in x 7in] [2.25in] 25mm x 76mm [1in x 3in] Bearing Stiffener/ Cross-frame Connection Plate Each Side (Typ.) 5/16 5/16 5/16 8mm x 457mm [5/16in x 18in] 3/Row @ 57mm [2.25in] 19mm x 178mm [3/4in x 7in] 3/Row @ 57mm 400mm [15.75in] [2.25in][2.25in] 3/Row @ 57mm 400mm [15.75in] Figure 27. Specimen section. 3040mm [119.8in] 1900mm [74.8in] 570mm [22.5in] 570mm [22.5in] C.L. Girder 2 C.L. Girder 1 No. 10 @ 75mm [#3 @ 3in] (All Layers) 25mm [1in] Cover 25mm [1in] Cover 25mm [1in] Haunch 13mm [1/2in] Cover 110m m [4.4in]
close to the FEM curve. That it was not compact itself is evidence of full effective width, given that, on the basis of current AASHTO provisions for effective width, it would have been compact. Deflection profiles were also predicted reasonably well by the FEM model up to the onset of buckling. 2. Girder strains obtained from the experiment also com- pared well with FEM-predicted values. There were some discrepancies near the boundary conditions (i.e., load- ing and tie-down points) but this was to be expected. 3. Strain readings associated with the deck were generally unreliable for the composite specimen, and most of them were questionable for the noncomposite one as well. Unfortunately, deck surface gage results were the most unreliable. Some of the rebar-mounted strain gages on 23 the second specimen did, however, yield reasonable results. This favorable outcome is believed to be due to the introduction of epoxy as the protective coating. The general unreliability of deck-related strain gages because of deck cracking makes it difficult, if not impossible, to extract effective width values directly from experi- mental results. That most of the other data correlated well with FEM, however, was considered sufficient to conclude that FEM results were reasonable. The reader may wish to refer to the dissertation by Chiewanichakorn (2005) for more information regarding the validity of FEM relating to evaluation of composite bridges. 4. The global behavior of the 4GHFNON specimen (non- composite but with developed rebar) was similar to that of the 4GHFCOM (intentionally composite) specimen, Cracking From Case Y3 Total Cracking After Case Y3 Figure 28. 4GHFCOM Case Y3 cracking.
especially at the ultimate limit state. Local behavior (i.e., slippage and separation of the concrete deck from the steel girder), however, would normally be used to clas- sify the girder as noncomposite. 5. Despite the problems encountered with deck gages a. There was good correlation of deck strains with FEM strains before cracking, b. Overall load-deflection prediction was good, c. Existence and extent of cracking was reasonably well predicted by the smeared cracking approach used in the FEM herein, d. Steel strains correlated well with FEM predictions pre-buckling, e. Those strain profiles confirmed the upward move- ment of the neutral axis consistent with the full effec- tive width predicted by FEM for the experiment, and 24 f. That the web flexural buckling was observed pro- vides additional confirmation that the neutral axis had moved upâconsistent with a full effective width. Thus, the principal insights from the experiments were that the FEM methodology employed was reasonably trustworthy for extracting effective width and that full width is consistent with those experimental results. Further details on the exper- iments conducted are provided in Appendixes E and F. 2.4 FEM PARAMETRIC STUDY In the parametric study of the effective slab width proj- ect (NCHRP Project 12-58), design of experiment (DOE) concepts described in Appendix G were employed to ensure Cracking From Case P1 Total Cracking After Case P1 Figure 29. 4GHFNON Case P1 cracking.
that both common and extreme cases were covered. In addi- tion, curve-fitted equations were derived considering the effects from each parameter. Various cases were considered: ⢠Simple-span right bridge (non-skewed), ⢠Simple-span with skewed supports, ⢠Multiple-span continuous right bridge (non-skewed), and ⢠Multiple-span continuous with skewed supports. By using DOE, all cases for both simple-span and multiple- span continuous bridges are illustrated in Tables 3 and 4, respectively. For simple-span cases, the main parameters are ⢠Girder spacing (S) 2.4 m to 4.8 m, ⢠Span length (L) from 15 m to 60 m, and ⢠Skew angle (θ) from 0 degree to 60 degrees. For multiple-span continuous cases, the main parame- ters are ⢠Girder spacing (S) 2.4 m to 4.8 m, ⢠Exterior span length (L1) from 20 m to 60 m, ⢠Interior-to-exterior span ratio (L2 /L1) from 1 to 1.5, and ⢠Skew angle (θ) from 0 degree to 60 degrees. 2.4.1 Bridge Designs for Parametric Study All bridges in the parametric study were designed accord- ing to a common set of industry guidelines for economical design of slab-on-steel girder-type structures. These guide- lines are as follows. Strength I, Service II, and Fatigue and Fracture limit states were considered in the designs, as was the construction stage assuming conventional unshored construction. Load effects 25 were calculated using the QConBridge software. Bridges were designed for these load effects using MathCad Work- sheets developed for that purpose. Bridges so designed were checked using the OPIS 5.0 software. Line girder analysis with the current 12t-limited effective slab width was used for each of the designs. Details of deck and girder design con- siderations are summarized below. 2.4.1.1 Deck Design The thinnest practicable deck was used in order to maxi- mize shear lag behavior. The deck thickness depended on the girder spacing. The following thicknesses were used: Girder Deck Spacing Thickness S/t Design Method 2.4m 175mm 13.7 Empirical Design 3.6m 200mm 18.0 Empirical Design 4.8m 240mm 20.0 Conventional Overhang width was assumed as 0.4S for every bridge design based on an investigation of overhang width on several bridges to produce the same exterior girder as used for the interior girder, with similar structural efficiency, i.e., perfor- mance ratio. Skewed Deck. Two skew angles were considered in the designs: 30 and 60 degrees. The reinforcement in both directions was doubled in the end zones of the deck and placed perpendicular to the main supporting components as specified in Article 9.7 of the AASHTO LRFD code. Negative Moment Regions. The total cross-sectional area of the longitudinal reinforcement should not be less than 1 percent of the total cross-sectional area of the slab. The 0 50 100 150 200 250 300 350 400 450 0 50 100 150 200 250 Displacement (mm) Fo rc e (k N) 0 10 20 30 40 50 60 70 80 90 100 0 1 2 3 4 5 6 7 8 9 10 (in) (ki ps ) FEM 4GHFNON LG 4GHFCOM 0.95Py 0.50Py 0.95Pcr Figure 30. Comparative force versus displacement at 1.20L.
minimum yield strength of reinforcement should not be less than 420 MPa and a size not exceeding #19 (metric, #6 Eng- lish) bars. Prestressed deck should be considered when S/t ⥠20, which corresponds to the 4.8 m girder spacing. Prestressed deck was not considered as part of the basic parametric study but was considered as one of the special cases. 26 2.4.1.2 Girder Design Guidelines employed for the girder design included the following: ⢠The minimum web plate thickness was assumed as 11 mm. Girder 2 Deflection at 0.95Pcr -100 -75 -50 -25 0 25 0 1000 2000 3000 4000 5000 6000 7000 Longitudinal Distance (mm) D e fle ct io n (m m ) -4 -3 -2 -1 0 1 0 50 100 150 200 250 (in) (in ) 4GHFCOM 4GHFNON LG FEM Girder 2 Deflection at 0.50Py -100 -75 -50 -25 0 25 0 1000 2000 3000 4000 5000 6000 7000 Longitudinal Distance (mm) D ef le ct io n (m m ) -4 -3 -2 -1 0 1 0 50 100 150 200 250 (in) (in ) 4GHFCOM 4GHFNON LG FEM Girder 2 Deflection at 0.95Py -100 -75 -50 -25 0 25 0 1000 2000 3000 4000 5000 6000 7000 Longitudinal Distance (mm) D e fle ct io n (m m ) -4 -3 -2 -1 0 1 0 50 100 150 200 250 (in) (in ) 4GHFCOM 4GHFNON LG FEM 0.75L 0.80L 0.90L 0.95L 1.05L 1.10L 1.20L 1.25L 1.00L0.70L 1.30L Figure 31. Comparative deflection profiles.
⢠The minimum flange size was assumed as 19 mm à 300 mm. ⢠The Traditional Minimum Depth requirement was applied [AASHTO LRFD Table 2.5.2.6.3-1]. ⢠Uniform depth was assumed for web design throughout the length of a bridge. ⢠The web was designed as partially stiffened, if applicable. ⢠For simply supported girders, girder transitions were located at 0.2L and 0.8L. For continuous girders, girder transitions were located approximately at 0.7L, 1.2L, 1.8L, and 2.3L. ⢠The top flange width was fixed for every design; heav- ier flange requirements were accommodated by varying thickness. The bottom flange width was changed only in negative moment regions. ⢠For positive moment regions, most of the girder sections were compact. For negative moment regions, noncom- pact sections (noncompact web) were used if applicable. ⢠Designs were fine-tuned to have the maximum perfor- mance ratio for the most critical limit state exceed 95 per- cent (except in some cases where the aforementioned minimum flange size of 19 mm à 300 mm was used). ⢠For skewed bridges, intermediate cross frames were oriented normal to the main members. Cross frames may be staggered or discontinuous across the bridge. Displacement-induced fatigue considerations should be 27 investigated in such cases, but those considerations were not the focus of the present study. ⢠For shear in skewed bridges, the same web thickness was used for both right and skewed bridges sharing the same span lengths and girder spacings to avoid devia- tion of flexural effects if possible. Shear effects in any two such comparable bridges are not the same, however, because of the shear correction applied to the distribu- tion factor for skewed bridges. More details on the specifics of the industry guidelines and rules of thumb used to design the suite of bridges in the para- metric study set, along with resulting girder section sizes and governing limit states, are provided in Appendix H. 2.4.2 Simple-Span Bridges Finite element analyses of eight simple-span bridge con- figurations were conducted using the general-purpose finite element analysis software, ABAQUS. Configurations of all simple-span bridges are illustrated in Table 3. Bridges ranged from 15 to 60 m in span length, 2.4 to 4.8 m in girder spac- ing, and 0 to 60 degrees in skew angle at the supports. Most bridges were designed to have two flange transition points at 0.2L and 0.8L, where L is the span length. Material proper- ties are summarized in Table 5. Parameter Bridge ID S (m) L (m) θ (degrees) L/S SS-01 2.4 15 0 6.25 SS-03 4.8 15 0 3.125 SS-07 2.4 60 0 25 SS-09 4.8 60 0 12.5 SS-19 2.4 15 60 6.25 SS-21 4.8 15 60 3.125 SS-25 2.4 60 60 25 SS-27 4.8 60 60 12.5 Parameter Bridge ID S (m) L1 (m) L2/L1 θ (degrees) L1/S CS-01 2.4 20 1.0 0 8.33 CS-03 4.8 20 1.0 0 4.17 CS-07 2.4 60 1.0 0 25 CS-09 4.8 60 1.0 0 12.5 CS-19 2.4 20 1.5 0 8.33 CS-21 4.8 20 1.5 0 4.17 CS-25 2.4 60 1.5 0 25 CS-27 4.8 60 1.5 0 12.5 CS-55 2.4 20 1.0 60 8.33 CS-57 4.8 20 1.0 60 4.17 CS-61 2.4 60 1.0 60 25 CS-63 4.8 60 1.0 60 12.5 CS-73 2.4 20 1.5 60 8.33 CS-75 4.8 20 1.5 60 4.17 CS-79 2.4 60 1.5 60 25 CS-81 4.8 60 1.5 60 12.5 TABLE 3 Simple-span parametric study cases TABLE 4 Multiple-span continuous parametric study cases
All bridges were subjected to the nominal live load, which consists of HL-93 trucks and lane load, including impact effects. Both truck and lane loads were applied at the specific location to simulate the maximum positive moment condi- tion. Longitudinally, the middle axle of the truck was located at mid-span of the bridge, while the trucks were placed trans- versely across the width to maximize the bending moment in either interior or exterior girders, whichever was the focus of interest. Each simple-span bridge analysis can be subdivided into two categories at the Service II limit state: ⢠Interior girder, and ⢠Exterior girder. Truck configurations are illustrated in Figure 32 for the interior girder loading and Figure 33 for the exterior girder loading. Distances between the front-to-middle axles and rear-to-middle axles were chosen to have the minimum of 4.3 m based on the code and the influence line principle for simple-spans. Additionally, lane load configurations are illus- trated in Figures 34 and 35 for the interior girder and exterior girder loading, respectively. For the purpose of the paramet- ric study, all bridges were analyzed up to the serviceability limit state (SERVICE II), which has the load combination of 1.0(DC1 & DC2 & DW) + 1.3(LL & IM). A limited number of Strength limit state cases were chosen randomly to verify that the serviceability limit states always governed the effec- tive slab width values. Effective Slab Width Variation Along the Span. The effec- tive slab width values were computed along the span using the proposed definition for positive moment section. The results are summarized in Table 6. Figures 36 and 37 illus- trate the effective slab width ratio variation (beff /b) and asso- ciated bending moment diagrams versus normalized span length (x/L) for simple-span bridges for interior and exterior girders, respectively. The values were determined based on the finite-element analysis results taken between a half width on one side and the other half width on the other side of the girder (interior) or the overhang width (exterior). The ending moments were calculated from element stresses and cross- sectional area. The circles on the plots represent the data points 28 and were connected by straight lines. The series of numbers after the bridge ID contain the bridge configuration informa- tion. The three numbers are ⢠Girder spacing (m), ⢠Span length (m), and ⢠Skew angle (degree). Thus, for bridge SS-19: 2.4/15/60 represents a bridge with 2.4-m-girder spacing, 15 m long, and 60-deg skew angle. Truck placement location is indicated in the diagram of each plot of beff /b. The results show that a full slab width can be used as the effective slab width for all investigated right bridges. These encompass a L/S range of 3.125 to 25. The SS-07 bridge has the highest L/S value among the four right bridges, hence the most flexural dominated structural behavior. Likewise, SS-09, with the second highest L/S value, exhibits similar behavior with the beff /b of 1.0 across the entire span length. In the region close to the abutments, the support boundary conditions influenced the effective slab width ratio. The closer the section was to the end support, the smaller the effective slab width ratio tended to be. In most practical situations, there is significant excess flexural capacity as well near end sup- ports. Thus the reduction in beff /b should not be of concern in such regions. The support effect becomes more prominent as the L/S values get smaller. For instance, the interior girder effective slab width ratios of the SS-03 bridge reduced below 1.0 further away from the supports than SS-01. For the interior girder and highly skewed cases, three out of four bridges exhibited an effective slab width ratio of less than 1.0. The exception was the SS-25 bridge, which had a high L/S of 25 (see Figure 36). But where beff /b < 1 near midspan, the bending moment diagrams of short-span skewed bridges SS-19 and SS-21 extracted from FEM do not have the shape or magnitude used in the girder design based on line girder analysis. FEM-extracted moments in these bridges, as shown in Figure 36, were less than the moments that full truck axle loads produce in a line-girder analysis. Table 7 compares the extreme fiber stresses with Service II Live Load (LL+IM), as computed by line-girder analysis (OPIS) and FEM, for comparable right and skewed configu- rations. As shown in the table, the line girder analysis signif- icantly overestimated the girder flange stresses in the skewed bridges. This overestimation provided a source of conser- vatism in the very situations where a full effective width was not attained. For short-span skewed bridges, the computed effective slab width ratios varied erratically along the span length. The effective slab width ratios at midspan of these short-span skewed bridges, the SS-19 and SS-21 bridges, were 0.90 and 0.93, respectively. These short bridges also had their flange sizes governed by the minimum flange size guideline rather Material Description Value Elastic modulus, Es 200 GPa Steel Yield strength, Fy 345 MPa Elastic modulus, Ec 24.4 GPa Concrete Compressive strength, f âc 28 MPa Elastic modulus, Erebar 200 GPa Reinforcement Yield strength, fy 420 MPa Elastic modulus, Esc 200 GPa Yield strength, fy,sc 345 MPa Shear Connector Ultimate strength, fu,sc 420 MPa TABLE 5 Material properties for parametric study cases
than by Service II or Strength I, as documented further in Appendix H. For exterior girders, all four skewed bridges experienced the effective slab width slightly smaller than the full width (see Figure 37). Of these, however, SS-25 had the highest effective slab width ratio as expected because of flexural dominated behavior. The results presented here are for Service II conditions. At Strength I loading levels, effective widths were always found from the FEM results to be equal or greater than the Service 29 II effective widths, as expected. Representative results of this nature are provided in Appendix G. 2.4.3 Continuous Span Bridges A total of 16 multiple-span continuous bridges, providing 64 subcases, were analyzed using ABAQUS. All these bridges are composed of four three-span continuous steel girders with conventional reinforced concrete slab. Bridge configurations Figure 32. HL-93 truck configurations, simple span, interior girder, positive moment.
are summarized in Table 4 with four different parametersâ girder spacing (S), exterior span length (L1), interior-to- exterior span ratio (L2 /L1), and skew angle of the support (θ). Parameters range from 2.4 m to 4.8 m for girder spacing, 20 m to 60 m for exterior span length, 1.0 to 1.5 for interior-to- exterior span ratio, and 0 deg to 60 deg for skew angle. Each bridge analysis consisted of four subcases at the Service II limit state: ⢠Positive Moment, Interior girder; ⢠Positive Moment, Exterior girder; 30 ⢠Negative Moment, Interior girder; and ⢠Negative Moment, Exterior girder. For the positive moment loading, the truck middle axles were placed at 0.4L1 where L1 was the exterior span length, with the rear axle facing the closest abutment (see Figures 38 through 41). Lane load for the positive moment loading cases was applied only on the exterior span where the trucks were located. In addition, selected bridges were loaded in the mid- dle span only and subjected to the truck loading at 0.5L2 where L2 was the interior span length. This was to simulate Figure 33. HL-93 truck configurations, simple span, exterior girder, positive moment.
the positive moment condition on Span 2. These cases were used for validating the results obtained by loading on Span 1. For the negative moment loading, two truck middle axles were placed on the exterior span at 0.6L1 and the other two truck middle axles were placed at 1.4L2, where L1 and L2 were the exterior and interior span lengths, respectively. These locations were systematically chosen based on influence line concepts to maximize the negative bending moment at the interior support. All trucksâ rear axles were facing the clos- est abutment as described for the positive moment loading. 31 Truck configurations are illustrated in Figures 42 to 45. Sim- ilarly, lane load was applied on both spans where the trucks were located, that is Spans 1 and 2. 2.4.3.1 Positive Moment Section Effective Slab Width Variation Along the Span. For posi- tive moment loading on the exterior span (Span 1), some sec- tions along the bridge experienced negative bending moment, Figure 34. Lane load configurations, simple span, interior girder, positive moment.
Figure 35. Lane load configurations, simple span, exterior girder, positive moment. Interior Girder Exterior Girder Bridge ID 0.40L 0.45 L 0.50 L 0.55 L 0.60 L 0.40 L 0.45 L 0.50 L 0.55 L 0.60 L SS-01 1.00 1.00 1.00 1.00 1.00 1.00 1.00 1.00 1.00 1.00 SS-03 1.00 1.00 1.00 1.00 1.00 1.00 1.00 1.00 1.00 1.00 SS-07 1.00 1.00 1.00 1.00 1.00 1.00 1.00 1.00 1.00 1.00 SS-09 1.00 1.00 1.00 1.00 1.00 1.00 1.00 1.00 1.00 1.00 SS-14 1.00 1.00 1.00 1.00 1.00 0.98 0.97 0.95 0.97 0.98 SS-19 1.00 0.80 0.90 0.84 0.88 0.83 0.89 0.88 0.86 0.85 SS-21 0.85 0.80 0.93 0.81 0.81 0.80 0.75 0.80 0.78 0.78 SS-25 1.00 1.00 1.00 1.00 1.00 0.93 0.96 0.96 0.95 0.93 SS-27 0.95 0.92 0.94 0.94 0.94 0.80 0.81 0.92 0.83 0.80 TABLE 6 Effective slab width ratio (beff /b) for simple-span bridges
33 Figure 36. beff /b and bending moment versus x/L, simple span, interior girder, positive moment.
Figure 37. beff /b and bending moment versus x/L, simple span, exterior girder, positive moment.
especially the region near the interior pier. Hence, the effec- tive slab width values were computed based on the proposed definitions for the positive and negative moments accordingly. In this section, the main focus will be on the positive moment section where the maximum positive bending moments take place. The variations of effective slab width ratio were plot- ted along the normalized span length between 0L1 and 1.1L2 35 in Figures 46 and 47 for the interior girder of right and skewed bridges, respectively. Similar plots for the exterior girders are illustrated in Figures 48 and 49. The associated bending moment diagrams are plotted. Numerical results are summarized in Table 8. All right bridge results indicate that the full width can be used as the effective slab width for the critical positive moment Bridge L (m) S (m) θ Flange Stress in OPIS (MPa) RF Flange Stress in FEM (MPa) SS-01 15 2.4 0 180.3 1.116 150 SS-09 60 4.8 0 86.8 1.423 60 SS-19 15 2.4 60 164.4 1.089 71 SS-27 60 4.8 60 93.23 1.171 48 TABLE 7 Comparison of 1.3(LL+IM) stresses in the bottom flange at 0.5L Figure 38. HL-93 truck configurations of the multiple-span continuous cases (right bridges, interior girder, positive moment).
section, at approximately 0.4L1 (see Figure 46). The reduction of the effective slab width occurs at the point of contraflexure where the transition of bending moment from positive to neg- ative takes place. This phenomenon will be addressed more fully in the negative moment section discussion. The variations of effective slab width ratio for the highly skewed bridges were rather chaotic. However, the effective slab width value associated with the maximum positive moment section was relatively close to 1.0. The exterior gird- ers had more or less the same behavior as the interior girders in terms of effective slab width ratio (see Figures 48 and 49). The case of loading on the interior span (Span 2) was also investigated. Eight selected cases were analyzed by subjecting 36 the interior span to the live load that maximizes the positive bending moment of the interior girder. Figure 50 illustrates the effective slab width ratio variation along the normalized span length of all eight of these cases, i.e. CS-03, CS-07, CS-21, CS-25, CS-57, CS-61, CS-75 and CS-79. These cases were chosen to ensure all the extreme cases in terms of L1/S were covered. All bridges experienced a full width as the effective slab width for positive moment in the middle span, except for CS-75. The result was very consistent with the exterior span loading case (see Figure G.48). Bridge CS-75, like SS-19 and SS-21, had not only high skew but also short spans such that the flange sizes in the pos- itive moment region were governed by the minimum flange Figure 39. HL-93 truck configurations of the multiple-span continuous cases (skewed bridges, interior girder, positive moment).
size guideline rather than by Service II or Strength I, as doc- umented further in Appendix H. 2.4.3.2 Negative Moment Section This section focuses on the region close to the interior pier where the negative moment is maximized. Many issues arise under the investigation of the negative moment section and will be explored more fully as the discussion progresses. Effective Slab Width Variation Along the Span. Figures 51 and 52 demonstrate how the effective slab width ratios of the interior girder varied in the region close to the interior pier, 1.0L1. Almost every right bridge experienced full width as 37 the effective slab width. The sole exception was the CS-03 bridge. For skewed bridges, a few cases had the effective slab width smaller than 1.0. In addition, the bending moment dia- grams associated with these skewed bridges deviated from the line-girder analysis results as with skewed simple-span bridges. Moments extracted from FEM in such cases were considerably less than those obtained from line-girder analy- sis. The location of truck placement could have had a major influence on the computed effective slab width ratios, espe- cially in the short and high skewed bridge (see Figure 52). Similar plots of the exterior girder are illustrated in Figures 53 and 54. All exterior girder cases, except the CS-03 bridge, experienced a full width as the effective slab width. Numer- ical results are summarized in Table 9. Figure 40. HL-93 truck configurations of the multiple-span continuous cases (right bridges, exterior girder, positive moment).
Uncracked Versus Cracked Sections. From the result of the investigation using the new effective slab width defini- tion for the negative moment section, the concrete slab can be divided into two categories: uncracked and cracked. There are major distinctions between the two slab types, which in turn affect how much of the slab contributes to resisting ten- sile stresses. An uncracked slab section is an intact condition of the concrete slab that is subjected to tensile stresses below the concrete tensile strength. Both concrete and rebars are work- ing together and sharing tensile forces accordingly. At low stress levels, this gives a smaller effective slab width. Once cracks initiate, tensile stresses would be redistributed in the uncracked portion of the slab and result in the larger effec- 38 tive slab width. As soon as the entire slab reaches the con- crete tensile strength, the slab becomes a cracked section. Forces start to transfer from slab to rebars, which pushes the effective slab width wider until the full slab width is reached. As for the positive moment region, the results presented here are for Service II conditions. At Strength I loading lev- els, effective widths were always found from the FEM results to be equal to or greater than the Service II effective widths, as expected. Representative results of this are provided in Appendix G. 2.4.4 Summary of FEM Parametric Study FEM results showed the following: Figure 41. HL-93 truck configurations of the multiple-span continuous cases (skewed bridges, exterior girder, positive moment).
⢠Full width was typically acting at cross sections where it was most needed, i.e., where moments and hence per- formance ratios would be highest. ⢠Where the effective width was less than full width at such cross sections, those cross sections had consider- able excess flexural capacity. 2.5 SPECIAL CASE BRIDGES Special cases such as cable-stayed and prestressed girder bridges typically confirmed the trends observed in the para- metric study reported above, although girder spacings wider than 4.8 m were beyond the realm of the parametric study. For 39 the purpose of this study, special case bridges were divided into Cable-Stayed Bridges and Validation Cases. 2.5.1 Cable-Stayed Bridge Investigation This section summarizes the investigation of effective slab width in cable-stayed bridges. Further detail on the cable- stayed investigation is provided in Appendix I. 2.5.1.1 Cable-Stayed Bridges Investigated Five cable-stayed bridges were investigated, four of them having been analyzed previously by Byers (1999). The fifth Figure 42. HL-93 truck configurations of the multiple-span continuous cases (right bridges, interior girder, negative moment).
bridge analyzed was the Cooper River Bridge. All had two edge girders on a cross section, two pylons, and a semi-harp cable configuration with two planes of cables. Table 10 and Figure 55 summarize principal dimensional differences among the bridges investigated. The first number in the bridge designation (e.g., â8â in â8_15â) indicates the number of cables on each side of the tower. The second number indicates the distance from the centerline (CL) of the slab to the centerline of the edge girder in meters. 40 2.5.1.2 Two-Level Modeling Scheme Each structure was modeled on a âglobalâ and a âsub- structureâ or âlocalâ level. The former takes into account the behavior of the bridge as a whole, while the latter focuses on parts of the structure with a more detailed model and assesses how the bridge performs under the loads considered. There were four global models, one for each bridge. The solution obtained for the global model was used as input to the local model of the structure where a part of the bridge Figure 43. HL-93 truck configurations of the multiple-span continuous cases (skewed bridges, interior girder, negative moment).
between two cables was modeled in greater detail. In this way the stresses in the composite cross-section could be obtained, and the effective width could be computed. Only dead load was applied. Global Models. Figure 55 shows the element types used in the global models. All materials were considered linear-elastic. The structural elements were modeled as follows. The deck was modeled as a thick plate (each element had width and length not significantly higher than the thickness) at the level of its mid-surface. The cables were modeled as truss ele- ments. The beams (floor beams and girders) and the towers 41 were discretized into 3-D beam elements along their centroidal axes. There were ârigidâ beam link elements connecting the deck to the floor beams; two edge girders and no middle girder existed in each model. The cable areas were such that they all provided approx- imately the same vertical stiffness. The towers were consid- ered to be fixed at their bases. Each linear element (e.g., beam or tower) was located at the equivalent memberâs cen- troidal axis. The concept of rigid linear elements was used to ensure that members that were connected shared common displacements. Part of a global bridge model (8_8) is shown in Figure 56. Figure 44. HL-93 truck configurations of the multiple-span continuous cases (right bridges, exterior girder, negative moment).
Local Models. Each local model represented the part of the structure lying between two adjacent cables. The floor beams and the girders shared common nodes at the points where they met given that those points were connected and should have had the same displacements. The cable-stayed local models had the same level of detail as the models used in the parametric study, except that deck rebar was neglected. The slab, for example, was divided into four layers. The material properties and beam dimensions were the same as those given in the description of the global models. All the elements were 3-D eight-noded solid elements (C3D8 42 in ABAQUS notation). Concrete was used for the slab. Steel was used for the beams. 2.5.1.3 Cable-Stayed Bridge Results Results were categorized on the basis of which of three regions along the bridge they were in: ⢠Type I (positive moment and low axial force regions close to the center of the main span), Figure 45. HL-93 truck configurations of the multiple-span continuous cases (skewed bridges, exterior girder, negative moment). (text continued on p. 47)
43 Figure 46. beff /b and bending moment versus x/L for the multiple-span continuous cases (right bridges, interior girder, positive moment, Service II).
44 Figure 47. beff /b and bending moment versus x/L for the multiple-span continuous cases (skewed bridges, interior girder, positive moment, Service II).
45 Figure 48. beff /b and bending moment versus x/L for the multiple-span continuous cases (right bridges, exterior girder, positive moment, Service II).
46 Figure 49. beff /b and bending moment versus x/L for the multiple-span continuous cases (skewed bridges, exterior girder, positive moment, Service II).
⢠Type II (positive moment and high axial force regions close to the support of the main span), and ⢠Type III (negative moment and high axial force regions very close to the tower). Figure 57 shows the transverse distribution of normal slab stresses in a Type I region, while Figures 58 and 59 show slab stresses in Type II and Type III regions, respectively. These were for the 8_15 and 12_15 bridges. Analogous distributions were also observed for the Cooper River Bridge, as shown in Figures 60 and 61. Some shear lag was evident in these figures, but substantial effective widths were realized anywayâ considerably beyond the 4.8-m girder spacing maximum investigated in the parametric study presented earlier. Table 11 summarizes the values of effective width extracted from all three regions of all five cable-stayed bridges ana- lyzed. As in the main parametric study, the short wide bridge (Bridge 8_15) had the smallest effective width. Figures 62 through 72 show the variation of effective width ratio beff /b along the length in representative regions of the first four bridges. Figure 73 shows the variation of effective 47 width ratio along the length of the main span in the Cooper River Bridge. Results from Cooper River were similar to those obtained from the other four bridge models. 2.5.2 Validation Cases The remaining bridges analyzed included the following in addition to steel multi-girder bridges with geometric parame- ters beyond those of the parametric study presented earlier: ⢠Two-girder continuous steel girder bridges with both cast-in-place and prestressed deck slabs and very wide (7.68-m) girder spacing, ⢠A continuous hybrid steel girder bridge, ⢠Simply-supported and continuous tub-girder bridges, and ⢠Simply-supported and continuous prestressed bulb-tee girder bridges. Full effective slab width was obtained for all these cases. Further details on the validation cases appear in Appendix J. Interior Girder Exterior Girder Bridge ID 0.3L1 0.35 L1 0.4 L1 0.45 L1 0.5 L1 0.3L1 0.35 L1 0.4 L1 0.45 L1 0.5 L1 CS-01 1.00 1.00 1.00 1.00 1.00 1.00 1.00 1.00 1.00 1.00 CS-03 1.00 1.00 1.00 1.00 1.00 1.00 1.00 1.00 1.00 1.00 CS-07 1.00 1.00 1.00 1.00 1.00 1.00 1.00 1.00 1.00 1.00 CS-09 1.00 1.00 1.00 1.00 1.00 1.00 1.00 1.00 1.00 1.00 CS-19 1.00 1.00 1.00 1.00 1.00 1.00 1.00 1.00 1.00 1.00 CS-21 1.00 1.00 1.00 1.00 1.00 1.00 1.00 1.00 1.00 1.00 CS-25 1.00 1.00 1.00 1.00 1.00 1.00 1.00 1.00 1.00 1.00 CS-27 1.00 1.00 1.00 1.00 1.00 1.00 1.00 1.00 1.00 1.00 CS-41 1.00 1.00 1.00 1.00 1.00 1.00 1.00 1.00 1.00 1.00 CS-55 0.95 0.95 0.96 0.96 0.96 1.00 1.00 1.00 1.00 1.00 CS-57 0.96 0.95 0.94 0.94 0.94 1.00 1.00 1.00 1.00 1.00 CS-61 0.85 0.92 0.98 0.95 0.92 1.00 1.00 1.00 1.00 1.00 CS-63 0.99 0.99 0.99 0.99 1.00 1.00 1.00 1.00 1.00 1.00 CS-73 0.86 0.89 0.92 0.95 0.97 1.00 1.00 1.00 1.00 1.00 CS-75 0.87 0.81 0.74 0.72 0.70 1.00 1.00 1.00 1.00 1.00 CS-79 0.94 0.95 0.96 0.95 0.98 1.00 1.00 1.00 1.00 1.00 CS-81 0.97 0.99 1.00 1.00 1.00 1.00 1.00 1.00 1.00 1.00 TABLE 8 Effective slab width ratio (beff /b) for multiple-span continuous bridges (positive moment)
48 Figure 50. beff /b and bending moment versus x/L for the multiple-span continuous cases (Span 2 loading, interior girder, positive moment, Service II).
49 Figure 51. beff /b and bending moment versus x/L for the multiple-span continuous cases (right bridges, interior girder, negative moment, Service II).
50 Figure 52. beff /b and bending moment versus x/L for the multiple-span continuous cases (skewed bridges, interior girder, negative moment, Service II).
51 Figure 53. beff /b and bending moment versus x/L for the multiple-span continuous cases (right bridges, exterior girder, negative moment, Service II).
52 Figure 54. beff /b and bending moment versus x/L for the multiple-span continuous cases (skewed bridges, exterior girder, negative moment, Service II).
53 Interior Girder Exterior Girder Bridge ID 0.9L1 0.95 L1 1.0 L1 0.05 L2 0.1 L2 0.9L1 0.95 L1 1.0 L1 0.05 L2 0.1 L2 CS-01 0.90 1.00 1.00 1.00 0.80 1.00 1.00 1.00 1.00 1.00 CS-03 0.92 0.92 0.92 0.92 0.92 0.87 0.87 0.87 0.87 0.87 CS-07 1.00 1.00 1.00 1.00 1.00 1.00 1.00 1.00 1.00 1.00 CS-09 1.00 1.00 1.00 1.00 1.00 1.00 1.00 1.00 1.00 1.00 CS-19 1.00 1.00 1.00 1.00 1.00 1.00 1.00 1.00 1.00 1.00 CS-21 1.00 1.00 1.00 1.00 1.00 1.00 1.00 1.00 1.00 1.00 CS-25 1.00 1.00 1.00 1.00 1.00 1.00 1.00 1.00 1.00 1.00 CS-27 1.00 1.00 1.00 1.00 0.95 1.00 1.00 1.00 1.00 0.95 CS-41 1.00 1.00 1.00 1.00 1.00 1.00 1.00 1.00 1.00 1.00 CS-55 0.80 0.90 1.00 0.80 0.75 0.90 0.95 1.00 0.95 0.90 CS-57 0.75 0.75 0.75 0.75 0.75 0.93 0.97 1.00 1.00 0.90 CS-61 0.80 0.90 1.00 1.00 0.91 0.96 0.98 1.00 1.00 0.90 CS-63 0.70 0.73 0.70 0.73 0.73 0.80 0.90 1.00 1.00 1.00 CS-73 0.80 0.90 1.00 0.90 0.82 1.00 1.00 1.00 1.00 1.00 CS-75 0.85 0.85 0.85 0.85 0.85 1.00 1.00 1.00 0.90 0.80 CS-79 0.94 0.95 0.96 0.95 0.98 1.00 1.00 1.00 1.00 1.00 CS-81 0.97 0.99 1.00 1.00 1.00 1.00 1.00 1.00 1.00 1.00 Bridge ID Overall Length (m) Main Span (m) Edge Girder Spacing (m) Deck Slab Thickness (mm) 8_8 495 255 16 250 8_15 735 375 30 250 12_8 495 255 16 250 12_15 735 375 30 250 Cooper River 867 471 38.4 240 TABLE 9 Effective slab width ratio (beff /b) for multiple-span continuous bridges (negative moment) TABLE 10 Cable-stayed bridges investigated Figure 55. Side views of Bridges 12_8 & 12_15 (total length = 735 m) and Bridges 8_8 & 8_15 (total length = 495 m).
54 Figure 56. Elements composing the global model; close-up of the area near the cable. Figure 57. Transverse distribution of normal stresses in the middle of Bridge 12_15 (3-D plot).
55 Figure 58. Transverse distribution of normal stresses in the positive moment region close to the support of Bridge 8_15 (3-D plot). Figure 59. Transverse distribution of normal stresses in the negative moment region close to the support of Bridge 12_15 (3-D plot).
56 beff/b Bridge ID Girder Spacing S (m) Type I Region Type II Region Type III Region 8_8 16 1.0 0.95 0.82 8_15 30 1.0 0.95 0.68 12_8 16 1.0 0.99 0.90 12_15 30 1.0 1.0 0.80 Cooper River 38.4 0.99 0.99 0.83 Figure 60. Transverse distribution of normal stresses in the positive moment region close to the support of the Cooper River Bridge (3-D plot). Figure 61. Transverse distribution of normal stresses in the negative moment region close to the support of the Cooper River Bridge (3-D plot). TABLE 11 Cable-stayed effective width FEM results
57 Figure 62. Longitudinal distribution of the normalized effective width for Bridge 8_8 (Region I). Figure 69. Longitudinal distribution of the normalized effective width for Bridge 8_15 (Region II). Figure 68. Longitudinal distribution of the normalized effective width for Bridge 8_15 (Region I). Figure 66. Longitudinal distribution of the normalized effective width for Bridge 12_8 (Region II). Figure 67. Longitudinal distribution of the normalized effective width for Bridge 12_8 (Region III). Figure 65. Longitudinal distribution of the normalized effective width for Bridge 12_8 (Region I). Figure 64. Longitudinal distribution of the normalized effective width for Bridge 8_8 (Region III). Figure 63. Longitudinal distribution of the normalized effective width for Bridge 8_8 (Region II).
58 Figure 70. Longitudinal distribution of the normalized effective width for Bridge 8_15 (Region III). Figure 71. Longitudinal distribution of the normalized effective width for Bridge 12_15 (Region I). Figure 72. Longitudinal distribution of the normalized effective width for Bridge 12_15 (Region II). Figure 73. Longitudinal distribution of the normalized effective width for the main span of the Cooper River Bridge.