


Below is the uncorrected machine-read text of this chapter, intended to provide our own search engines and external engines with highly rich, chapter-representative searchable text of each book. Because it is UNCORRECTED material, please consider the following text as a useful but insufficient proxy for the authoritative book pages.
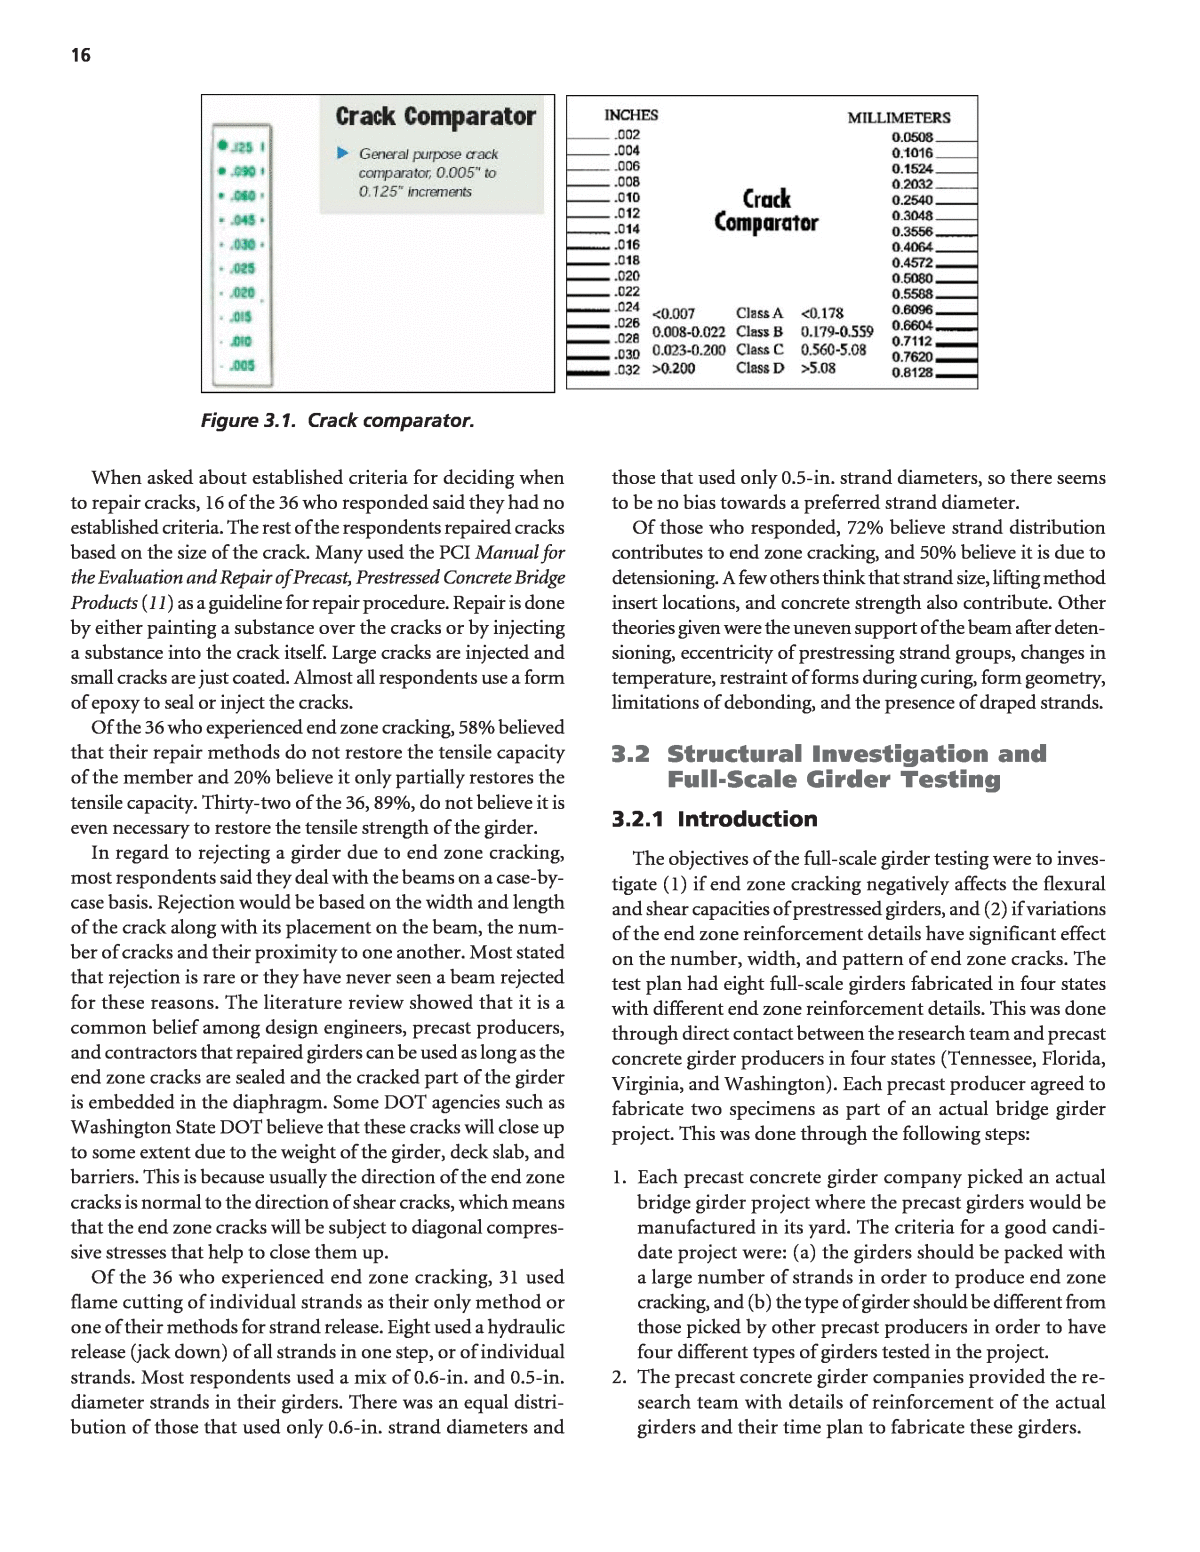
15 This chapter presents the results and ï¬ndings of the work plan developed by the research team and reported in Chapter 2. In order to keep the size of this report within acceptable limits, detailed discussions on the material covered in this chapter are provided in Appendices B through G, which are not provided herein (to find Appendices A through G for this report, go to www.trb.org and search for âNCHRP Report 654â). The contents of Chapter 3 and the correspond- ing appendices are as follow. Subtasks and Deliverables Section Appendix ⢠National Survey 3.1 B ⢠Structural Investigation and 3.2 C Full-Scale Girder Testing ⢠Epoxy Injection Testing 3.3 â ⢠Durability Testing 3.4 D and E ⢠Field Inspection of Bridges 3.5 F ⢠Manual of Acceptance, Repair, 3.6 â or Rejection ⢠Improved Crack Control 3.7 G Reinforcement Details for Use in New Girders ⢠Proposed Revisions to the 3.8 â AASHTO LRFD Bridge Design Speciï¬cations 3.1 National Survey The research team developed a questionnaire to survey ex- periences regarding longitudinal end zone cracking. It was sent to all the state DOTs, other owner agencies, selected bridge con- sultants, and precast concrete producers. It was also sent to about 150 PCI bridge product producers, the PCI Committee on Bridges, the PCI Bridge Producers Committee, and selected Canadian agencies. The questionnaire included surveys on reinforcement details, strand release process, criteria for repair and rejection of cracked members, and repair methods. A copy of the survey is presented in Appendix B. Results from the questionnaire have been most helpful in seeing how organiza- tions around the country and beyond have been dealing with this issue. The research team received 44 responses, which have been compiled and summarized in Appendix B. There were 32 responses from state DOTs, 10 responses from precast concrete producers, 1 response from a consultant, and 1 re- sponse from a researcher. Most responses indicated experience in the design, fabri- cation, or construction of thousands of linear feet of precast/ prestressed concrete girders annually. As anticipated, most state DOTs deal with I-girders, bulb tees, and box girders. Some also stated that they deal with voided slabs, double tees, andâ among othersâinverted tees. Thirty-six respondents, or 82% of those who replied, said that they experienced longitudinal or diagonal cracks in the webs of the end zones of their girders, but only eight said they did not encounter the problem. I-girders and bulb tees seem to be experiencing the longitudinal crack- ing the most. About half of the responses stated that only 1% to 10% of their girders experienced cracking, while the other half stated that cracking occurred in 80% to 100% of their girders. Of those who experienced longitudinal web cracking, 56% do not have any ofï¬cial criteria for classifying it. The others use a combination of crack width and crack length. The most preva- lent answer in the surveys for acceptance/rejection was criteria based on crack width in the range of 0.006 to 0.025 in. The size of the width determines the need for, and level of, repair. The literature review shows that cracks that are 0.01 in. wide or smaller can be sealed just by using a brush-on sealant, but cracks that are in the range of 0.01 to 0.025 in. must be repaired by epoxy injection. Most of these ranges were set for durability aspects, to protect the reinforcement from corrosion and the crack width from growing during freeze and thaw cycles. Most inspectors stated that routine inspection is used to determine the extent of cracking. However, 17 of the 36 who experienced end zone cracking used crack comparators, shown in Figure 3.1, and 5 used magnifying scopes. C H A P T E R 3 Research Findings
When asked about established criteria for deciding when to repair cracks, 16 of the 36 who responded said they had no established criteria. The rest of the respondents repaired cracks based on the size of the crack. Many used the PCI Manual for the Evaluation and Repair of Precast, Prestressed Concrete Bridge Products (11) as a guideline for repair procedure. Repair is done by either painting a substance over the cracks or by injecting a substance into the crack itself. Large cracks are injected and small cracks are just coated. Almost all respondents use a form of epoxy to seal or inject the cracks. Of the 36 who experienced end zone cracking, 58% believed that their repair methods do not restore the tensile capacity of the member and 20% believe it only partially restores the tensile capacity. Thirty-two of the 36, 89%, do not believe it is even necessary to restore the tensile strength of the girder. In regard to rejecting a girder due to end zone cracking, most respondents said they deal with the beams on a case-by- case basis. Rejection would be based on the width and length of the crack along with its placement on the beam, the num- ber of cracks and their proximity to one another. Most stated that rejection is rare or they have never seen a beam rejected for these reasons. The literature review showed that it is a common belief among design engineers, precast producers, and contractors that repaired girders can be used as long as the end zone cracks are sealed and the cracked part of the girder is embedded in the diaphragm. Some DOT agencies such as Washington State DOT believe that these cracks will close up to some extent due to the weight of the girder, deck slab, and barriers. This is because usually the direction of the end zone cracks is normal to the direction of shear cracks, which means that the end zone cracks will be subject to diagonal compres- sive stresses that help to close them up. Of the 36 who experienced end zone cracking, 31 used flame cutting of individual strands as their only method or one of their methods for strand release. Eight used a hydraulic release (jack down) of all strands in one step, or of individual strands. Most respondents used a mix of 0.6-in. and 0.5-in. diameter strands in their girders. There was an equal distri- bution of those that used only 0.6-in. strand diameters and those that used only 0.5-in. strand diameters, so there seems to be no bias towards a preferred strand diameter. Of those who responded, 72% believe strand distribution contributes to end zone cracking, and 50% believe it is due to detensioning. A few others think that strand size, lifting method insert locations, and concrete strength also contribute. Other theories given were the uneven support of the beam after deten- sioning, eccentricity of prestressing strand groups, changes in temperature, restraint of forms during curing, form geometry, limitations of debonding, and the presence of draped strands. 3.2 Structural Investigation and Full-Scale Girder Testing 3.2.1 Introduction The objectives of the full-scale girder testing were to inves- tigate (1) if end zone cracking negatively affects the ï¬exural and shear capacities of prestressed girders, and (2) if variations of the end zone reinforcement details have significant effect on the number, width, and pattern of end zone cracks. The test plan had eight full-scale girders fabricated in four states with different end zone reinforcement details. This was done through direct contact between the research team and precast concrete girder producers in four states (Tennessee, Florida, Virginia, and Washington). Each precast producer agreed to fabricate two specimens as part of an actual bridge girder project. This was done through the following steps: 1. Each precast concrete girder company picked an actual bridge girder project where the precast girders would be manufactured in its yard. The criteria for a good candi- date project were: (a) the girders should be packed with a large number of strands in order to produce end zone cracking, and (b) the type of girder should be different from those picked by other precast producers in order to have four different types of girders tested in the project. 2. The precast concrete girder companies provided the re- search team with details of reinforcement of the actual girders and their time plan to fabricate these girders. 16 Figure 3.1. Crack comparator.
3. For each bridge project, the research team designed two 42-ft-long specimens using the same number of strands used in the actual bridge. At least one of the four ends of the specimens had to have the same end zone reinforcement details used on the actual bridge. 4. The precast concrete girder companies reviewed the details of the specimens and tried to ï¬nd the right time to cast them next to some of the girders of the actual bridge project. Therefore, the specimens were fabricated using the same material in the production of the girder of the actual bridge and received the same level of treatment regarding curing and strand release technique. 5. The precast concrete girder companies in Washington, Virginia, and Florida allowed the research team to be present at time of prestress release and to record any end zone cracking that might appear. Most of the specimens were shipped to the structures laboratory in Omaha, Nebraska, within a month from their production date. Concrete cylinders made during production and coupons of rebars were also sent to the structures laboratory with the specimens. 3.2.2 Description of the Test Specimens and Test Setup Table 3.1 summarizes the details of the eight specimens. The details in this table include the specimen type, type of end zone reinforcement (EZR) details, material properties, number of prestress strands, and type of failure. Specimens are listed in the order in which they were fabricated and tested. The âproposedâ detail was developed by the research team based on the research that was conducted at the University 17 Girder #1 Girder #2 State Girder Type Left End EZR Type Repair Right End EZR Type Repair Left End EZR Type Repair Right End EZR Type Repair TN1L LRFD 2007 EZR No repair TN1R Proposed EZR No repair TN2L TN DOT EZR No repair TN2R Proposed EZR* No repair Tennessee Type III AASHTO Beams Construction Products, Inc., Jackson, Tennessee Designed to fail in flexure ' cif = 6,000 psi, 'cf = 7,000 psi Bottom: 30 straight 0.5 in., 270 ksi, low relaxation strands stressed to 33.8 kips Top: 2 straight 0.5 in., 270 ksi, low relaxation strands stressed to 5 kips 7.5 in. thick CIP slab was added in the lab, 'cf = 9,000 psi WA1L Proposed EZR* No repair WA1R LRFD 2007 EZR No repair WA2L NO EZR No repair WA2R NO EZR Epoxy Injection Washington State WF58G (Wide Flange Super Girder) Concrete Technology Corporation (CTC), Tacoma, Washington Designed to fail in shear ' cif = 6,000 psi, 'cf = 8,000 psi Bottom: 38 straight 0.6 in., 270 ksi, low relaxation strands jacked to 43.9 kips Top: 20 straight 0.6 in., 270 ksi, low relaxation strands jacked to 43.9 kips + 4 âtemporaryâ post-tension 0.6 in. diameter strands VA1L No EZR No repair VA1R No EZR No repair VA2L LRFD 2007 EZR No repair VA2R Proposed EZR* No repair Virginia PCEF45 (VA new Bulb-Tee) Bayshore Concrete Products, Cape Charles, Virginia Designed to fail in flexure ' cif = 6,000 psi, 'cf = 8,500 psi Bottom: 38 straight 0.6 in., 270 ksi, low relaxation strands jacked to 43.9 kips Top: 14 straight 0.6 in., 270 ksi, low relaxation strands jacked to 43.9 kips 4-in. thick, 47-in. wide deck slab was cast monolithically with the top flange FL1L FL DOT EZR No repair FL1R Mod. FL DOT EZR No repair FL2L LRFD 2007 EZR No repair FL2R Proposed EZR* No repair Florida 60-in. deep inverted T beams Standard Concrete Products, Tampa, Florida Designed to fail in flexure ' cif = 6,000 psi, 'cf = 8,500 psi Bottom: 36 straight 0.6 in., 270 ksi, low relaxation strands jacked to 43.9 kips 10-in. thick, 24-in. wide CIP deck was added in the lab, 'cf = 10,000 psi * Proposed EZR is the end zone reinforcement recommended by Tuan et al. (16) and discussed in Section 1.2.3 of this report. Table 3.1. Design criteria of the full-scale specimens.
of Nebraska (16). As explained in Chapter 2, the LRFD Spec- iï¬cations (18) and University of Nebraska proposed detail (16), recommend that the end zone reinforcement should be designed to resist 4% of the total prestressing force at trans- fer, and that the reinforcement should be designed for a ser- vice stress not exceeding 20 ksi. However, the LRFD Speciï¬- cations states that this reinforcement should be distributed within h/4 (one-fourth of the depth of the girder) from the end of the girder, while the University of Nebraska proposed detail recommends that 50% of this reinforcement should be placed within h/8 (one-eighth of the depth of the girder) from the end of the beam and the remainder should be placed be- tween h/8 and h/2 from the end. 3.2.2.1 Tennessee Specimens Construction Products, Inc. of Jackson, Tennessee, fab- ricated two 42-ft-long Type III AASHTO I-girders for the project. Each specimen had thirty 0.5-in. diameter, 270 ksi, low relaxation prestressing strands, stressed to 33.8 kips per strand. They also contained two partially stressed 0.5-in. diameter strands in the top ï¬ange, stressed to 5 kips per strand. The specimens were designed to fail in ï¬exure. Of the four ends, two had the end zone reinforcement designed to the proposed design; one was designed using LRFD speciï¬cations, and one contained the same end zone reinforcement existing on the typical Tennessee production girders. Figures 3.2 through 3.5 show the details of the Tennessee specimens. 18 1'-4" 7" 7" 7 1/2" 1'-7" 4 1/2" 7" 3'-9" 1'-10" Strands pulled to 5 kips 6" 6" 8" 1'-4" 8" 8" 2#6 (A601) 2#5 (A500) each end, projecting 6" (only appears on End TN2L) #5(A500) 5'-6" 2 1/2" #6 (A601) 41'-10" (a) Longitudinal Reinforcement #5(H500) or #6(H600) #3(HA310) #3 (HA300) 10" 90° HA301 4' - 0" 11 " 5" H5 00 o r H 60 0 HA300 1'-8" 10" 7 1/8" 5 1/2" (b) Shear and Confinement Reinforcement Figure 3.2. Cross section details of Tennessee specimens.
3.2.2.2 Washington State Specimens Concrete Technology Corporation (CTC) of Tacoma, Washington, produced two 42-ft long, 58-in. deep Wash- ington Super Girders (Wide Flange Girders). Each spec- imen contained 38 straight 0.6-in. diameter, 270 ksi, low relaxation prestressing strands in the bottom portion of the girder, jacked to 43.9 kips per strand. At the top of the web, each specimen contains 20 additional straight 0.6-in diam- eter prestressing strands and 4 âtemporaryâ post-tension 0.6-in diameter strands. The four âtemporaryâ strands were included in an attempt to amplify the end zone cracking as much as possible. The production girders that the Washington specimens were modeled after contained 20 draped prestressing strands. However, none of the girder specimens manufactured for the structural testing contained draped strands, so the top strands in the Washington specimens remained straight. Having the prestressing strands remain straight at the top of the girder was more critical than having the strands draped. The force at the top of the girder from the prestressed strands and the post- tensioned strands created additional stresses in the girder web, amplifying the end zone cracks. The top and bottom strands apply opposing flexural moments creating vertical tensile forces in the web. The specimens were designed to fail in shear. The ï¬rst girder had one end designed using the AASHTO LRFD speciï¬cations and the other using the proposed improved reinforcement design procedure. The other girder did not contain any addi- tional end zone reinforcement other than the typical shear reinforcement. This was done to create the maximum amount of end zone cracking possible for the girder. The precast pro- ducer stated that if they had a production girder that showed the extent of end cracking experienced by the test specimens, it would not be accepted. One of the ends that did not con- tain additional end reinforcement received an epoxy injec- tion repair at the precast yard using the typical epoxy repair 19 3" 4.5" 3 pairs of H600 @ 3" 12 HA300 + 12 HA301 @ 6" 2 spa @ 4 1/2" = 9" 4 pairs of H600 @ @2 1" 3 spa @ 2" = 6" 5" 1 1/2" Double Projected Bars H500 @ 6" 2 spa @ 3" = 6" 12 HA300 + 12 HA301 @ 6" Figure 3.3. End zone reinforcement details of TN1L (LRFD) and TN1R (proposed). 3" Double Proj. Bar H600 (typ) 6 pairs of H601 4 pairs of H600 @ 2" 1" 5" 12 HA300 + 12 HA301 @ 3" 1 1/2" 5 HA300 @ 6" 4.5" 5 spa @ 3" = 1'-3" 4 pairs of H501 Double Projected Bars H500 @ 6" 3 spa @ 2" = 6" Figure 3.4. End zone reinforcement details of TN2L (TN) and TN2R (proposed).
procedure outlined in Manual for the Evaluation and Repair of Precast, Prestressed Concrete Bridge Products (11). The matching end was not repaired in any way. Figures 3.6 through 3.8 show the details of the Washington State specimens. 3.2.2.3 Virginia Specimens Bayshore Concrete Products of Cape Charles, Virginia, donated two 42-ft long, 45-in. high bulb-T girders with thirty- eight 0.6-in. diameter, 270 ksi, low relaxation prestressing strands in the bottom ï¬ange and fourteen 0.6-in. diameter, 270 ksi, low relaxation prestressing strands in the top ï¬ange of the girders, each tensioned to 44 kips. The straight pre- stressing strands in the top of the girder were designed to create additional vertical tensile stresses in the girder web, amplifying end zone cracks. These girders were designed to fail in flexure. Much like the Washington girders, two of the girder ends did not contain any additional end zone rein- forcement other than the typical shear reinforcement. The remaining ends were designed using the AASHTO LRFD Specification and the proposed improved details. In the end that was designed using the proposed details, a #8 C-shaped bar was placed at 1 in. clear cover, in the same cross-sectional plane as one of the pairs of #5 bars in order to get a larger amount of steel closer to the girder end. None of the four ends were repaired in any way. Figures 3.9 through 3.11 show the details of the Virginia specimens. 3.2.2.4 Florida Specimens Standard Concrete Products of Tampa, Florida, produced two 42-ft long, 60-in. deep inverted-T girders for the project. 20 2" 1'-8" 2" 2" 3 1/2" 2" 2 1/2" 2 1/2" 2 1/2" (2) #4 bars (2) #3 bars (2) #4 threaded rods Figure 3.5. Girder TN1 decking cross section. Figure 3.6. Details of Washington specimens. They had thirty-six 0.6-in. diameter, 270 ksi, low relaxation pre- stressing strands in the bottom ï¬ange, tensioned to 43.94 kips each, and six #6 bars of mild steel reinforcement along the top of the web. These six bars were placed to resist the top tensile forces produced by the prestressing strands. On spec- imen FL1, one end contained the exact same configuration for end reinforcement as the Florida production girders, while the other end was designed to resemble the Florida end reinforcement design. On specimen FL2, one end was designed using AASHTO LRFD specifications and the other was designed using the proposed detail. After receiving the
specimens in the structures laboratory, a 10 à 24-in., 12,500 psi concrete deck was formed and made composite with the girder. Figures 3.12 through 3.14 show the details of the Florida specimens. 3.2.3 Test Setup In order to simulate the decking system that would be placed on the girders in the actual bridge, a deck was cast in place on top of the Tennessee and Florida specimens in the structural laboratory, while a deck was cast mono- lithically with the top flange during fabrication of the Vir- ginia and Washington specimens in the precast yard. The existing vertical reinforcement was extended in deck to act as horizontal shear reinforcement to create a composite system. The deck weight helped to increase the amount of stress in the bottom strands of prestressing steel at flexural failure. Examples of the CIP deck and the deck cast during fabrication of the specimens are shown in Figures 3.5 and 3.9, respectively. To test the ï¬rst end of a specimen, the specimen was sup- ported at 6 in. from both ends, leaving an unsupported length of 41 ft. A point load was applied at 12 ft from the end being tested and 30 ft from the other end, as shown in Figure 3.15. Once the test on this end was complete, the support on this end was moved 12 ft inside the specimen and the load setup was placed 12 ft from the second support. This setup helped to test both ends of every specimen while avoiding any effect from the tested end on the performance of the second end of the specimen. Since the dead loads, applied after a girder is installed on a bridge, help in closing the end zone cracks, a clamping force mechanism was provided in the test setup at 30 in. away from the end of the girder in order to simulate this load. The clamp- ing force was provided by using a hydraulic jack attached to a self-equilibrium frame built around the specimen as shown in Figures 3.16 and 3.17. This clamping force was calculated as the balance between the reaction developed by the actual bridge girder (due to the slab, barrier, wearing surface, and utilities weight) and the reaction generated by the 42-ft long specimen. The clamping mechanism was placed only at the end being tested. The load was applied at a rate of about 5 kips per second in stages of 100 kips. After each additional 100 kips, the load- ing was paused so that the girder could be checked and marked for cracks. Once the estimated failure load was reached, the loading was stopped and the girder was checked for signs of failure and the cracks were marked. Then the loading was resumed until failure was reached. In some cases, as will be discussed in the following sections, failure could not be 21 2# 6 2# 6 2# 6 2# 6 2# 6 2# 6 2#42#4 1 1/ 2" 2 1/ 2" 2 1/ 2" 2 1/ 2" 2 1/ 2" 2 1/ 2" 1'-0"1'-0" #8 C ba r & 2# 6 2# 6 2# 4 2# 4 2# 4 2# 4 2# 4 2# 4 2# 4 2#4 2#4 1 1/ 2" 3" 3" 3" 3" 3" 3" 3" 3" 1'-0" 1'-0" Figure 3.7. End zone reinforcement details of WA1L (proposed) and WA1R (LRFD). 2# 1'-0" 1'-0" 1'-0" 1'-0" 4 2#4 2#4 2#4 2#4 Figure 3.8. End zone reinforcement details of WA2L (no EZR) and WA2R (no EZR).
3.2.4 Test Results A summary of test results is given in Table 3.2. The table gives the failure mode and failure moment including those calculated based on the speciï¬ed and measured material properties and those obtained from the test. A summary dis- cussion related to each set of specimens is given in the follow- ing sections. More details about all fabrication and testing of all specimens are given in Appendix C. 3.2.4.1 Tennessee Specimens Upon inspection after the release of the strands, neither girder appeared to have experienced any visible end zone cracking. The research team believes that the lack of end zone cracking is due to the limited amount of prestressing force, the presence of end zone reinforcement, and the size and shape of the girder. The girders contained thirty 0.5-in. diameter strands. This amount was the largest available to the producer at the time the specimens were made. The relatively small girder size and amount of prestressing, compared to the depths, spans, and levels of prestress in other states, has been a challenge to the research team. This is because the research 22 #4(402A) 1/2" 1/2" 1" clear Cross Section Reinforcement Detail at Ends 1/2" 1/2" 1 1/2" Cross Section Reinforcement Detail at Midsection #4(401A) 1 1/2" #8 C-bar (VA2R only) 1" clear (2) #5(504A) or #6(604A) (2) #5(501A) #4(402A) #4(401A) #4 (401) 8 5/8" 4" 3' - 6 3/ 4" 4 1/2" #4 (402) 1'- 1 3/8" 4 1/2" 1'- 1 3/4" 5'- 4 1/4" #4 (404) 6" #4 (403) 4' 3 1/2" #5 (504) #6 (604) 4' 8" 8" 1 1/2" 2" 2'-0" 3 1/2" 3" 7" 4'-0" 3" 2" 3 1/2"2'-2" 2'-9" 8" 3 1/2"9" 2" 1'-6" Cross Section Figure 3.9. Cross section details of the Virginia specimens. (9) #4(402A) 1 1/2" (1" clear) pairs of #5(501A) bars @ 4" spacing (9) #4(402A) @ 4"3 1/2" 7 1/2" pairs of #4(401A) bars @ 12" spacing #4(402A) bars @ 12" Figure 3.10. End zone reinforcement details of VA1L (no EZR) and VA1R (no EZR). reached as the failure load was beyond the capacity of the loading frame. The failure load was calculated using the mea- sured material properties of the concrete cylinders made during fabrication of the specimens and the coupons taken of the reinforcing bars.
23 #8 C-bar 1 1/2"(1" clear) 2" 3" 2 1/2" 7 spa @ 4" = 28" 2 spa. @ 2" (10) #4(402A) 7 1/2" 1 3/4" pairs of #5(501A) bars @ 4" #4(401A) bars @ 12"6 1/2" 6 pairs of #6(604A) 5 spa @ 2" 1 1/2" (1" Clear) (12) #4(402A) 4 spa @ 2" 6 spa @ 4"2 1/2" @ 2" spacing #4(402A) @12" 3" pairs of #5(501A) bars @ 4" #4(401A) bars @ 12" #4(402A) @12" Figure 3.11. End zone reinforcement details of VA2L (LRFD) and VA2R (proposed). 5'-0"" 2'-4"" 6 #6 bars @2 in. 2" 4" 3" 6" 36- 0.6 in. strands @2 in. #3(3D1) 6 1/ 2" 7 1/ 2" 3' - 10 " 6 1/2" 6'-7 1/2" #5 (5K 1A ) 1'-1" Figure 3.12. Cross section details of Florida specimens.
24 Bars #3(3D1) @ 3" Bars 4L NOTE: PROVIDE A TOE PLATE 2'-2" BY 12" BY 1/2" WITH 6 STUDS AT EACH END Bars #3(3D1) @ 6" 1 1/2" #5(5K1A) spaced at 4" Bars #3(3D1) @ 6" Bars #3(3D1)@ 6" Bars #3(3D1) @ 3" 1 1/2" 6#6 bars full length #5(5K1A) 22 spaces @3"#5(5K1A) 22 spaces @3" Figure 3.13. End zone reinforcement details of FL1L (FL) and FL1R (modified FL). 6#6 bars full length 1 1/2" 7'-6" Bars #3(3D1) @ 6" 1.5" 6' - 0" 1 1/2" Bars #3(3D1) @ 8" Bars #3(3D1) @ 2" 1 1/2" #5(5K1A) 5 spaces @3" #5(5K1A) 5 spaces @ 4" #5(5K1A) 5 spaces @ 2" Figure 3.14. End zone reinforcement details of FL2L (LRFD) and FL2R (proposed).
25 3'-0" 5'-5 1/4" 12" (2) C12 x 20.7 steel shapes jack locked in at 54k 1" threaded rods 3/4" rubber pad 3'-9" 7 1/4" 1'-0" 9' (2) C12 x 20.7 steel shapes 1" threaded rods (2) C12 x 20.7 steel shapes Figure 3.16. End clamping detail. 6" a = 11'-6" b = 29'-6" 6" L = 41'-0" (a*b/L) P = 8.274 P (k-ft) (b/L) P = 0.72 P (a/L) P = 0.28 P Bending Moment Diagram Shear Force Diagram Location of the clamping force 30" (a*b/L) P = 7.119 P (k-ft) (b/L) P = 0.41 P (a/L) P = 0.59 P Bending Moment Diagram Shear Force Diagram Location of the clamping force 30" 12'-0" L = 29'-6" 6" b = 12'-0"a = 17'-6" Te st se tu p fo r th e fir st e n d Te st se tu p fo r th e se co n d en d P P Figure 3.15. Support and loading arrangement of the full-scale specimens. P6" 2'-6" 12'-0" Figure 3.17. Location of the point load and clamping mechanism.
team wanted to have specimens with end zone cracking to see their effect on the girder capacity. To achieve this goal, deep girders with a large number of strands should be used. How- ever, these large girders would be a challenge to load to fail- ure in the structures laboratory because they require a large amount of applied force that might be beyond the capacity of the testing facility. Reviewing the test results revealed that classical flexural failure occurred in all specimens at a load higher than the estimated load. The flexural failure was associated with loss of bond between the strands and the concrete at the girder end, as shown in Figure 3.18. Figure 3.19 shows the load-deï¬ection relationship of end TN1L, which clearly shows the elastoplastic behavior of the concrete section. 3.2.4.2 Washington State Specimens As expected, upon release of the prestress force, the ends without end zone reinforcement (WA2L and WA2R) expressed much more end zone cracking than the ends that contained additional reinforcement (WA1L and WA1R). The comparison is shown in Figure 3.20. Both ends that contained additional end reinforcement experienced similar widths and patterns of end zone cracking. In both of the reinforced ends, there was a delay in the loca- tion of the end zone cracks where they did not start until a few inches into the girder. The responsible factor for this may be the concentrated amount of reinforcing steel located near the end preventing cracks from starting at the very edge, but then allowing them to form once the presence of reinforcing steel decreases. This phenomenon is shown in Figure 3.21. The figure also shows the end reinforcement for WA1L contain- ing a C-shaped #8 bar 1.5 in. from the girder end. This bar was placed in conjunction with the pairs of #6 bars to locate a greater amount of steel close to the girder end. All four ends failed in shear and reached much higher capac- ities than the estimated requirements. Figure 3.22 shows how the shear cracks run in the opposite direction of the end zone cracks. The load on the girder produces a force that works in a direction to close the end zone cracks. This demonstrates that even with excessive amounts of end zone cracking, the structural capacity of the girders was not reduced below acceptable limits. Both the repaired and unrepaired girders reached capacities greater than the theoretical cal- culated capacities. It was also noted that the end that was repaired by epoxy injection did not perform noticeably bet- ter than the unrepaired end, having similar percent differ- ences between the theoretical and actual results, as shown in Table 3.2. This gives evidence that epoxy injection does not necessarily improve the structural capacity of girders with end zone cracks. An example of the load-deï¬ection relationship is presented in Figure 3.23, which shows how the test data far exceeds the estimated capacities. The curve is for End WA1R that was designed using LRFD specifications. In this case, the load required to fail the girder in flexure was greater than the 800 kips capacity of the two hydraulic jacks in the test setup. The curve shows where loading was halted, but it can be 26 Strength Calculated Using: % Difference State End Design Mode of Failure Specified Values Measured Values Test Data Specified and Test Measured and Test TN1L LRFD Flexure 4,204 k-ft 4,299 k-ft 4,539 k-ft 8.0 5.6 TN1R Proposed* Flexure 4,204 k-ft 4,299 k-ft 4,494 k-ft 6.9 4.5 TN2L TN DOT Flexure 4,204 k-ft 4,299 k-ft 4,649 k-ft 10.6 8.1 Tennessee TN2R Proposed* Flexure 4,204 k-ft 4,299 k-ft ** -- -- WA1L** * Proposed* Shear 311.3 k 319.8 k 508.5 k 63.3 59.0 WA1R LRFD Shear 311.3 k 319.8 k *** -- -- WA2L Non Shear 311.3 k 319.8 k 434.2 k 39.5 35.8 Washington State WA2R Non Shear 311.3 k 319.8 k 457.5 k 47.0 43.1 VA1L Non Flexure 7,471 k-ft 7,809 k-ft 7,852 k-ft 5.1 0.6 VA1R Non Bearing 7,471 k-ft 7,809 k-ft 7,593 k-ft 1.6 2.8 VA2L LRFD Flexure 7,471 k-ft 7,809 k-ft 8,215 k-ft 10.0 5.2 Virginia VA2R Proposed* Flexure 7,471 k-ft 7,809 k-ft 8,492 k-ft 13.7 8.7 FL1L FL DOT Flexure 10,039 k-ft 10,317 k-ft 9,890 k-ft 1.5 4.1 FL1R Mod. FLDOT Flexure 10,039 k-ft 10,317 k-ft ** -- -- FL2L LRFD Flexure 10,039 k-ft 10,317 k-ft ** -- -- Florida FL2R Proposed* Flexure 10,039 k-ft 10,317 k-ft ** -- -- * Proposed EZR detail is the end zone reinforcement recommended by Tuan et al. (16) and discussed in Section 1.2.3 of this report. ** The girder exceeded the setup capacity. *** Girder end was epoxy repaired. Table 3.2. Summary of the test results of the full-scale specimens.
300000 400000 500000 600000 700000 Lo ad (lb ) 0 100000 200000 0 0. 2 0. 4 0. 6 0. 8 1 1. 2 1. 4 Lo ad (lb ) Deflection (in) Capacity Using Estimated Values (590 K) Capacity Using Measured Values (604 K) Load vs. Deflection Figure 3.19. Load-deflection curve of TN1L. 27 (a) Classical Flexural Cracking (b) Strand Rotation (c) Strand Slippage Figure 3.18. Typical flexural failure and loss of bond in the Tennessee specimens.
presumed that the girder would continue to take load until flexural failure. 3.2.4.3 Virginia Specimens Upon release of the prestress force, all of the Virginia spec- imens experienced cracking in the range of 0.004 to 0.010 in. in width and extending no more than 3 ft from the end. The Figure 3.20. End zone cracking of WA2L and WA1R. cracks on the ends without end zone reinforcement were wider and more prevalent. The end designed using the AASHTO LRFD speciï¬cations experienced the least amount of cracking. See Figure 3.24. End VA1R was the first Virginia end tested and it failed prematurely due to inadequate bearing area, as shown in 28 (a) WA2L (no EZR) (b) WA1R (LRFD) Figure 3.21. Crack pattern of WA1L and WA2R. Figure 3.22. End WA1L after shear failure.
than 3 ft into the specimens. The two ends designed using LRFD specifications and the proposed method had crack- ing patterns of similar severity. However, the end designed using the LRFD experienced slightly more cracking than the proposed method. The two ends designed from Florida details were similarly cracked as well. The end that had some of the end reinforcement removed experienced slightly more crack- ing than the end with more reinforcement, however, the improvement is not significant enough to justify using that amount of extra steel for reinforcement. Comparisons are shown in Figures 3.27 and 3.28. The girders were originally designed to fail in ï¬exure. How- ever, a mix-up at the precasting plant caused one or both of Figure 3.25. This occurrence prompted the team to devise a pivoting support with a larger bearing area, shown in Fig- ure 3.26. The three remaining ends failed in shear as designed, where all ends held loads higher than their design capacities. This is further proof that end zone cracks, even in cases where the cracks are wider and longer than any typically reported, do not reduce the structural capacity of girders below the design limits. 3.2.4.4 Florida Specimens Upon release of the prestress force, all end zone cracks were around 0.004 to 0.006 in. in width and did not extend farther 29 Figure 3.24. End zone cracking of VA1R and VA2R. (a) VA1R (No EZR) (b) VA2R (Proposed) 400000 500000 600000 700000 800000 Lo ad (lb ) 0 100000 200000 300000 0 0. 1 0. 2 0. 3 0. 4 0. 5 0. 6 Deflection (in) Capacity Using Estimated Values (510 k) Capacity Using Measured Values (524 k) System Capacity (800 k) Load vs. Deflection Figure 3.23. Load versus deflection curve for End WA1R.
the girders to contain only half the amount of shear reinforce- ment requested, leading to the premature failure of the ends in shear. One girder was observed to contain half of the spec- iï¬ed shear reinforcement when it burst in shear failure. How- ever, the girder that was tested first did not fail, keeping the reinforcement hidden, so it is only assumed that it also con- tained half the speciï¬ed shear reinforcement. In most cases, the design capacity of the specimens was more than the test setup could apply. The team decided to continue with test- ing and use the first half of the load versus deflection curves to determine when the girders would fail. Figure 3.29 shows the load-deï¬ection curve for End FL2R. The loading of this end had to be stopped before failure because the three hydraulic jacks had reached capacity at 1,200 kips. However, it can be inferred that if more load had been applied, the test values would have risen above the experimental values. The corresponding image, Figure 3.30, shows the shear cracks experienced by End FL2R just before the loading was stopped. The ï¬gure illustrates how the shear cracks form in the opposite direction as the end zone cracks. End FL1L unexpectedly failed in shear due to the lack of adequate shear reinforcement. Images of the shear failure are shown in Figure 3.31. One can see how the prestressing force pulled the bottom ï¬ange in toward the center of the girder once there was no web to resist it. This is the same force that pulls on the web of precast girders causing end zone cracking. Once the reinforcement had been exposed, the team was able to calculate the theoretical shear design capacity for the girder to be around 700 kips. The experimental failure point was still greater than the calculated shear capacity value. 3.2.5 Full-Scale Testing Conclusions The full-scale tests on eight full-scale girders has indicated that end zone cracking due to prestress bursting forces does 30 Figure 3.25. End VA1R after bearing failure. (a) FL2R (Proposed EZR) (b) FL2L (LRFD EZR) Figure 3.27. Comparison of ends FL2R and FL2L. (a) FL1L (FL Typical EZR) (b) FL1R (FL Modified EZR) Figure 3.28. Comparison of ends FL1L and FL1R.Figure 3.26. Support with roller.
(a) General View (b) Close View Showing Relative Movement of the Bottom Flange not cause a reduction in the structural capacity of prestressed concrete girders. The orientation of the diagonal cracks is nearly perpendicular to the forces caused by diagonal tension (i.e., shear). When external loads are applied, they induce compressive stresses across the bursting force cracks, and therefore the types of cracks are not cumulative to each other. Even when end zone cracks were induced in the testing that were signiï¬cantly larger than cracks commonly observed in practice, there still was not a measurable reduction in struc- tural capacity. All specimens had capacities at or higher than the expected theoretical capacity. When repairing was performed with epoxy injection in an attempt to restore concrete tensile capacity across the cracks, there was no significant change in capacity between repaired 31 Figure 3.30. Shear cracks on End FL2R after loading was stopped. Figure 3.31. End FL1L after failure, east side. 600000 800000 1000000 1200000 Lo ad (lb ) Capacity Using Estimated Values (1,195 k) 0 200000 400000 0 0. 1 0. 2 0. 3 0. 4 0. 5 0. 6 0. 7 0. 8 0. 9 1 Deflection (in) city Using Estimated Values (1,195 k) Capacity Using Measured Values (1,229 k) System Capacity (1,200 k) Load vs. Deflection Figure 3.29. Load versus deflection curve for End FL2R.
and unrepaired specimens. Using epoxy injection to restore tensile capacity of concrete cracked under the effect of pre- stressing bursting forces is unwarranted and misleading. Even if the injected cracks are assured to be completely filled with epoxy and the interface surface between epoxy and concrete have adequate adhesion, the tensile capacity restoration would only be assured at the injected cracks. In the meantime, there would be numerous cracks, some of which are too narrow to effectively inject or are even invis- ible. At these locations, the tensile capacity of the concrete perpendicular to the crack lines would be lost even if wider cracks are satisfactorily injected with epoxy. Thus, the value of epoxy is to act as a sealant preventing penetration of water and salts into the concrete member. For this purpose, epoxy sealing may not be the most economical or efï¬cient method, unless the cracks are very wide. The full-scale testing also validated the statement that prop- erly designed and detailed end zone reinforcement is impor- tant in controlling end zone cracking. The AASHTO LRFD method produced acceptable results. The proposed method resulted in further improvements in crack control. The exper- iments demonstrated that reinforcement should not just be placed at the very end of the girder. The reinforcement should gradually diminish over a distance equal to h/2 of the girder depth. If reinforcement is placed only at the very end, there may be instances where wider cracks appear beyond the concen- trated reinforcement. This was conï¬rmed in the Washington State experiments, where relatively large prestressing was applied. 3.3 Epoxy Injection Testing 3.3.1 Introduction The epoxy injection test was developed and conducted at an early stage of the project to investigate (1) if epoxy injec- tion repair of end zone cracking is able to restore the tensile capacity of the cracked concrete, (2) if epoxy injection is capa- ble of completely ï¬lling the crack through the width of the web, and (3) if variations of the end zone reinforcement details have a signiï¬cant effect on the number, width, and pattern of end zone cracks. To shed light on these issues, the research team had two 12-ft long specimens fabricated by Concrete Industries Inc., Lincoln, Nebraska, as part of an NU 1350 (53 in. deep) bridge girder production. Details of these specimens and discussion on the experimental activities conducted on them are given in the following sections. 3.3.2 Description of the Test Specimens Figure 3.32 shows the cross section of the test specimen. An NU 1350 section was used in making the specimens. Speciï¬ed release strength was 6,500 psi and ï¬nal strength was 8,000 psi. The bottom flange was reinforced with thirty-two 0.6-in., 270 ksi, low relaxation straight strands in two rows, and the web top was reinforced with twelve 0.6-in., 270 ksi, low relax- ation straight strands. The strand stress just before release was 202.5 ksi. Four additional 0.5-in., 270 ksi strands stressed at 13.2 ksi were provided in the top ï¬ange. Vertical shear web 32 WWF6 (4) 0.5" Dia. Low-Lax 270K Strands Stress to 13.2 ksi 4' -5 1 /8 " 3' -1 1 /8 " (12) 0.6" Dia. Low-Lax 270K Strands Stress to 202.5 ksi (32) 0.6" Dia. Low-Lax 270K Strands Stress to 202.5 ksi 2" 2" 2" 2" 2" 2" 2" 2" 1" 2" (2) #4 bars Figure 3.32. Cross section of test specimen (NU 1350).
reinforcement consisted of pairs of #4 at 4 in. for the full 12-ft length of each specimen. No conï¬nement reinforcement was provided in the bottom ï¬ange. No special end zone reinforcement was provided in either end of the first specimen, as shown in Figure 3.33. Both ends of the second specimen were provided with special end zone reinforcement, where the left end was designed using the LRFD Specifications (18) and the right end was designed using the proposed end zone reinforcement detail that is given in Section 3.7 of this report, as shown in Figure 3.34. The pro- posed detail was developed at the University of Nebraska (16). The test specimens were not provided with sole plates at the ends, or with transverse conï¬nement reinforcement in the bot- tom flange. The research team believes in the importance of these two elements. However, they were intentionally omit- ted to demonstrate their value. The production girders, made in the same production run as the test specimens, had these elements, thus offering an opportunity for comparison. Both specimens, as well as the production girders, experi- enced end zone cracking. Figures 3.35 through 3.37 show the end zone cracks of the test girders. As expected, both ends of the ï¬rst specimen, S1L and S2R, which had no special end zone 33 2'-0" 12'-0" 11'-9" (WWF5 @ 3") 2" 11'-8" ( #4 bar EA. FACE @ 4" ) 2" 1 1/2" 8'-0" 2'-0" (2) WWF6 #4 bar EA. FACE @ 4" 1 1/2" Figure 3.33. Specimen #1: S1L (no EZR), S1R (no EZR). (6) SPA. @ 2" = 1' 2'-0" 12'-0" 11'-9" (WWF5 @ 3") 2" 10'-0" ( #4 bar EA. FACE @ 4" ) 1 1/2" 8'-0" 2'-0" (2) WWF6 1 1/2"1 1/2" #5 EA. FACE 1 1/2" 1 1/2" #4 bar EA. FACE @ 4" #6 EA.FACE (3) SPA. @ 2" = 1' Figure 3.34. Specimen #2: S2L (LRFD), S2R (proposed).
reinforcement, experienced a greater amount of cracking than those of the second specimen, which was provided with spe- cial end zone reinforcement. One end of Specimen #1 has cracks that were longer and wider than the other end. For Specimen #2, the end designed according to the AASHTO LRFD specifications experienced more severe cracking than the end designed using the proposed detail. The lack of bot- tom plate and bottom ï¬ange reinforcement contributed to in- creased cracking near the bottom ï¬ange. At one end, splitting cracks occurred at a corner strand. The precast producer used epoxy injection to repair one end of Specimen #1 (the girder without bursting end reinforcement) and the end designed according to the LRFD specifications of Specimen #2. The epoxy injection repair was conducted according to the pro- cedure given in the Manual for the Evaluation and Repair of Precast, Prestressed Concrete Bridge Products (11). Then, 34 Figure 3.37. Specimen #2: S2R (proposed). Figure 3.35. Specimen #1 with no special end zone reinforcement (cracks traced for clarity). Figure 3.36. Specimen #2: S2L (LRFD).
the specimens were shipped to the structures laboratory in Omaha, Nebraska, for testing. 3.3.3 Preparation of the Test Specimens The teamâs objective was to ï¬nd the most suitable method of testing the cracked and repaired ends for tensile capacity, and to compare them with the capacity of the uncracked zone in the mid-length of the specimen. This was done by cutting out sections of the web, turning them over on their sides, and loading each section as if it were a beam. The top and bottom flanges were cut away, leaving only the webs of each girder. The thickness of the web required two cuts of the saw, one on each side of the web, as shown in Figure 3.38. The bottom ï¬ange contained a large prestress- ing force in the 32 strands. This force had been resisted by the full section, before the bottom ï¬ange was separated from the rest of the section. When the bottom flange was cut away from the web, the web was no longer able to oppose these forces, and the bottom ï¬ange cracked. Figure 3.38 shows the bottom ï¬ange while being cut from the web. Although there was a great deal of cracking, the section remained intact, as shown in Figure 3.39. When the beam was cut, the full extent of the interior cracking became visible, as shown in Figure 3.40. Upon inspection, it was clear that the epoxy did not totally fill the cracks as anticipated. From the cut section, the epoxy could only be seen entering approximately 0.2 in. into the crack, as shown in Figures 3.41 and 3.42. Also, visual inspection revealed a lack of adhesion between the concrete and the epoxy. 35 Figure 3.38. Bottom flange during cutting. Figure 3.40. End zone cracking extending the full length of the web. length of penetration of epoxy seal Figure 3.41. End zone cracking extends vertically and horizontally. Figure 3.39. Bottom flange completely cut from the specimen.
Figure 3.43. The 16-in.-wide strips and test setup. 36 Girder Specimen Specimen #1 (Without Special End Reinforcement) Specimen #2 (With Special End Reinforcement) Test Specimen S1L S1R S1MS S2L S2R Location of the Specimen Left End Right End Midspan Left Right Repaired (R) or Unrepaired (UR) R UR UR No cracks R UR End Reinforcement Design No special end reinforcement LRFD Proposed Reinforcement on Each Face 4 #4 @ 1.25 in. 7 #5 @ 1.31 in. 4 #6 @1.31 in. + 3 #4 @ 1.25 in. Dimensions b (width) = 16 in., h (depth) = 6 in., l (length) = 24 in. Concrete Strength 8,000 psi Table 3.3. Properties of test specimens. length of penetration of epoxy seal Figure 3.42. Very limited penetration of the epoxy repair. The web sections were cut into 16-in. strips, as shown in Figure 3.43. One strip was extracted from each of the four ends of the two girders. Each specimen was turned on its side and subjected to a bending test, as shown in Figure 3.43. The struc- tural testing was performed to ï¬nd the cracking moment and tensile capacity of the specimens. The supports were set 18 in. apart. A two-point loading system was used, with the two points 6 in. apart. Table 3.3 provides the description and prop- erties of each specimen. 3.3.4 Test Results 3.3.4.1 Specimen S1L (No End Zone Reinforcement, Repaired) The last recorded load point was 47.8 kips, but the speci- men actually reached a load of 56 kips before failure. While testing, a crack began to form at the bottom center of the
(a) Flexural Cracking (b) Bearing Failure at the Support (c) Bottom Surface at Failure Figure 3.44. Test specimen S1L after failure. beam due to the bending stress, as shown in Figure 3.44(a). The lack of a bearing surface contributed to premature fail- ure, as shown in Figure 3.44(b). Figure 3.44(c) shows cracks that formed on the bottom on the specimen during testing. Before testing, this specimen had a crack along the length of a vertical bar. It appeared to have formed during prestress release. This preexisting crack was not visible before the saw cutting and was not grouted with epoxy. The final failure cracking was a continuation of this preexisting crack. The fail- ure load resulting in this test may be considered to be unreli- able due to the setup issues (bearing and data acquisition). An important lesson learned, besides reï¬ning the setup for future testing, was that the epoxy repair used may not be effective in restoring the tensile capacity, and may not totally ï¬ll and seal all cracks. 3.3.4.2 Specimen S1R (No End Zone Reinforcement, Unrepaired) The specimen failed at a load of 109 kips with a maximum deï¬ection of 0.236 in. This maximum load was much greater than that of the repaired Specimen S1L. The unrepaired sec- tion had larger bearings, each with a 4 à 12-in. contact area. This specimen also did not contain a crack along its rebar as observed in Specimen S1L. Figure 3.45 shows the specimen setup before and after failure. 3.3.4.3 Specimen S1MS (No End Zone Reinforcement, Midspan Strip) This specimen had no cracks, and therefore no repair was required. The specimen failed at a load of 103 kips and reached a maximum deï¬ection of 0.251 in. Figure 3.46 shows both ends of the specimen after failure. The cracks formed vertically along the rebar. 3.3.4.4 Specimen S2L (LRFD End Zone Reinforcement, Repaired) Similar to Specimen S1L, this specimen contained a crack along the rebar before testing, as shown in Figure 3.47(a). The specimen failed at 103.4 kips and reached a maximum deï¬ection of 0.260 in. Figures 3.47(b) and (c) show both ends of the specimen after failure. This specimen also split along the direction of the rebars at failure. Figure 3.47(d) shows how the splitting occurred through the epoxy injection. Instead of the concrete failing, the epoxy-crack separated. This shows that the epoxy repair of these specimens did not appear to be effective. The rest of the cracking occurred in the same planes as the pre-existing crack along the rebar, as shown in Figure 3.47(e). 37
Figure 3.46. Specimen S1MS after failure. 3.3.4.5 Specimen S2R (Proposed End Zone Reinforcement, Unrepaired) The specimen contained four pairs of #6 bars and three pairs of #4 bars, as shown in Figure 3.48(a). The specimen failed at a load of 154.2 kips and reached a maximum deflec- tion of 0.246 in. Figures 3.48(b) and 3.48(c) show the spec- imen after failure. Once again, the cracks formed in the same direction as the rebar. 3.3.5 Discussion and Conclusions Calculations were performed to estimate the cracking and failure moments of the five specimens. Table 3.4 gives the calculated cracking and failure load, and the test results of the five specimens. Cracking load is measured as the load at the intersection between the steep and flat lines on the load-deflection diagram. None of the specimens exhibited a discernible âkinkâ in the load-displacement curve, imply- ing that there was practically no cracking load capacity. Another less accurate method of measuring cracking is by visual inspection as the load is gradually applied. The computer-aided data acquisition system is more accurate, because micro cracks are impossible to detect visually. These observations led the team to conclude that (1) all speci- mens became cracked transverse to the prestressing direc- tion at the time of prestress release, and (2) epoxy injection for these specimens was ineffective in restoring them to a pre-cracked condition. The epoxy injection testing demonstrated the following: 1. Cutting coupons from the web end of a pretensioned I-beam was not an effective method of testing for structural tensile capacity; 38 (a) Setup with Wider Bearing Plates (b) At Failure Figure 3.45. Specimen S1R before and after testing.
2. Prestressing release causes end zone cracking some of which cannot be epoxy injected or even seen with the naked eyes; 3. The epoxy injection used on the specimens, even though it was applied by experienced professionals in a precast concrete plant, was not a reliable method of totally ï¬lling the injected cracks across the entire web width; 4. The tested specimens had no concrete tensile capac- ity, indicating that epoxy injection does not restore con- crete tensile capacity of repaired end zones even if the injection totally repairs the individual cracks being injected; 5. The AASHTO LRFD method was effective in controlling end zone cracks; 6. The proposed reinforcement was more effective than the AASHTO LRFD method; and 7. The bottom ï¬ange conï¬nement reinforcement and the base plate should be treated as an integral part in crack control of the end zone (they are highly recommended in all stemmed prestressed concrete girders). 39 (b) View at Bottom Flange Junction (c) View at Top Flange Junction (d) Splitting Occurred Right through Epoxy Injection (e) Splitting Occurred Right through Pre-Existing Crack at Lower Layer of Reinforcement (a) Pre-Existing Crack across Bottom Layer of Reinforcement Figure 3.47. Specimen S2L (LRFD end zone reinforcement, repaired specimen).
3.4 Durability Testing 3.4.1 Introduction To prevent chloride penetration into end zone cracks, espe- cially for coastal regions and areas where deicing chemicals are used in winter, waterprooï¬ng sealants can be used. However, since the cracks tend to open and close with the loading of the girder, the sealant must be able to withstand this movement while spanning the gap created by the crack. The objectives of the durability testing were to investigate the following issues: 1. If repair is required, what sealant material should be used? 2. Is it required that end zone cracks be ï¬lled with a patching material before a surface sealant is applied? 3.4.2 Durability Test, Stage I The research team devised an experiment to gauge the effec- tiveness of commonly used sealants in order to select charac- teristics that can be recommended to the public for use in crack repair. This test also observed and recorded the properties of each sealant as well as the method and ease of application. 3.4.2.1 Stage I Test Procedure The test slightly modiï¬ed the test from ASTM D6489-99, Standard Test Method for Determining the Water Absorption of Hardened Concrete Treated with a Water Repellant Coating. (ASTM Standard D6489-99 is provided in Appendix E.) Concrete cylinders were used as test specimens in the proce- dure. Sixty specimens were produced at Concrete Industriesâ precast plant in Lincoln, Nebraska, from a self-consolidating concrete production line. After the cylinders were received at the structures laboratory, they were washed and cleared of debris and then heated in a draft oven for 24 hours to remove any moisture. They were then coated with the sealants, which were mixed, prepared, and applied according to the manufac- turersâ speciï¬cations, taking care not to leave any uncovered spots. A control group was designated, which received no sealant coating. All of the specimens were then immersed completely in water and left to soak, as shown in Figure 3.49. At 24 h, and again at 96 h the specimens were towel dried and weighed. By taking the weight of the specimens before and after submersion the percent absorption was calculated and aver- aged for each sealant type. Five different sealants were tested for effectiveness in pro- tecting against water and chloride penetration as follow: 1. Pipewipe®, 2. DuralPrep® A.C., 3. Transpo Sealate® T-70, 4. Xypex® Concentrate, and 5. DegaDeck® Crack Sealer Plus. 40 (a) Before Testing (b) At Failure (c) At Failure Figure 3.48. Specimen S2R (UNL end zone reinforcement unrepaired specimen).
Appendix D provides technical information on the sealants. Figure 3.50 shows the cylinders after being sealed with the ï¬ve sealants. ⢠Pipewipe® is a cement-based product designed to produce a âsack rubbedâ ï¬nish to the concrete. It ï¬lls in any voids or cracks to create a smooth, uniform coating. Its primary pur- pose is to be a cosmetic repair product. Pipewipe® contains a polymer-bonding agent along with very ï¬ne aggregates. It expands and contracts at the same rate as normal con- crete, therefore preventing cracking at extreme tempera- ture changes. As a liquid, the product is thick and easy to apply by hand. However when dry, the coating could eas- ily be rubbed away and was also water absorbent. Due to its cement base, Pipewipe® is not intended to be a waterproof- ing sealant. Therefore, the research team decided not to con- sider Pipewipe® for further testing. ⢠DuralPrep® A.C. is a water-based epoxy modiï¬ed Portland cement bonding agent and anti-corrosion coating. It con- tains a migratory corrosion inhibitor and claims that it can be used as a coating for steel reinforcement. The mixture requires the blending of three separate chemicals. The mix- ture is non-volatile and does not give off any harmful fumes. The product is very viscous, making it difficult to apply a thin coating. Once dry, the product is rough and cement- like in texture, giving the impression of being porous. ⢠Transpo Sealate® T-70 is a high molecular weight methacry- late resin system. It is designed to ï¬ll and seal concrete cracks. It has a very low viscosity that is designated to penetrate deep into cracks of small widths. Due to this low viscosity, the product works best on horizontal surfaces where it cannot ï¬ow away. It is a three-part substance that, when its chemi- cal components are combined, may produce skin irrita- tion and will give off harsh, volatile fumes. However, the seal that is produced appears glassy and has water-resistant characteristics. The team believes that the product itself is water resistant, but the method of application and orienta- tion of the cylinders prevented a solid coating around the specimens. Due to the ultra low viscosity of the product, it easily ï¬owed off the surface before setting up. This shows that the product is satisfactory for the water and chloride prevention requirement, but may not be effective for ver- tical application on the webs of precast girders. ⢠Xypex® Concentrate is designed to waterproof and repair concrete. When exposed to water, this product causes a catalytic reaction that produces a non-soluble crystalline formation within the pores and capillary tracts of concrete and cement-based materials. It is mixed with water and can be made into different consistencies to match the applica- tion method. The results for this sealant may be confus- ing due to initial saturated surface and the moist curing procedure. It may be that the Xypex® layer absorbs a limited amount of water, yet would not allow any to leak through. The Xypex®-coated specimens absorbed more water than the uncoated control specimens. ⢠DegaDeck® is a reactive methacrylate resin designed to pen- etrate and seal cracks in concrete. It produces a hard, clear, matte, water repellant surface. The product has a low enough viscosity to flow easily into small cracks. DegaDeck® is 41 Girder Specimen Specimen #1 (Without Special End Reinforcement) Specimen #2 (With Special End Reinforcement) Test Specimen S1L S1R S1MS S2L S2R Location of the Specimen Left End Right End Midspan Left Right Nominal Cracking Load (kip) 23.1 25.5 25.0 Nominal Ultimate Load (kip) 77.3 175.6 153.2 Test Results Cracking Load (kip) --- --- --- --- --- Failure Load (kip) 56 109 103 103 154 Midspan Deflection (in.) --- 0.236 0.251 0.260 0.246 Table 3.4. Test results of the five specimens. Figure 3.49. Specimens submerged in water.
two-part substance comprised of liquid and powder hard- ener. It is recommended for horizontal surfaces only. How- ever, the team found that the product performed well on vertical surfaces, such as girder webs, and did not ï¬ow off the exterior. DegaDeck® Crack Sealer Plus was the best performing sealant of the ï¬ve tested. It also had a very easy workability and mixing procedure. However, when mixed, the chemical is highly volatile and produces harsh, poten- tially dangerous fumes. It is also a skin and eye irritant. The fumes, as well as the liquid, are ï¬ammable. 3.4.2.2 Stage I Test Results Tables 3.5 and 3.6 present a summary of the percent absorp- tion of each specimen at 24 h and 96 h, respectively. Also, these tables provide the average, standard deviation, and variance for the ï¬ve sealants. The ï¬ve sealants were rated from the analysis of the absorp- tion results at 24 h and 96 h and ease of application, and from the best to the worst were (1) DegaDeck® Crack Sealer Plus, (2) DuralPrep® A.C., (3) Pipewipe®, (4) Transpo Sealate® T-70, and (5) Xypex® Concentrate. The top performing sealants retained for Stage II of the dura- bility tests were DegaDeck® Crack Sealer Plus, DuralPrep® A.C., and Transpo Sealate® T-70. 3.4.3 Durability Test, Stage II For the second stage of the durability test, the team observed how assorted sealers perform in preventing water from pen- etrating into concrete specimens exhibiting various sizes of cracks. The procedure was modiï¬ed from two ASTM Stan- dards, G109-99a Standard Test Method for Determining the Effects of Chemical Admixtures on the Corrosion of Embedded Steel Reinforcement in Concrete Exposed to Chloride Environ- ments, and D6489-99 Standard Test Method for Determining the Water Absorption of Hardened Concrete Treated with a Water Repellent Coating. (ASTM Standard D6489-99 is provided in Appendix E.) 42 Table 3.5. Summary of percent absorption of all sealants at 24 hours. Sealant Specimen Control Specimens Pipewipe ® DuralPrep® A.C. Transpo Sealate® T-70 Xypex® Concentrate DegaDeck® Plus 1 2.65% 1.58% 0.38% 2.52% 2.99% 0.62% 2 2.49% 1.31% 0.37% 2.45% 3.16% 0.52% 3 2.43% 1.71% 0.45% 2.59% 3.12% 0.44% 4 2.65% 1.41% 0.58% 2.23% 3.15% 0.29% 5 3.02% 1.38% 0.37% 2.13% 3.21% 0.27% 6 3.01% 1.39% 0.38% 2.29% 3.15% 0.68% 7 2.74% 1.50% 0.51% 2.59% 3.24% 0.23% 8 2.80% 1.55% 0.48% 2.53% 3.14% 0.16% 9 2.69% 1.46% 0.68% 2.05% 2.55% 0.18% 10 2.74% 1.54% 0.62% 2.71% 3.00% 0.15% Average 2.72% 1.48% 0.48% 2.41% 3.07% 0.35% Stand. Dev 0.190 0.118 0.112 0.219 0.199 0.195 Variance 0.036 0.014 0.012 0.048 0.040 0.038 Rating (1 = best, 5 = worst) 3 2 4 5 1 (a) Pipewipe® (b) DuralPrep® A.C. (c) Transpo Sealate® T-70 (d) Xypex® Concentrate (e) DegaDeck® Crack Sealer Plus Figure 3.50. Specimens coated in sealants.
Figure 3.51. Specimens with metal shims. The sealants chosen for this experimentation are the three best-performing sealants from the ï¬rst durability test (Dega- Deck® Crack Sealer Plus, DuralPrep® A.C., and Transpo Sealate® T-70) along with SilACT®, which was recommended by Central Pre-Mix Prestress Co. of Washington State. The specimens were made from the same concrete mix design, with a concrete strength of about 5,000 psi. Although this con- crete mix is relatively more porous than the concrete normally used in precast girders, it was used to amplify the amount of water absorbed if the sealers failed. 3.4.3.1 Stage II Test Procedure The concrete specimens were made in the structures labora- tory of the University of Nebraska, in the form of 3 à 3 à 12-in. rectangular prisms. Artiï¬cial cracks were formed with metal and plastic shims, penetrating down 2.25 in. from the top sur- face of the specimens and measuring 9 in. in length, as shown in Figure 3.51. These shims were placed in the concrete while it was still wet and removed when it began to set. The artiï¬- cial cracks were produced in a variety of widths, ranging from 0.007 to 0.054 in. After all specimens were fabricated, they were placed in a draft oven for 24 h to remove any moisture. When cooled, their weight was recorded as WA, and then the sealants were used to cover the four sides and bottom face of each specimen, leaving only the top surface containing the crack uncoated. These sides were covered to prevent moisture from either entering or escaping the areas not being tested. There were two sets of specimens for each sealant, with each set containing prisms with cracks of each available size. The ï¬rst set was sealed only with the speciï¬ed sealant. The second set had a Hilti® Brand hydraulic cementitious material, REM 43 Table 3.6. Summary of percent absorption of all sealants at 96 hours. Sealant Specimen Control Specimens Pipewipe ® DuralPrep® A.C. Transpo Sealate® T-70 Xypex® Concentrate DegaDeck® Plus 1 2.76% 1.67% 0.66% 2.92% 3.23% 0.82% 2 2.60% 1.39% 0.63% 2.81% 3.40% 0.67% 3 2.54% 1.80% 0.65% 2.98% 3.35% 0.58% 4 2.77% 1.48% 0.83% 2.60% 3.40% 0.47% 5 3.14% 1.45% 0.63% 2.55% 3.46% 0.42% 6 3.15% 1.47% 0.60% 2.70% 3.44% 1.05% 7 2.86% 1.59% 0.74% 2.99% 3.52% 0.34% 8 2.92% 1.61% 0.81% 2.89% 3.36% 0.87% 9 2.81% 1.55% 1.04% 2.36% 2.74% 0.27% 10 2.87% 1.63% 1.11% 3.07% 3.27% 0.26% Average 2.84% 1.56% 0.77% 2.79% 3.32% 0.58% Stand. Dev. 0.199 0.122 0.177 0.226 0.219 0.273 Variance 0.040 0.015 0.031 0.051 0.048 0.074 Rating (1 = best, 5 = worst) 3 2 4 5 1 800, rubbed into the cracks by hand, and then sealed with the same sealant as the first set. An additional set was made as the control, where the specimens were not repaired with any sealant at all and did not contain any artiï¬cial cracks. Table 3.7 shows the test plan. The specimens were placed on their sides and the selected sealants and REM 800 were applied to their speciï¬c sets. This orientation mimics the orientation of the cracks on the webs of production girders. Care was exercised not to leave any con- crete surface uncovered or to allow any air bubbles to form. The REM 800 was rubbed into the cracks by hand but the sealants were applied with a roller. Once all of the specimens dried, they were turned upright and a 3-in.-tall rectangular plastic dam was built on the top
surface of each specimen around the artiï¬cial crack so that water could pond on the repaired surface. Waterproof caulk- ing material was used to secure the plastic walls in place, as shown in Figure 3.52. With the dam in place, the specimens were weighed, recording the data as W1. The specimens were all placed face up in an area where they would not be disturbed. Each dam was then filled to the top with water. The specimens were given the opportunity to absorb water for 24 h. Every effort was made to ensure that the dam remained filled with water at all times. At 24 h, the water in each dam was emptied. Then, the specimens were towel dried. The weight of each sample was measured and recorded as W2. The percent of water absorption by each sample can be found using the following equation: Where WA is the weight of the concrete specimen after dry- ing, but before exposure to the sealant and before dam place- ment, W2 is the weight of the sealed specimen after soaking, and W1 is the weight of the sealed specimen before soaking. Percent Absorption W W WA = â( )100 2 1i (Equation 1) 3.4.3.2 Stage II Test Results The test results show that packing larger cracks with a thick, cementitious material (REM 800) allowed the cracks to be closed, while repair with a sealant alone failed in most cases with large cracks. Typically, the specimens with REM 800 were able to keep the water out better than the specimens without REM 800. The material packed into the crack created a bridge, over which the less viscous water-resistant sealants were allowed to lay, forming an unbroken seal across the entire surface. Without REM 800, the sealants with a water-like consistency (DegaDeck®, Transpo Sealate®, and SilACT®) were not able to adequately ï¬ll the large-sized cracks when applied on a ver- tical surface. Table 3.8 gives a summary of the 24-h percent absorption of the specimens. This experiment was designed to exaggerate actual bridge conditions to which end zone cracks would be exposed. In service, the crack surface would not be continuously under water, as the specimens were, but the exposure to wet envi- ronmental conditions would extend for a much longer period of time. DegaDeck® Crack Sealer Plus was effective when coupled with REM 800, but without the hydraulic cementitious material enough water penetrated into the crack for it to be con- sidered ineffective. About half of these DegaDeck® specimens remained relatively water resistant while the remaining seals failed. The sealant was not thick enough to be able to bridge the gap created by the crack on its own, as shown in Figure 3.53. Transpo Sealate® was not considered effective with or with- out REM 800. Except for a few outliers, the specimens contain- ing REM 800 collectively had a much lower percent absorption of water than the specimens without REM 800. The ineffective- ness of Transpo Sealate® may be attributed to the thin, water- like consistency of the product. When applied to the vertical surface, most of this sealant ï¬owed off of the sample. There- fore, the layer that remained was not thick enough to prevent water inï¬ltration. The product is recommended for horizon- tal application and the experiment conï¬rms that this is where it would be most useful. Figure 3.54 shows the specimens sealed with Transpo Sealate®. 44 Figure 3.52. Specimens with water dams. Table 3.7. Plan for the durability tests, Stage II. DegaDeck® TranspoSealate® DuralPrep® A.C. SilACT®Crack Width (in.) Control Batch With REM 800 Without REM 800 With REM 800 Without REM 800 With REM 800 Without REM 800 With REM 800 Without REM 800 Number of Specimens, Stage II (Total = 46 Specimens) 0.000 1 0.007 1 1 1 1 1 1 1 1 1 0.012 1 1 1 1 1 1 1 1 1 0.016 1 1 1 1 1 1 1 1 1 0.033 1 1 1 1 1 1 1 1 1 0.054 1 1 1 1 1 1 1 1 1 Total 6 5 5 5 5 5 5 5 5
(a) With REM 800 (b) Without REM 800 Figure 3.53. Specimens coated with DegaDeck®. (a) With REM 800 (b) Without REM 800 Figure 3.54. Specimens coated with Transpo Sealate®. 45 Crack Width (in.) Control DegaDeck® Transpo Sealate® DuralPrep® A.C. SilACT® 0.000 4.28 With REM 800 Without REM 800 With REM 800 Without REM 800 With REM 800 Without REM 800 With REM 800 Without REM 800 0.007 1.81 0.22 4.10 2.06 4.63 0.42 0.66 0.09 2.17 0.012 1.49 0.11 1.44 2.96 0.87 0.51 2.78 0.13 0.46 0.016 2.59 0.36 0.69 2.82 1.03 1.07 3.25 0.19 1.45 0.033 4.19 0.35 0.37 2.29 4.04 0.33 1.46 0.17 1.94 0.054 1.69 0.08 3.81 1.34 4.03 0.72 0.54 0.15 2.43 Table 3.8. Summary of 24-hour percent absorption for the durability test, Stage II.
DuralPrep® A.C. was moderately effective with an under- coating of REM 800, but was not effective without it. The sealant was mixed by combining a powder with two liquid chemicals. This created a thick, slurry-like liquid that was able to bridge the space created by the cracks, even without REM 800 and with the largest 0.54-in. crack. DuralPrep® A.C. was the only sealant of the four tested that did not gap when applied over the crack, especially when voids appeared at the crack location. However, the product performed well when the specimen was batched with REM 800. Figure 3.55 shows the specimens sealed with DuralPrep® A.C. SilACT® was effective at preventing water penetration with REM 800, but was ineffective without the cementitious pack- ing material. The manufacturer states that SilACT® chemically bonds with the substrate and creates a water-resistant layer just below the concrete surface that repels water but allows gasses to ï¬ow through. Therefore, SilACT® has a different method of water resistance than the other sealants tested. There is no hard, water-resistant outer shell that covers the specimen, as is the case with the other sealants. Instead, the water-resistant layer is actually within the concrete. Without the hard, outer layer, there is nothing to bridge the crack gap. The strength of SilACT® comes from being able to be soaked into the concrete. This is why it performed well after soaking into the REM 800 layer. Without the patching material, the crack was left open and SilACT® was not able to soak all of the way into the crack when the opening was located on a vertical surface. If the sur- face had been horizontal and the product had been allowed to soak all the way into the crack, the results would have been more effective, but this would not be representative of the actual end zone crack position. Figure 3.56 shows the spec- imens sealed with SilACT®. In comparison to what the study team expected, the data had quite a few inconsistent results. It seemed that whether the sealant was effective or not depended largely on how well the application was executed. Specimens (such as the 0.016-in. 46 (a) With REM 800 (b) Without REM 800 Figure 3.55. Specimens coated with DuralPrep®. (a) With REM 800 (b) Without REM 800 Figure 3.56. Specimens coated with SilACT®.
and 0.033-in. cracks treated only with DegaDeck®) that were unexpectedly water resistant in relation to the other specimens with that sealant may have been unintentionally administered extra sealant. The sample may also have been inadvertently tipped during application, allowing the sealant to pool in the crack before drying. There was only one sample of each spe- ciï¬c combination of sealant and crack size created, so an aver- age of multiple specimens could not be found. These inconsistent results led the team to repeat sections of the Stage II test before conclusions could be drawn. (See the following section for information on the Stage III test.) From Stage II of the durability tests, the four sealants were rated from the analysis of the absorption results at 24 h and the ease of application. Ratings are as follows, from the best to the worst: 1. SilACT®, 2. DegaDeck® Crack Sealer Plus, 3. DuralPrep® A.C., and 4. Transpo Sealate® T-70. 3.4.4 Durability Test, Stage III For Stage III of the Durability Test, the research team re- peated the procedure used in Stage II for DegaDeck®, Dural- Prep® A.C., and SilACT® for the crack widths 0.007-in., 0.016-in., 0.033-in., and 0.054-in. Transpo Sealate® T-70 was removed from the testing because it did not perform well with a vertical application, as shown in Stage II. The procedure used for Stage III of the durability test is iden- tical to the procedure for Stage II. However, each case contain- ing the same crack width and sealant combination had three separate specimens. Three batches of concrete were required to manufacture the 69 specimens for Stage III. Table 3.9 shows the Stage III durability test plan. Figure 3.57 shows hand appli- cation of REM 800 on Stage III specimens. 3.4.4.1 Stage III Test Results Water was allowed to soak in the dams on the specimens for 48 h. Readings were taken at both 24 h and 48 h, and the percent absorption for each specimen was determined. The 47 DegaDeck® TranspoSealate® DuralPrep® A.C. SilACT®Crack Width (in.) Control Batch With REM 800 Without REM 800 With REM 800 Without REM 800 With REM 800 Without REM 800 With REM 800 Without REM 800 Number of Specimens, Stage III (Total = 69 Specimens) 0.000 3 0.007 3 3 3 - - 3 3 3 3 0.012 - - - - - - - - - 0.016 3 3 3 - - 3 3 3 3 0.033 3 3 - - - 3 - 3 - 0.054 3 3 - - - 3 - 3 - Total 15 12 6 - - 12 6 12 6 Table 3.9. Plan for the durability tests, Stage III. Figure 3.57. Hand application of REM 800. percent absorption results for Stage III of testing are given in Tables 3.10 and 3.11. The ï¬nal results were fairly similar for each group of iden- tical specimens. This shows that the results gathered are con- sistent with one another and are repeatable. For clariï¬cation purposes, the results from the three identical specimens were averaged together and are shown in Tables 3.12 and 3.13. Tables 3.12 and 3.13 show that DuralPrep® A.C. was the best performing sealant. It was the thickest sealant of those that were tested. It performed well both with and without the REM 800 cementitious packing material, showing almost no mea- surable absorption of water in either case. Even with the largest cracks, this thick sealant was able to ï¬ll the gap created by the crack without leaving voids into which the water could seep. The reason that DuralPrep® A.C. did not perform as well in Stage II of testing was that small openings appeared at the crack location, allowing water to seep into the hole in the sealant. The product itself is waterproof, however, the person applying the sealant must take care not to leave any open voids in the layer of sealant. DuralPrep® A.C. was the only sealant that gave acceptable results without REM 800. The second-best-performing sealant was DegaDeck® Crack Sealer Plus. With the REM 800, the specimens showed
48 Crack Width (in.) Control DegaDeck® DuralPrep® A.C. SilACT® 2.164 2.3830.000 2.293 With REM 800 Without REM 800 With REM 800 Without REM 800 With REM 800 Without REM 800 4.056 0.003 0.493 0.000 0.000 0.069 3.182 3.871 0.000 2.850 0.000 0.000 0.325 2.712 0.007 4.116 0.000 3.610 0.000 0.000 0.071 1.355 4.624 0.000 3.854 0.000 0.000 0.092 3.549 4.737 0.003 4.063 0.000 0.000 0.091 2.447 0.016 4.630 0.000 0.170 0.000 0.000 0.058 0.999 4.475 0.000 0.000 0.115 4.650 0.000 0.000 0.111 0.033 4.657 0.000 0.000 0.064 5.091 0.000 0.000 0.299 4.951 0.000 0.000 0.149 0.054 5.120 0.000 0.005 0.127 Table 3.10. Summary of 24-hour percent absorption for the durability test, Stage III. Crack Width (in.) Control DegaDeck® DuralPrep® A.C. SilACT® 2.724 2.9950.000 2.940 With REM 800 Without REM 800 With REM 800 Without REM 800 With REM 800 Without REM 800 4.358 0.000 0.762 0.000 0.000 0.085 3.861 4.360 0.000 3.644 0.000 0.000 0.411 3.524 0.007 4.406 0.000 3.942 0.000 0.000 0.089 3.000 4.817 0.000 4.224 0.000 0.000 0.126 4.081 4.919 0.000 4.285 0.000 0.000 0.110 3.177 0.016 4.781 0.000 0.212 0.000 0.000 0.082 1.479 4.690 0.000 0.000 0.164 4.842 0.000 0.000 0.164 0.033 4.784 0.000 0.000 0.084 5.182 0.000 0.000 0.401 5.069 0.000 0.006 0.199 0.054 5.225 0.000 0.000 0.172 Table 3.11. Summary of 48-hour percent absorption for the durability test, Stage III. Crack Width (in.) Control DegaDeck® DuralPrep® A.C. SilACT® 0.000 2.280 With REM 800 Without REM 800 With REM 800 Without REM 800 With REM 800 Without REM 800 0.007 4.014 0.001 2.318 0.000 0.000 0.155 2.416 0.016 4.663 0.001 2.696 0.000 0.000 0.081 2.332 0.033 4.594 0.000 0.000 0.097 0.054 5.054 0.000 0.002 0.192 Table 3.12. Summary of 24-hour percent absorption for the durability test, Stage III.
almost no measurable absorption of water. However, without the REM 800, the cracks were not able to be bridged nor sealed, and water was allowed to seep into the open cracks. DegaDeck® is too thin to bridge even the smallest cracks tested. For the specimens without REM 800, the specimens with a crack size 0.016 in. absorbed more water than the specimens with a crack size 0.007 in. However, neither ab- sorbed as much water as the control group that did not have a sealant. DegaDeck® Crack Sealer Plus has performed well in all phases of testing and has been near the top in each experiment. SilACT® did not perform as well as the other two sealants tested in this experiment. It performed relatively well with REM 800, but did not perform well without REM 800. With REM 800, only a small amount of water was allowed to seep into the concrete. However, in all cases water was continuing to seep into the concrete from Day 1 to Day 2, and would continue to do so as time went on. The sealant was thin enough that, with- out REM 800, the product was not able to bridge the void cre- ated by the crack. This left a large opening that water was able to pass through and absorb into the concrete. The water that absorbed into the SilACT® specimens was still less than the water absorbed by the control group that did not have a sealant. The control group absorbed the highest volume of water, as expected. The results in Tables 3.10 through 3.13 also show a relationship between the amount of water absorbed and the crack width. Typically, wider cracks absorbed more water, and narrower cracks absorbed less water. This is not apparent in all cases, but most of the specimen results follow this statement. These results are different than those acquired in Stage II of testing. This may be due to procedural error and the fact that there were multiple specimens from which to take an average. By Stage III, the team had become more familiar with the test- ing procedure and would have been more careful with the sealant application. The team was able to propose that when using thin sealants, packing cracks with a thick cementitious material allows the cracks to be closed when the sealant alone is not adequate. In order to make this a universal statement and to avoid confu- sion on limits on sealant viscosity, a packing material is recom- mended with the use of all sealants. Typically, the specimens treated with REM 800 were able to prevent water absorption better than the specimens that were not treated with REM 800. The material packed into the crack created a bridge over which the less viscous water resistant sealants were allowed to lay, forming an unbroken seal across the entire surface. This experiment was designed to exaggerate actual bridge conditions to which end zone cracks would be exposed. In ser- vice, the crack surface would not be continuously under water, as the specimens were, but the exposure to wet environmental conditions would extend for a much longer period of time. 3.4.5 Chemical Composition of the Sealers In order to help design engineers specify the appropriate sealer for a project, Table 3.14 lists the sealers used in this study and their chemical composition. 3.5 Field Inspections of Bridges 3.5.1 Introduction The objectives of the ï¬eld inspection of highway bridges were to determine the following: 1. Does the width of end zone cracking change with time? 2. If end zone cracking was detected at the precast plant and no repair was conducted, do these cracks lead to corrosion of the strands and bars, or delamination of the concrete? To investigate these issues, the research team selected two pilot states, Nebraska and Virginia. Two bridges were selected from Nebraska and three bridges were selected from Virginia for ï¬eld inspection. The inspection process included ⢠Collection of reports for inspections conducted at the plant, examination of the reports, and identification of repair method and material; ⢠Collection of inspection reports for the bridges in ser- vice; and ⢠Research team visits of the bridges under study for in- spections that included observation of crack growth since 49 Crack width (in.) Control DegaDeck® DuralPrep® A.C. SilACT® 0.000 2.886 With REM 800 Without REM 800 With REM 800 Without REM 800 With REM 800 Without REM 800 0.007 4.375 0.000 2.783 0.000 0.000 0.195 3.462 0.016 4.839 0.000 2.907 0.000 0.000 0.106 2.912 0.033 4.772 0.000 0.000 0.137 0.054 5.158 0.000 0.002 0.257 Table 3.13. Summary of 48-hour percent absorption for the durability test, Stage III.
production and examination for signs of reinforcement corrosion and concrete delamination. The complete inspection reports for all bridges inspected in this project are presented in Appendix F. 3.5.2 Nebraska Department of Roads (NDOR) With help from NDOR, the research team selected two bridges for inspection. The ï¬rst bridge was located on High- way 6, near the 168th Street exit, over a branch of Papillion Creek, in Omaha, Nebraska. The second bridge is located on I-80 over the Platte River in Cass County, Nebraska. 3.5.2.1 Papillion Creek Bridge This bridge is located on Highway 6, near the 168th Street exit, over a branch of Papillion Creek, in Omaha, Nebraska. The bridge consists of three spans (95 ft, 122 ft, and 95 ft, re- spectively), with a bridge deck 117 ft wide on the east end and 124 ft wide on the west end, as shown in Figure 3.58. The bridge was constructed in 2002 to 2003 and girder ends were consistently encased from the top ï¬ange to the top of the bottom ï¬ange. The team members were able to get close access to all of the girder ends in order to look for end zone cracks. No visible cracking was noted at the ends of any of the girders, as shown in Figure 3.59. The concrete encasing the ends of each girder extended about a foot from the end. It is possible, although unlikely, that very small end zone cracks may have existed within a foot from the end of the girder, but these would have been covered by the end block. The end block would prevent any water or chlorides from penetrating these possible cracks; therefore, they would not be a threat to the girder. The research team was not able to get the records of end zone cracking from the precast producer. 3.5.2.2 Platte River Bridge Members of the research team visited a bridge on Inter- state I-80 over the Platte River in Cass County, Nebraska. The bridge was in the process of being replaced with new spans of precast prestressed concrete girders. It consists of 10 spans total; two 156-ft spans and eight 166.5-ft spans. The bridge deck is 206 ft wide and the girders are prestressed with ï¬fty- eight 0.6-in.-diameter strands. See Figure 3.60. The research team compiled and reviewed the girder produc- tion records and post-pour product inspection reports from the precast producer, Coreslab Structures, Inc., of Omaha, Nebraska. The team was able to inspect both interior and exterior girders on the Platte River Bridge. A self-propelled scissor boom lift was used to get right up next to the girder ends on the eastbound section. The team also walked along the eastern side of the river and was able to inspect each of the girder ends resting on that bank on both the westbound and eastbound sections. All of the girders that were inspected are NU2000s (79-in.- deep section), and they all experienced end zone cracking. The crack patterns, as well as the crack widths and lengths, were fairly consistent from one girder to another. Generally, the cracks in the end zones were reported to be 0.004-in. to 0.008-in. wide and ranged from 2 ft to 6 ft long. Although evidence of end zone cracking was prevalent, there were no signs of further damage to the girders (such as reinforcement corrosion or delamination). Most cracks 50 Product Chemical Compound Pipewipe® Cementitious product: silicon dioxide + Portland cement DuralPrep® A.C. Water-based, epoxy-modified Portland cement bonding agent and anti-corrosion coating Part A: water + bisphenol A polyglycidyl ether resin + phenol + glycidyl ether + octylphenoxypolyethoxy ethanol + benzyl alcohol Part B: water + polyamine polymer+ polyamine + tetraethylene pentamine Part C: Portland cement + Portland cement + amorphous silica + vinyl acetate copolymer Transpo Sealate® T-70 A specially formulated, high molecular weight methacrylate resin system Xypex® Concentrate A crystalline waterproofing system DegaDeck® Crack Sealer Plus A reactive methacrylate resin SilACT® A clear penetrating silane with ethylsilicate treatment specially formulated to treat limestone; the treatment causes concrete, masonry and many natural stones to become repellent to water, chloride, and other waterborne contaminants and weathering elements REM 800 Fast-setting concrete patching material; self-bonding patching compound with special cement and additives Table 3.14. Sealers used in this study and their chemical composition.
(a) Longitudinal Profile (b) Cross Section of the Westbound Side (c) Cross Section of the Eastbound Side Figure 3.58. Papillion Creek Bridge, Omaha, Nebraska. had a white-colored efflorescence surrounding them. There appeared to be neither structural nor durability problems occurring. The girders have only been in place for a few years, but so far no durability issues have been observed at the girder ends. Examples of the girder ends with end zone cracks are shown in Figure 3.61 where the cracks are highlighted for clarity. The cracks shown on the girders in Figure 3.61 are traveling in two distinct directions. Near the top portion of the web, the cracks are traveling diagonally downward. Near the bottom portion of the web, the cracks are traveling diagonally upward. The top section of cracks was caused by the prestressing force of strands in the bottom ï¬ange. Likewise, the collection of cracks on the bottom was caused by the prestressing strands 51
one girder in the project, and there are no repetitions. How- ever, this number is not carried over once the girder leaves the precast plant. Once the girder is in the ï¬eld and placed on a bridge, there is no way to identify its piece mark number and there is no way to get previous information on any specific girder. Therefore, it was impossible to follow a speciï¬c girder from the precast yard to storage and then to the construction site. If a girder was repaired, one would not be able to locate this girder on the bridge to see if the original damage was causing any problems. If a girder on a bridge started to show signs of deteri- oration after years of use, there would be no way to look up that girderâs speciï¬c history to see what kind of cracking, damage, or repair it was subjected to earlier on in its service life. For this reason, the research team recommends giving each individual girder an identiï¬cation number for the entire life of the girder. Although every single girder that was observed experienced end zone cracking, there is no record of these cracks drawn on the inspection sheets. There are records of vertical cracks and shrinkage cracks, but nothing is mentioned about end zone cracks. In their response to the research team, the precast pro- ducer made the following statement: . . . the inspectors do not record end zone cracks unless they exceed acceptable limits. The presence of these cracks is expected, and it would be redundant to mark down the same cracks for every girder, especially if they are inconsequential. The only way these cracks would be reported would be if the inspector felt they were severe enough to be repaired. 52 Figure 3.59. Girder showing end block. (a) Longitudinal Profile (b) Cross Section of the Westbound Side Figure 3.60. I-80 Platte River Bridge, Nebraska. near the top of the girder. This arrangement of prestressing strands in both the top and bottom portions of a girder creates increased stress on the girder end, amplifying the likelihood of increased end zone cracking. The team received inspection documents from Coreslab Structures, Inc. The inspector was looking for any imperfections or damage to the girders. Each individual girder design has its own unique piece mark number. This number identiï¬es each girder in the prestressing plant. Each number belongs to only
3.5.3 Virginia Department of Transportation (VDOT) The research team, jointly with VDOT, selected two bridges on Route 33 and one bridge on Route 614, for inspection. The selected bridges were constructed between 2005 and 2007. Girders of these bridges experienced end zone cracking at strand release. Some of the girders were repaired in the pre- cast yard. The two bridges on Route 33 are located in West Point, Virginia, and they are next to each other. The first bridge is over the Mattaponi River between King William and Queen Counties, and the second bridge is over the Pamunkey River between New Kent and King William Counties. The third bridge is located on Route 614 (Hickory Fork Road) over Carterâs Creek, 1.6 miles west of Route 17, in Gloucester County, Virginia. 3.5.3.1 Bridge on Route 33 over Mattaponi River, West Point, Virginia The bridge consists of 28 spans with 7 girders at 10 ft, 6 in. and two overhangs, 3 ft, 8 in. long each, as shown in Figure 3.62. All girders were lightweight concrete of 120 pcf with a 28-day concrete strength of 8 ksi. Half-inch diameter, 270 ksi, low relaxation pretensioned strands were used in all spans. The eastbound and westbound approaches of the span were made from pretensioned VA 45-in.-deep new bulb tee girders, as shown in Figure 3.63. The spans over the Mattaponi River were made from pretensioned/post-tensioned VA 95-in.-deep new bulb tee girders, as shown in Figure 3.64. The concrete girders were fabricated by Standard Concrete Products (SCP), Inc. of Tampa, Florida, in October 2005. According to the shop inspection reports, end zone cracking was reported in almost of all the girders. End zone cracking in the web ranged from hairline to 0.016 in. at time of release, and some of these cracks grew up to 0.020 in. at time of shipping. For web cracks 0.009 in. and under, the precast producer sprayed on a penetrant sealer all along the crack. Sikagard 701W was used in this project. Web cracks that are 0.010 in. or greater were epoxy injected using the typical epoxy injection procedure given in the PCI Manual for the Evaluation and Repair of Precast, Prestressed Concrete Bridge Products (11). Prime Rez 1100 High Mod LV was used in this project. The bridge was open to trafï¬c in September 2006. The inspection report that was generated by the district engineer at that time stated that âhairline diagonal cracks exist in the web of Spans âj through q.ââ However, the report did not provide any detailed information on crack size, length, or number. The research team inspected the bridge on July 1, 2008, and was looking for signs of distress such as delamination (which was inspected by tapping with a hummer on the girder at the crack and its vicinity) and reinforcement corrosion. End zone cracks were visible in almost all of the girders on the bridge. The crack width ranged from 0.008 to 0.010 in. wide. 53 Figure 3.61. End zone cracks on the Platte River Bridge girders.
Figure 3.64. Girder details of the spans over the Mattaponi River. 54 Figure 3.62. Cross section of the bridge (eastbound and westbound approaches). Figure 3.63. Girder details of the eastbound and westbound approaches.
Efï¬orescence could be seen around some of these cracks. The inspection engineer stated that the efflorescence was re- ported at the time when the bridge was opened to trafï¬c in 2006 and, based on his experience, the amount of efï¬orescence did not increase with time. No signs of reinforcement corro- sion were reported, except in one girder in one of the spans of the eastbound approach, as shown in Figure 3.65. No delami- nation was reported in the girders that were inspected. 3.5.3.2 Bridge on Route 33 over Pamunkey River, West Point, Virginia The bridge consists of 49 spans. Girders of all spans were made of 120 pcf lightweight concrete with a 28-day concrete strength of 8 ksi. Half-inch diameter, 270 ksi, low relaxation strands were used in all spans. The bridge is made of eight VA New BT girders spaced at 9 ft, 6 in. to 11 ft, 6 in., as shown in Figure 3.66. Figures 3.67 and 3.68 show the cross section of 55 Figure 3.65. Web end zone cracking (0.009 in.) show- ing some efflorescence, no delamination, and some signs of corrosion. Figure 3.66. Cross section of the bridge on Route 33 over the Pamunkey River. Figure 3.67. Girder details of the eastbound and westbound approaches.
It was evident that all of the girders have an almost identi- cal pattern of end zone cracking. At each end of the girders, one end zone crack is formed where it extends from the top of the ï¬ange and the member end to the top surface of the bottom ï¬ange, as shown in Figure 3.72. It was evident that efflorescence exists on about 75% of the cracks. Upon inspection, the concrete at the crack and in its vicinity looked very sound with no signs of delamina- tion or reinforcement corrosion. The size of the crack ranges from 0.006 to about 0.009 in., with the majority of the cracks 56 Figure 3.69. Web end zone cracking (0.008 in.) showing no efflorescence, no delamination, no signs of corrosion. Figure 3.68. Girder details of the spans over the Pamunkey River. the girders used on the eastbound and westbound approaches and the spans over Pamunkey River. The bridge was opened to trafï¬c in late 2007. The inspec- tion report that was generated by the district engineer at that time stated that âhairline diagonal cracks exist in the web of Spans âj through q.ââ However, the report did not provide any detailed information on crack size, length, or number. The research team inspected the bridge on July 1, 2008, and was looking for signs of distress such as delamination and reinforcement corrosion. End zone cracks were visible in many exterior and interior girders on the bridge. The crack width ranged from 0.008 to 0.010 in. No efï¬orescence, signs of reinforcement corrosion, or delamination was reported in the inspected girders, as shown in Figure 3.69. 3.5.3.3 Bridge on Route 614 over Carterâs Creek in Gloucester County, Virginia The third Virginia bridge is located on Route 614 (Hickory Fork Road) over Carterâs Creek, 1.6 miles west of Route 17, in Gloucester Co. The bridge consists of 6 spans (82.5 ft each) with one expansion joint at the center pier. The cross section of the bridge consists of 6 girders at 7 ft, 4 in., which support 8-in.-thick cast-in-place concrete slab, as shown in Fig- ure 3.70. All of the girders are 54 in. deep AASHTO Type IV. The bridge crosses over a marsh land with a very humid environment. Also, the bridge has a very low profile that places trees in contact with the bottom flange of most of the spans, as shown in Figure 3.71. The bridge was opened to traffic in 2006.
57 (a) Cross Section of the Bridge (b) Girder Details Figure 3.70. Details of the bridge on Route 614 in Gloucester County, Virginia. Figure 3.72. End zone crack, Span 5, left side, exterior girder, 0.006 to 0.008 in. wide, with efflorescence, no delamination, no reinforcement corrosion. Figure 3.71. View of bridge over Carterâs Creek showing its low profile.
around 0.008 in. wide. The end zone cracks extend for about 30 in. from the face of the member end. No signs of shop repair could be detected by the research team. Although no inspection reports were made available by the precast producer for review by the research team, it was clear that no repair was made to the end zone cracks. 3.5.4 Bridge Field Inspection Conclusions Based on the ï¬eld inspection conducted on ï¬ve bridges in Nebraska and Virginia, the study team made the following conclusions: ⢠Of the ï¬ve bridges inspected in Nebraska and Virginia, four bridges were built over water channels where the ambient air is humid. Field inspection of these bridges did not reveal any signs of reinforcement corrosion or concrete delamination, although end zone cracking had existed at the time of pre- stress release. ⢠Comparing the crack widths at the time of inspection with those documented in the inspection reports revealed no deterioration. ⢠There is no NDOR or VDOT policy that speciï¬cally requires field inspection reports to document end zone bursting cracks, regardless of whether they had been reported in plant inspection reports. Also, there was no consistency in girder identiï¬cation between the producerâs and the ownerâs iden- tiï¬cation systems. Thus, it was difï¬cult for the research team to gain much value from ï¬eld inspection reports. These con- straints reduced the researchersâ effort to recording cracks in the ï¬eld without fully correlating them with cracks at the plant before the girders were shipped. ⢠There was no documentation relative to methods and materials used to repair end zone cracking. 3.6 Manual of Acceptance, Repair, or Rejection Based on the information collected from field inspection in Nebraska and Virginia, and the results of the structural testing of eight full-scale girders, the research team devel- oped Table 3.15 to provide decision criteria for acceptance and repair of web end cracking during production. These criteria were developed based on observation of the results of structural testing of eight full-scale girders and field inspection of five bridges. The investigation shows that ⢠There was no deï¬ciency of shear, bond, or ï¬exural capac- ity attributed to end zone cracking whether the cracks were ï¬lled or not prior to testing. ⢠The epoxy repaired end of one of the Washington girders did not exhibit any improvement in load carrying capacity over the unrepaired end. Thus, if epoxy repair is desirable, it should be intended only to seal the cracks, not to restore tensile capacity of the repaired surface. ⢠No signs of efï¬orescence or corrosion due to web end crack- ing were reported in the inspected Virginia and Nebraska bridges. ⢠No cracks wider that 0.01 in. were observed, even in the cases where end zone reinforcement was extremely light (#4 at 12 in.) and the prestressing force is relatively large (sixty-two 0.6-in. diameter strands). ⢠Most observed crack lengths from this study and from pre- vious reports were limited to about 36 in. End zone cracking is quite different from ï¬exural cracks in conventionally reinforced beams and slabs, and from tensile cracks in water storage structures. Even if one equates these cracks with ï¬exural cracking, the 0.012-in. width is less than the 0.013 in. and 0.016 in. used in early versions of the ACI-318 Building Code for exterior and interior exposures, respectively. It corresponds to the âzâ value of 130 kip/in. that was pre- viously used in AASHTO specifications to indirectly con- trol crack width in environments with severe exposure. Specification of crack width limits and âzâ value limits for flexural design have been dropped from recent editions of the ACI-318 Building Code and from the AASHTO speci- fications. This was done due to evidence that flexural crack- ing, which is normal to the flexural reinforcement, does not correlate to reinforcement corrosion. Thus, it is quite rea- sonable to limit end zone cracking to 0.012 in., without need for any repair. 58 Criterion Crack Width (in.) Action 1 Less than 0.012 No action 2 0.012 to 0.025 Fill the cracks and apply surface sealant to the end 4 ft as recommended in this report 3 0.025 to 0.05 Fill cracks with epoxy and apply surface sealant to the end 4 ft as recommended in this report 4 Greater than 0.05 Reject girder, unless shown by detailed analysis that structural capacity and long-term durability are sufficient Table 3.15. Decision criteria for acceptance and repair of web end cracking during production.
Criterion 1: Crack width less than 0.012 in. Action recommended: No action is recommended. With a crack width this narrow, no repair is required. However, if the owner requires repair, steps for Criterion 2 can be followed. Criterion 2: Crack width 0.012 in. to 0.025 in. Action recommended: Apply cementitious packing materi- als to cracks between 0.012 in. and 0.025 in. Apply surface sealant to the end 4 ft as recommended in this manual. It is recommended that the crack be ï¬lled with a cementitious packing material and covered with a water-resistant surface sealant to keep water contaminated with corrosion-inducing chemicals from reaching the steel inside the girder. The area in question should be cleaned and cleared of any debris such as dirt, dust, grease, oil, or any other foreign material. This will aid in the bonding of the material to the concrete. Cleaning prod- ucts that are corrosive should not be used. It is best that the packing material used to fill the cracks be cementitious, slightly viscous, and easily worked by hand. The material should be rubbed into the cracks either by hand or by brush until the entire outer opening is filled and a surface is created that is even with the original girder web surface. Excess material should be wiped off so the surface remains even. The surface sealant should be water resistant and highly ï¬ow- able. Its application should result in a smooth surface. The sealant should be applied with either a brush or a roller so the side faces of the girder are fully covered. The top face of the girder where it normally is connected with a cast-in-place concrete slab should not be covered with sealant. It is recommended that a minimum length of 4 ft at each end of the girder be covered. Examples of acceptable patching and sealant materials to be used are provided in Section 3.4 of this report. Criterion 3: Crack width 0.025 in. to 0.050 in. Action recommended: Epoxy injection of all cracks larger than 0.025 in. Apply surface sealant to the end 4 ft as recom- mended in this report. For cracks wider than 0.025 in., epoxy injection is recom- mended. It is important that this be performed such that the crack is completely ï¬lled and that the epoxy is effectively bonded to both surfaces of the crack. Cracks of this size in the web gen- erally exist in the full width of the web and appear on both side faces of the member. Injection must be done in accordance with proven practices and epoxy manufacturerâs speciï¬cations. Epoxy pressure should be high enough to fully penetrate the crack depth, yet the pressure should not cause a blow out of the epoxy paste material used to conï¬ne the epoxy. Before injection, the surface and interior of the crack should be cleared of all debris such as dirt, dust, grease, oil, moisture, or any other foreign material without using corrosive chemicals. If loose particles have entered the crack, they can be blown out with ï¬ltered high-pressure air equipment, as long as they do not introduce oil into the ï¬ssure. Water, solvents, or detergents should not be used because they may compromise the ability of the epoxy to bond to the concrete. When applying the epoxy, the crack should first be exam- ined to determine the ideal placement for the injection ports. Port spacing can depend on the crack width and the amount of pressure applied. Professional judgment from an experienced injector should be used. The ports should be at least 8 in. apart. However, if the crack passes through the entire web, the spac- ing should not exceed the thickness of the web. After the ports are installed, the exterior of the cracks are to be sealed with an epoxy paste and allowed to harden. This is to prevent the injected epoxy from leaking out of the crack. With cracks that extend on both sides of the girder, the opposite side of the injection should be sealed as well. If the cracks on each side do not connect, epoxy injection should be performed on each side individually. After conï¬ning the cracked area is completed, the epoxy can be mixed and the injection can begin from the bottom up. Injection should be performed with an epoxy injecting machine. The low- est injection port should be ï¬lled with epoxy ï¬rst until it begins to come out of the next port, which is slightly higher than the ï¬rst port. The used port is to be plugged so the epoxy does not leak out. Then, the process can be repeated until epoxy begins to come out of the next port in line. This process continues until the top port is reached, and the crack is completely ï¬lled. The ï¬nal port should be placed a few inches away from the termination point of the crack, but this remaining portion of the crack should still be ï¬lled with the last injection. Criterion 4: Crack width greater than 0.050 in. Action recommended: Reject girder, unless shown by de- tailed analysis that structural capacity and long-term dura- bility are satisfactory. Cracks exceeding a width of 0.050 in. may be symptomatic of causes beyond the normal effects of bursting forces due to pre- stress release. All aspects of material quality, reinforcement qual- ity and quantity, and production practices must be examined. If a loss of structural capacity were to occur, typical methods of epoxy injection may not be sufï¬cient to measurably return the girder back to its intended strength, especially if cracking causes excessive loss of prestress. 3.7 Improved Crack Control Reinforcement Details for Use in New Girders Most designers follow the provisions of Article 5.10.10.1 of the AASHTO LRFD Bridge Design Specifications (18). However, states with recently introduced I-girder shapes that can accommodate a relatively large amount of prestressing (as many as sixty-eight 0.6-in. diameter strands) have devel- oped supplementary requirements for end zone reinforcement. Factored Bursting Resistance, as given in Article 5.10.10.1 of the AASHTO LRFD (18), indicates that the end reinforcement resistance shall not be less than 4% of the prestressing force at transfer. The end zone reinforcement is designed for 20 ksi allowable stress to control the crack size and is located within h/4 from the end of the girder, where h is total girder depth. The following recommendations offer improvements to the AASHTO provisions, especially for cases with high 59
prestressing levels. Effective and simplified reinforcement detailing is proposed. The following recommendations are based on experience in Nebraska and Washington State where very large amounts of prestressing have been provided on some projects. A re- search project conducted for NDOR resulted in recommen- dations published in a 2004 PCI Journal article (16). Results of this project have shown that the end zone reinforcement closest to the member end is the most stressed and would correspond to the widest crack, as shown in Figure 3.73. Also shown is that the stress in the vertical reinforcement drops sharply at a distance h/8 away from the girder end, with steel beyond the h/2 distance having little influence on cracking. Since the end zone reinforcement is provided to mini- mize the crack width, and not for strength, there is no need to develop the full yield strength beyond the locations of the top and bottom cracks, which are assumed for design to be at the junction between the web and the flanges. The results of this research, along with additional recom- mendations from the Nebraska and Washington producers involved in NCHRP Project 18-14, have been used in the full- scale testing in this project (see Section 3.2 of this report), where these recommendations have been compared with the AASHTO LRFD provisions as well as other local practices in the four states supplying eight full-scale girder specimens. The full-scale testing conï¬rmed that, although the AASHTO LRFD requirements provided acceptable performance in all cases, the proposed details provided better performance. More signiï¬cantly, the proposed details lend themselves to optimal bar detailing with minimized end zone reinforcement conges- tion. The team has found it to be most effective to have a large area of vertical steel as close as possible to the end of the girder, with the steel area gradually diminishing as the distance from the end is increased. The reinforcement must be anchored well enough into the bottom and top flanges to assure no slippage at the design stress level of 30 ksi. The bot- tom ï¬ange must also be conï¬ned with a minimum amount of conï¬nement steel to help resist strand slippage and bound- ary zone cracking. The ï¬ve proposed requirements are as follow: (1) Provide reinforcement in the end (h/8) to resist at least 2% of the prestressing force, using an allowable stress limit of 20 ksi. (2) Provide reinforcement in the end (h/2) to resist at least 4% of the prestressing force, using an allowable stress limit of 20 ksi. The reinforcement in the zone between the h/8 and h/2 sections must not be less than shear reinforcement requirement as stipulated in (3) below. (3) Beyond the (h/2) zone, provide reinforcement to meet shear requirements at the nearest critical section. (4) Determine the bar anchorage into the ï¬anges for a max- imum stress of 30 ksi. (5) Conï¬ne the strands in the bottom ï¬ange with at least the equivalent of #3 bars at 3-in. spacing for a distance equal to at least 60 strand diameters. The #3 bars must totally enclose the bottom ï¬ange strands. Welded wire reinforce- 60 0.0 5.0 10.0 15.0 20.0 25.0 0.000 0.5000.125 1.1250.250 0.7500.375 0.625 0.875 1.000 1.250 Distance from the Beam End/Girder Height (z/h) D es ig n St ee l S tre ss (k si) h/4h/4h/8h/8 14.8 ksi 10.7 ksi 6.9 ksi 4.0 2.8 h/4 8.3 ksi 5.1 ksi fs = 2.4/(z/h + 0.1) Source: Reprinted with permission from Tuan, C.Y., Yehia, S.A., Jongpitaksseel, N., and Tadros, M.K., âEnd Zone Reinforcement for Pretensioned Concrete Girders,â PCIJournal, Vol. 49, No. 3, May-June (2004), Figure 15. Figure 3.73. Average measured stress in end zone reinforcement versus distance from the member end.
ment (WWR) of the same area per unit length may be used to substitute for the #3 bars. The same amount of conï¬nement steel must be provided at the bonded ends of all debonded strand groups. Appendix G provides two examples for the design of end zone reinforcement using the AASHTO LRFD speciï¬cations and the proposed requirements. 3.8 Proposed Revisions to the AASHTO LRFD Bridge Design Specifications The research team proposes the following changes to Arti- cle 5.10.10 of the AASHTO LRFD Bridge Design Speciï¬ca- tions (18). Table 3.16 presents Article 5.10.10.1, with additions underlined, and deletions struck through. 61 5.10.10.1 Factored Bursting Resistance The bursting resistance of pretensioned anchorage zones provided by vertical reinforcement in the ends of pretensioned beams at the service limit state shall be taken as: Pr = fs As (5.10.10.1-1) where: fs = stress in steel not exceeding 20 ksi As = total area of vertical reinforcement located within the distance from the end of the beam (in.2) h = overall depth of precast member (in.) The resistance shall not be less than 4 percent of the prestressing force at transfer. The end vertical reinforcement shall be as close to the end of the beam as practicable. Vertical reinforcement located within the distance from the end of the beam shall be provided to resist at least 2 percent of the prestressing force at transfer. Also, the total amount of vertical reinforcement located within the distance h/2 from the end of the beam shall be provided to resist at least 4 percent of the prestressing force. The reinforcement in the end h/2 shall be not less than that required for shear resistance. Crack control reinforcement shall be anchored beyond the anticipated extreme top and bottom cracks, an embedment adequate to develop at least a stress = 30 ksi. C5.10.10.1 This provision is roughly equivalent to the provisions of Section 9.22.1 in AASHTO Standard Specifications (1996). Results of tests conducted by the Florida Department of Transportation were taken into account. Additional research by Tuan et al. (PCI Journal, 2004) and Tadros et al. (NCHRP 18-14, 2009) shows that distribution of the 4% reinforcement such that at least one half of that reinforcement is concentrated in the end h/8 of the member while the balance of the 4% is distributed over a distance from h/8 to h/2 provides for arrest of the cracking at the member end and for well distributed cracks in the balance of the end zone. Since the crack control reinforcement is required to minimize the crack width, and not for strength, there is no need to develop the full yield strength beyond the locations of the top and bottom cracks, which are assumed for design to be at the junction between the web and the flanges. The bar anchorage into the flanges should be designed for a maximum stress of 30 ksi which was found (NCHRP 18-14, 2009) to be conservative. 5.10.10.2 Confinement Reinforcement For the distance of 1.5d at least 60 strand diameters from the end of the beams, other than box beams, reinforcement shall be placed to confine the prestressing steel in the bottom flange. The reinforcement shall not be less than No. 3 deformed bars, with spacing not exceeding 6.0 3.0 in. and shaped to totally enclose the strands. The same amount of confinement steel must be provided at the bonded end of all debonded strand groups. For box beams, transverse reinforcement shall be provided and anchored by extending the leg of stirrup into the web of the girder. C5.10.10.2 Welded wire reinforcement (WWR) of the same area per unit length may be used to substitute for the #3 bars. Add the following references to the list of references of Section 5: Tuan, C., Yehia, S., Jongpitakseel, N., and Tadros, M., âEnd Zone Reinforcement for Pretensioned Concrete Girders,â PCI Journal, Vol. 49, No. 3, May-June 2004, pp. 68-82. Tadros, M.K., Badie, S.S., and Tuan, C., âEvaluation and Repair Procedures for Precast/Prestressed Concrete Girders with Longitudinal Cracking in the Web,â NCHRP 18-14, Contractorâs Final Report, November 2009 (published as NCHRP Report 654). Table 3.16. Proposed changes to Article 5.10.10.1 of the AASHTO LRFD specifications.
