


Below is the uncorrected machine-read text of this chapter, intended to provide our own search engines and external engines with highly rich, chapter-representative searchable text of each book. Because it is UNCORRECTED material, please consider the following text as a useful but insufficient proxy for the authoritative book pages.
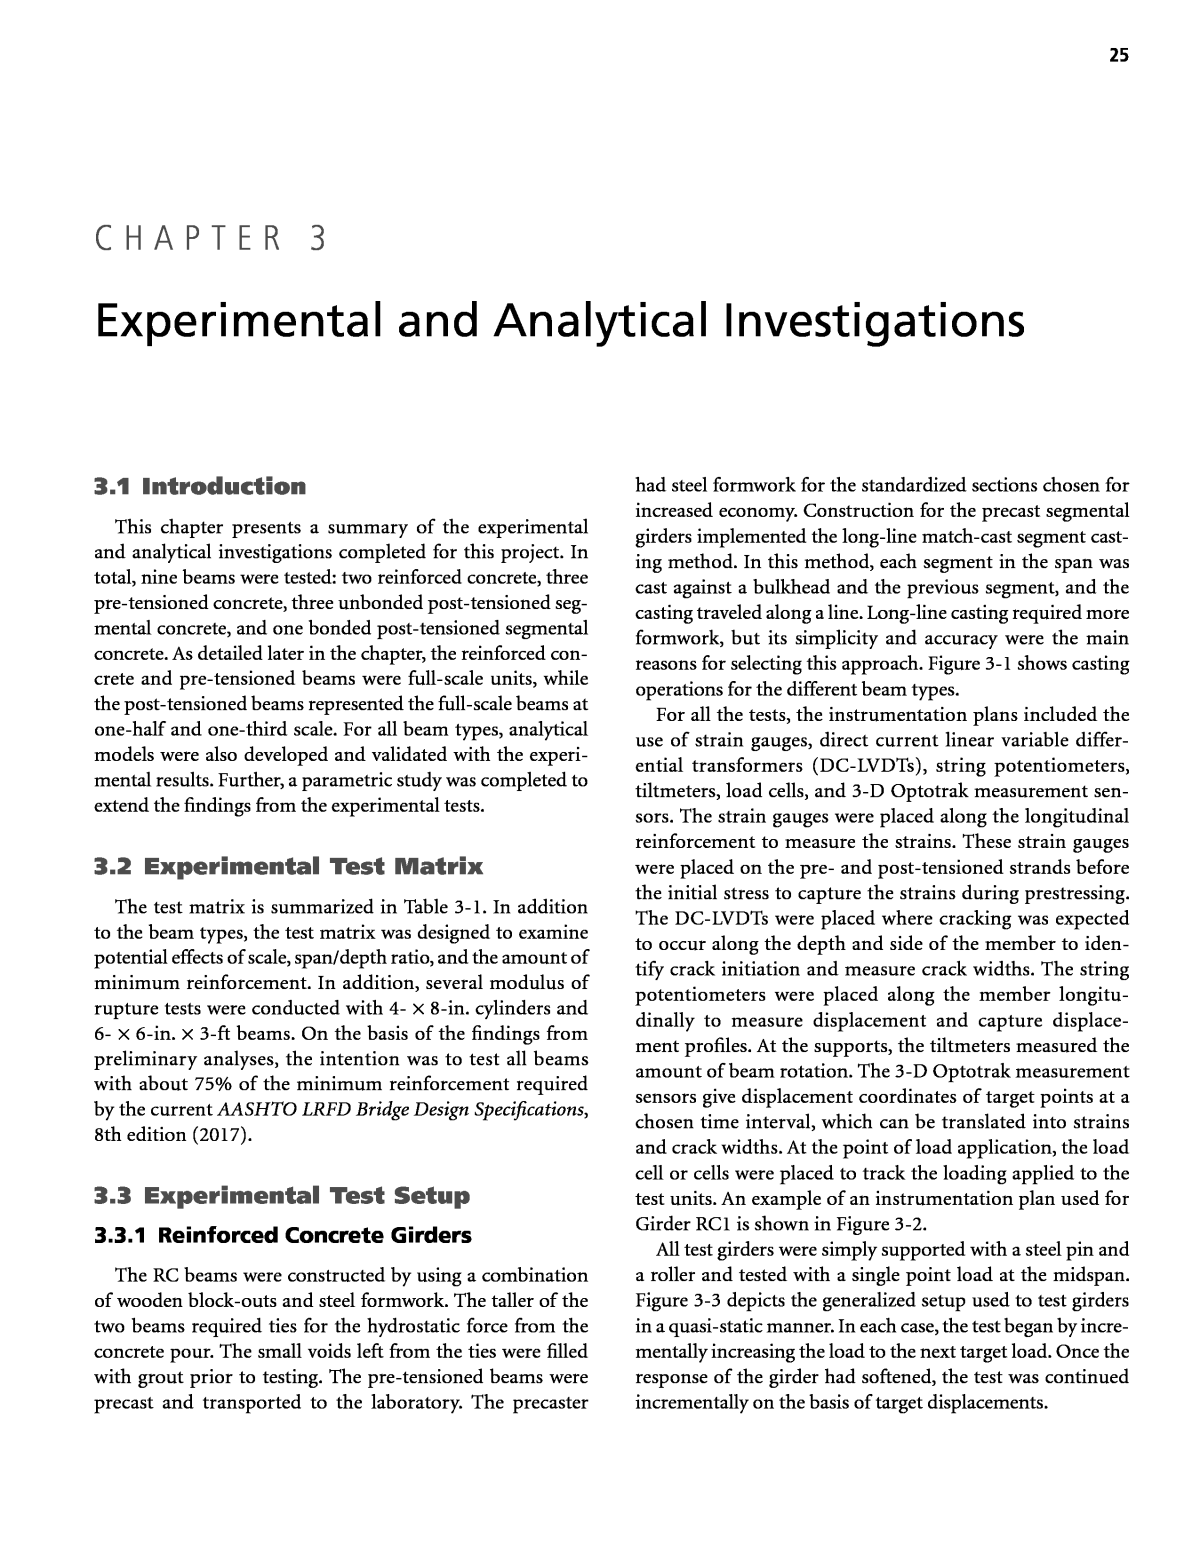
25 3.1 Introduction This chapter presents a summary of the experimental and analytical investigations completed for this project. In total, nine beams were tested: two reinforced concrete, three pre-tensioned concrete, three unbonded post-tensioned seg- mental concrete, and one bonded post-tensioned segmental concrete. As detailed later in the chapter, the reinforced con- crete and pre-tensioned beams were full-scale units, while the post-tensioned beams represented the full-scale beams at one-half and one-third scale. For all beam types, analytical models were also developed and validated with the experi- mental results. Further, a parametric study was completed to extend the findings from the experimental tests. 3.2 Experimental Test Matrix The test matrix is summarized in Table 3-1. In addition to the beam types, the test matrix was designed to examine potential effects of scale, span/depth ratio, and the amount of minimum reinforcement. In addition, several modulus of rupture tests were conducted with 4- Ã 8-in. cylinders and 6- Ã 6-in. Ã 3-ft beams. On the basis of the findings from preliminary analyses, the intention was to test all beams with about 75% of the minimum reinforcement required by the current AASHTO LRFD Bridge Design Specifications, 8th edition (2017). 3.3 Experimental Test Setup 3.3.1 Reinforced Concrete Girders The RC beams were constructed by using a combination of wooden block-outs and steel formwork. The taller of the two beams required ties for the hydrostatic force from the concrete pour. The small voids left from the ties were filled with grout prior to testing. The pre-tensioned beams were precast and transported to the laboratory. The precaster had steel formwork for the standardized sections chosen for increased economy. Construction for the precast segmental girders implemented the long-line match-cast segment cast- ing method. In this method, each segment in the span was cast against a bulkhead and the previous segment, and the casting traveled along a line. Long-line casting required more formwork, but its simplicity and accuracy were the main reasons for selecting this approach. Figure 3-1 shows casting operations for the different beam types. For all the tests, the instrumentation plans included the use of strain gauges, direct current linear variable differ- ential transformers (DC-LVDTs), string potentiometers, tiltmeters, load cells, and 3-D Optotrak measurement sen- sors. The strain gauges were placed along the longitudinal reinforcement to measure the strains. These strain gauges were placed on the pre- and post-tensioned strands before the initial stress to capture the strains during prestressing. The DC-LVDTs were placed where cracking was expected to occur along the depth and side of the member to iden- tify crack initiation and measure crack widths. The string potentiometers were placed along the member longitu- dinally to measure displacement and capture displace- ment profiles. At the supports, the tiltmeters measured the amount of beam rotation. The 3-D Optotrak measurement sensors give displacement coordinates of target points at a chosen time interval, which can be translated into strains and crack widths. At the point of load application, the load cell or cells were placed to track the loading applied to the test units. An example of an instrumentation plan used for Girder RC1 is shown in Figure 3-2. All test girders were simply supported with a steel pin and a roller and tested with a single point load at the midspan. Figure 3-3 depicts the generalized setup used to test girders in a quasi-static manner. In each case, the test began by incre- mentally increasing the load to the next target load. Once the response of the girder had softened, the test was continued incrementally on the basis of target displacements. C H A P T E R 3 Experimental and Analytical Investigations
26 The reinforced concrete girders, RC1 and RC2, were con- structed in the Structural Engineering Laboratory at Iowa State University. After the rebar cage was completed, as shown in Figure 3-4, the formwork was constructed. The formwork was built so that it could be used to cast both of the RC beams, thus minimizing the work and time between pours. Wooden forms were required to achieve the desired shape where the flange intersected with the web, as shown in Figure 3-5. Because Girders RC1 and RC2 were designed with similar cross sections, the wooden forms were reused for the construction of Girder RC2. Atop the wooden forms, metal formwork was placed to reach the full height of the web for Girder RC1, which can be seen in Figure 3-6. To adequately provide resistance to the hydrostatic pressure from wet con- crete, support frames were built using 2 Ã 4 wood studs and placed along the length of the beams. The ends and tops of the formwork were reinforced with yokes, which functioned as ties, and can be seen in Figure 3-7. Table 3-2 presents the reinforced concrete girders tested, where the percentage of minimum flexural reinforcement represents the amount of Section ID Depth (without deck) Span Length (ft) Span/Depth Ratio Targeta (ksi) Targeta design Reinforced Concrete 5Girder RC1 4 ft 0 in. 32 8 75% AASHTO Minimuma Girder RC2 2 ft 6 in. 20 8 Bonded Pre-tensioned Girder BTE70 5 ft 3in. 70 13.33 Girder BTC60 3 ft 9 in. 60 16 Girder A34 2 ft 8 in. 34.17 12.81 Unbonded Post-tensioned 6 Girder UNB1 3 ft 0 in. 66 22 Girder UNB2 3 ft 0 in. 54 18 Girder UNB3 4 ft 6 in. 54 12 Bonded Post-tensioned Girder BON2 4 ft 6 in. 54 12 aActual values varied, as discussed in subsequent sections. Table 3-1. Experimental test matrix. Figure 3-1. Casting operations for the RC (left), pre-tensioned (center), and segmental girders (right).
27 Figure 3-2. External instrumentation layout used for Girder RC1. L/2 L/2 Figure 3-3. General test setup used for all girders. Figure 3-4. Assembled reinforcement cage for Girder RC1. Figure 3-5. Bottom flange of Girder RC1 rebar cage with one side of the side formwork attached. reinforcement in the girder with respect to the minimum flexural reinforcement requirement according to AASHTO. After the formwork was successfully stripped off the girders, Girders RC1 and RC2 were white washed, set on supports, and instrumented. The loading frame and actuator setup as used are shown in Figure 3-8. This frame was designed to have capacity well beyond that of the test girders. The actuator, which can be seen in the figure, is an SPX Power
28 Metal Formwork Wooden Block-out Figure 3-6. Girder RC1 metal formwork rests on the wooden block-out. Top Yoke Bottom Yokes Figure 3-7. Girder RC2 formwork with top and bottom yokes to resist hydrostatic pressure. Percentage of Minimum Flexural Reinforcement Reinforcement Girder f'c,design (%) f'c,experimental (%) Size Quantity RC1 82.2 74.6 #5, #3 5, 2 RC2 77.1 82.4 #5, #3 3, 2 Table 3-2. Summary of reinforced concrete test girders. Girder RC1 Loading Frame Actuator Figure 3-8. Setup used for testing Girder RC1. Team RD10020 Double Acting Push/Pull Cylinders with a 100-ton capacity and a total stroke of 201â8 in. The reinforced concrete girders were instrumented with strain gauges and mounted to the longitudinal and transverse reinforcement, as shown in Figure 3-9. A total of 11 strain gauges placed on the longitudinal main rebars and three other strain gauges were mounted to a stirrup near the mid- span. The locations of the strain gauge used with Girders RC1 and RC2 are shown in Figure 3-10. Strain Gauges Figure 3-9. Strain gauges applied on the reinforcement of Girder RC1.
29 (a) (b) Figure 3-10. Strain gauge locations for Girders (a) RC1 and (b) RC2. Figure 3-11. Optotrak sensors on the north face of Girder RC1. All measurement recordings throughout the entire test were taken at a minimum sampling rate of 5 Hz, so that the cracking limit state, yield limit state, and overstrength limit state could be accurately defined. Figure 3-11 shows the Optotrak sensors on the north face, and Figure 3-12 shows some DC-LVDTs and a tiltmeter on the south face of a girder. To ensure adequate quantification of the performance of the reinforced concrete girders, both concrete samples and steel reinforcement coupons were tested under uniaxial loads. Typically, three units were tested, and average values of the key material properties were determined unless there was sig- nificant variation among the measured properties. Figure 3-13 shows a uniaxial tensile test response of size #5 and #3 reinforcing bars. The #5 bar (i.e., the main longi- tudinal reinforcement) did not show a clearly defined yield point. The yield strength was therefore determined by using a 0.2% offset strain, which produced a value of 68.61 ksi. For the #3 bar, the yield strength was 71.55 ksi. Table 3-3 sum- marizes the key properties established for the longitudinal
30 reinforcing bars on the basis of the coupon testing at a strain rate of 0.2 in./in./min. Concrete strengths for Girders RC1 and RC2 were evalu- ated periodically. While the specified strength of the con- crete mix was 5,000 psi, the concrete strength data showed a gradual increase in concrete strength, as seen in Table 3-4 and Figure 3-14. In addition, 4- by 8-in. cylinders were cored from Girder RC2 following the test and further compression tests were completed. 3.3.2 Pre-tensioned Concrete Girders The pre-tensioned concrete girders were designed to target a net tensile strain of approximately 50 me. In most cases, this equated to about 75% of the minimum amount of reinforce- ment required by the AASHTO LRFD code (AASHTO 2017). The selected target percentage of the minimum amount of reinforcement required was 75% because the overstrength moment ratios of most cases studied were close to 1, and yet the girders exhibited sufficient ductile behavior. Three pre- tensioned concrete girders were designed and identified as A34, BTC60, and BTE70. These girders had standard Iowa bulb-tee sections at full scale with bonded pre-tensioned strands. A summary of strands used in the pre-tensioned test girders is presented in Table 3-5. The pre-tensioned concrete girdersâA34, BTC60, and BTE70âwere constructed at Coreslab Structures in Omaha, Figure 3-12. DC-LVDTs placed on the south face of Girder RC1. 0 20,000 40,000 60,000 80,000 100,000 120,000 - 0.02 0.04 0.06 0.08 0.10 0.12 St re ss (p si) Strain (in./in.) #5 Rebar #3 Rebar Figure 3-13. Stressâstrain diagram for #5 and #3 rebars. Bar Size fy avg. (ksi) fu avg. (ksi) Modulus of Elasticity, E (ksi) #3 71.55 103.3 29,234 #5 68.61 106.2 28,264 Note: fy = yield stress; fu = ultimate stress; E = modulus of elasticity; avg. = average. Table 3-3. Steel reinforcement material properties.
31 Age (days) Compressive Stress (psi) Modulus of Rupture Stress (psi) Splitting Stress (psi) (ksi) Girder RC1 3 2,821 7 3,716 14 4,058 28 4,492 Test day (50)a 4,691 Core (65) 6,108 588 0.237 Girder RC2 3 2,531 7 3,257 14 4,014 434 0.217 28 4,047 543 0.270 Test day (64) 4,241 599 0.291 Core (84) 4,348 536 0.257 Note: Shading = not available. aBased on one cylinder, owing to unexpected damage to other samples. Table 3-4. Measured concrete material properties for Girders RC1 and RC2. 0 1000 2000 3000 4000 5000 6000 7000 0 10 20 30 40 50 60 70 80 90 Co m pr es siv e St re ng th (p si) Concrete Age (Day) Girder RC1 Girder RC2 Cores Girder RC1 Cores Best Fit (Girder RC1) Girder RC2 Best Fit (Girder RC2) Figure 3-14. Compressive strength versus time. Percentage of Minimum Flexural Reinforcement Strands Girder f'c,design (%) f'c,experimental (%) Diameter (in.) Quantity fpi (ksi) A34 108.1 101.5 0.6 5 199 BTC60 61.6 55.1 0.6 8 196 BTE70 57.7 50.1 0.6 9 196 Table 3-5. Summary of pre-tensioned test girders.
32 Nebraska. They were then transported to the Structural Engi- neering Laboratory at Iowa State University, and a deck was constructed over a length in the midspan region of each girder where flexural cracking was expected to form. This measure was taken primarily to minimize the cost of the test girders. Prior to testing of the girders, it was confirmed that the concrete strength of the partial deck had reached 4 ksi. The girders were instrumented with strain gauges mounted to the longitudinal pre-tensioned strand. The strain gauge locations used in all three girders are shown in Figure 3-15, Figure 3-16, and Figure 3-17, respectively. The transverse reinforcement, strain gauges, and the formwork for Girder BTC60 can be seen in Figure 3-18. In addition, the girders were also externally instrumented with displacement trans- ducers, string potentiometers, tiltmeters, and a dense array of 3-D Optotrak measurement sensors in the critical region. External instrumentation plans for the pre-tensioned girders are presented in Figure 3-19, Figure 3-20, and Figure 3-21. To apply the quasi-static load to the test girders, two high- strength steel rods passing through small voids in the deck were used to load the beam as depicted in the test setups in Figure 3-22, Figure 3-23, and Figure 3-24 for Girders A34, BTC60, and BTE70, respectively. This loading approach was preferred, as it was expected to increase the stability of girders during testing. Directly under the rods, load cells were placed to monitor the applied load. Then a spreader beam was placed underneath the load cells. Finally, a thick neoprene pad was positioned between the spreader beam and the surface of the deck as a contact area for loading the structure. To ensure adequate quantification of the performance of the pre-tensioned concrete girders, both concrete samples and steel strand coupons were tested. Figure 3-25 shows a uniaxial tensile test response of the strands used in the pre-tensioned girder specimens. As expected, the tendons did not show a clearly defined yield point. The yield strength was therefore determined by using a 0.2% offset strain, which produced a value of 263.1 ksi. The key properties established for the longitudinal strands from coupon testing are as follows: Eps = 28,600 ksi fpy = 263.1 ksi fpu = 288.6 ksi eu = 0.0438 in./in. After the casting of test girders with a specified strength of 6,000 psi at 28 days, concrete strengths were evaluated peri- odically. The progression in the gain of compressive strength is reported in Table 3-6 and shown graphically in Figure 3-26. 1 32 Figure 3-15. Strain gauge locations used in Girder A34.
33 1 2 3 4 5 6 7 8 9 Figure 3-16. Strain gauge locations used in Girder BTC60. 1 2 3 4 5 6 7 8 9 10 11 Figure 3-17. Strain gauge locations used in Girder BTE70.
34 Strain Gauges Figure 3-18. Strain gauges as mounted to prestressed strand in Girder BTC60. Figure 3-19. External instrumentation used for Girder A34. 3.3.3 Post-tensioned Segmental Concrete Girders For the construction of the segmental girders, bids were solicited from precast manufacturers twice. In both occa- sions, the cost estimates were significantly higher than was allocated in the project. Therefore, with permission from the NCHRP program officer and the panel, construction of the segmental girders was completed in-house at Iowa State University by the project team. The long-line approach was used to cast the segments. Table 3-7 presents the strand information for the segmen- tal post-tensioned girders. These units were designed at full scale with a 9-ft-deep girder section, and the testing was done at one-third (Girders UNB1 and UNB2) and one-half scale (Girders UNB3 and BON2). In all cases, the minimum reinforcement was found at full scale. However, the minimum reinforcement solution did not converge for Girders UNB1 and UNB2 when they were reevaluated at test scale (ÏMn/Mcr < 1, regardless of the amount of prestressed steel added); this was the result of modifications made to the test unit to keep the form- work and construction cost effective. Therefore, Girder UNB1 was tested with lower and Girder UNB2 with higher than the required min imum reinforcement at full scale according to the AASHTO LRFD Bridge Design Specifications (2017). Compari- son of the responses of Girders UNB1 and UNB2 with each other and both responses with that produced by Girder UNB3 would reveal whether the use of Leonhardtâs method for designing minimum reinforcement is appropriate when the minimum reinforcement requirement set by the code does not converge. Use of Leonhardtâs method to overcome convergence issues is believed to be the common practice in the industry. When the segmental beams were being cast, a segment was left in place after it was cast so that the next pour could be match cast against the end of the previous segment. Match casting was employed to ensure the segmentsâ joints would be properly placed together when they were epoxied, as is done in practice. Once all segments of the girder were match cast, the segments were positioned on temporary shoring, as shown in Figure 3-27, prior to being joined with a thin epoxy layer and temporary post-tensioning. Afterward, the strands
Figure 3-20. External instrumentation used for Girder BTC60. Figure 3-21. External instrumentation used for Girder BTE70. ActuatorsLoad Cell Spreader Beam Steel Rod Figure 3-22. Testing of Girder A34. ActuatorLoad Cell Spreader Beam Steel Rod Neoprene Pad Figure 3-23. Testing of Girder BTC60.
36 screwed into the steel base to sufficiently counteract the shear and uplift forces from the wet concrete. The wooden form- work was also placed against the side steel formwork, which was bolted to the base through a series of angles attached to the formwork base. The completed end block formwork is shown in Figure 3-30. The end block reinforcing steel was tied, and the appropriate ducts were used to run the pre- stressing cables. The reinforcement for the end block, shown in Figure 3-31, was much more congested than in a typical segment, shown in Figure 3-32, as it included reinforcement needed for anchoring the prestressing tendons. Also shown in Figure 3-32 is the pipe brace, which was used to provide a horizontal support to the formwork during pouring of con- crete. Chairs and bolsters were used to ensure sufficient clear cover for the reinforcement. Alignment and shear keys were secured to the steel bulkhead, and the bulkhead was moved down the line after each subsequent pour. These attachments created the keys seen in Figure 3-33. Along with form release agent, debonding agent was applied to the hardened segment to inhibit the bond between the concrete surfaces. Some refinements to the initial construction procedures were undertaken along the way to ensure quality of con- struction. These included increased curing time for the seg- ments from a 24-hour cycle to a 48-hour cycle. Additional refinements to the alignment and shear keys were made to minimize any spalling around the keys when the match cast segments were broken apart. ActuatorLoad Cell Spreader Beam Steel Rod Figure 3-24. Testing of Girder BTE70. 0 50,000 100,000 150,000 200,000 250,000 300,000 350,000 0.0000 0.0100 0.0200 0.0300 0.0400 0.0500 St re ss (p si) Strain (in./in.) Prestressed Tendon Average 0.2% Offset Figure 3-25. Stressâstrain diagram for the prestressing tendons. were placed, anchored, and stressed prior to the removal of the temporary shoring. Removal of the temporary shoring is presented in Figure 3-28. For the construction of Girder UNB1, a steel platform was set and leveled on concrete blocks to provide access under- neath the steel forms. A general view of how each segment was cast on the leveled formwork base is shown in Figure 3-29. After the platform was leveled, the steel bulkhead was posi- tioned. Wooden block-outs that formed the section were
37 Girder Age (days) Compressive Stress, f c (psi) Modulus of Rupture Strength, fr (psi) Splitting Stress, fsp (psi) (ksi) (ksi) A34 3 4,703 7 4,848 14 5,439 28 6,492 650 0.255 35 6,676 637 0.247 A34 Deck 7 4,858 BTC60 2 5,119 7 6,170 34 7,033 58 7,300 608 466 0.225 0.172 62 7,422 480 0.176 BTC60 Deck 8 4,808 BTE70 1 5,499 7 5,754 29 6,910 99 7,677 100 7,879 689 625 0.245 0.223 BTE70 Deck 15 4,840 504 0.229 Note: Shading = not available. fr f â²c fsp f â²c Table 3-6. Measured properties of concrete materials for pre-tensioned girders. 0 1000 2000 3000 4000 5000 6000 7000 8000 9000 0 20 40 60 80 100 Co m pr es siv e St re ng th (p si) Concrete Age (Days) Best Fit (Girder A34) Girder A34 Best Fit (Girder BTC60) Girder BTC60 Best Fit (Girder BTE70) Girder BTE70 Figure 3-26. Increase in concrete compressive strength with time for the pre-tensioned girders.
38 Percentage of Minimum Flexural Reinforcement Strands Girder f'c,design (%) f'c,experimental (%) Diameter (in.) Quantity fpi (ksi) UNB1 81.0 66.4 0.6 10 202.5 UNB2 130.9 115.9 0.6 14 202.5 UNB3 73.8 59.3 0.5 18 202.5 BON2 56.3 47.8 0.5 12 202.5 Table 3-7. Summary of segmental post-tensioned test girders. Figure 3-27. Elevation view of temporary shoring of segmental girders (courtesy of EFCO). Figure 3-28. Segment shoring and removal after final stressing (courtesy of EFCO). Formwork Base Cast Segments Bulkhead Figure 3-29. Cast segments on formwork base. Figure 3-30. Completed formwork of an end segment. Figure 3-31. Reinforcement cage of an end segment.
39 Wooden Block-out Bulkhead Match Cast Pipe Brace Figure 3-32. Typical segment formwork and reinforcement. Shear Keys Alignment Keys Figure 3-33. Shear and alignment keys. Prior to application of the epoxy, the shear key surfaces of each segment were prepared by pressure washing each face at 3,500 psi according to the epoxy specifications. After different options were investigated, a slow set epoxy suitable for a tem- perature range of 55°Fâ75°F temperature range was selected. To ensure suitability, a tension test of the concrete cylinders connected with the slow-set epoxy was completed. The result of the tests was a fracture within the concrete, as shown in Figure 3-34, not within the epoxy layer or at the concrete- to-epoxy layer interface, which justified the suitability of the chosen epoxy. The epoxy process began at the midspan section with the intention of moving outwards. The section at the midspan was first secured in place utilizing vertical rods placed through voids in the top flange to ensure proper placement on the temporary shoring. Each concrete face was then smeared with approximately a 1â16-in. layer of epoxy, totaling to 1â8 in. of epoxy within each joint, in accordance with FHWA stan- dards (FHWA 2013). A temporary prestressing force to gener- ate a stress of 0.04 ksi across the joint was applied, as shown in Figure 3-35, in accordance with AASHTO Specification Arti- cle 5.12.5.4.2 for post-tensioning. The connected segments of the beam were cured for a minimum of 48 hours before the force was removed, and the next segments were set in place on the temporary shoring to repeat the process. Figure 3-36 shows an epoxy joint after the curing process. Figure 3-34. Tension test failure of concrete cylinders connected with epoxy.
40 Figure 3-35. Application of temporary post-tensioning. Figure 3-36. Joint interfaces after application of the temporary post-tensioning. Figure 3-37. Girder BON2 grout input valve. Actuator Load Cell Spreader Beam Figure 3-38. Test setup for segmental girders. Once the epoxy within all joints reached the minimum target strength of 6 ksi, the steel tendons, composed of either 0.5- or 0.6-in.-diameter strands, were placed. The tendons were stressed to 75% of fpu, where fpu was the specified ultimate strength of 270 ksi. Following the post-tensioning, the end supports were put into place and the temporary shoring under the girder was removed. Girder BON2 required an additional step, in which the internal duct containing the post-tensioned tendon was grouted. The grout was pumped from one end of the girder to the other, with an additional outlet located near the midspan of the girder to ensure proper grout flow. Figure 3-37 shows inlet and outlet valve ports utilized for grouting. Grout flow- ing out of the opposite end, as well as the built-up pressure following closure of all outlet valves, ensured proper grouting of the tendon in Girder BON2. The segmental girders were tested with a setup similar to that used for the pre-tensioned girders. Voids were cast into the top flange of the center segment to allow loading rods to pass through it. The segmental girders were also loaded mono- tonically in a quasi-static manner until failure. To apply the load to the test girders, two high-strength steel rods passing through the top and bottom flange were used, as shown for Girder UNB3 in Figure 3-38. The remaining setup followed that used for the pre-tensioned girders. The instrumentation for the segmental girders was some- what altered from that used for the pre-tensioned girders, in order to capture the behavior at the segmental joints. In addi- tion, strain gauges were placed along the length of the ten- dons, and the Optotrak was used to capture the critical joint openings and vertical slip between segments near the midspan region. Additionally, tiltmeters were placed above the sup- ports and at the midspan. More details of the instrumentation for Girders UNB1, UNB2, UNB3, and BON2 are given in Fig- ure 3-39, Figure 3-40, Figure 3-41, and Figure 3-42, respectively.
Figure 3-39. External instrumentation used for Girder UNB1.
Figure 3-40. External instrumentation used for Girder UNB2.
Figure 3-41. External instrumentation used for Girder UNB3.
Figure 3-42. External instrumentation used for Girder BON2.
45 cells at the anchorage ends. The internal tendons required strain gauges to be secured to the strand before the strand was fed through the girder, and strain gauges for the external ten- dons were on both sides of the web. The internal tendons had strain gauges applied by measuring and marking the loca- tions before entry into the duct. A protective coat of poly- urethane and tape was applied over the strain gauges. The external tendons had strain gauges applied before the initial prestressing, in order to record the increase in strain from the jacking stress. To obtain the engineering material properties, both con- crete and steel strand coupons were tested for each girder. Concrete testing was mainly done for the critical sections near the midspan. Because the casting of the test girders used self-consolidating concrete with a specified strength of 6,000 psi at 28 days, concrete compressive strengths ( fcâ²) were evaluated periodically over the 28-day period after casting, as well as on the day of testing. Tables 3-8 to 3-11 report the concrete compressive strengths evaluated over the period described above as well as measured rupture strengths for the middle three segments of all girders. Figure 3-45 and Figure 3-46 present uniaxial tensile test responses of 3-ft-long coupons of a 0.6-in.-diameter strand used in Girders UNB1 and UNB2 and a 0.5-in.-diameter strand used in Girders BON2 and UNB3, respectively. The yield strength was determined by using a 0.2% offset strain. The averaged properties of the strand material were as follows: Material properties of 0.6-in.-diameter prestressing strand: Eps = 31,100 ksi fpy = 251 ksi fpu = 277.4 ksi eu = 0.046 in./in. Strain Gauge Additionally, strain gauges were mounted to the mild rein- forcement within the midspan segment on all girders, as detailed in Figure 3-43 and Figure 3-44. There were differences in the instrumentation used for the externally unbonded and internally bonded prestressed segmental girders. The post-tensioning of Girders UNB1 and UNB2 was monitored by using load cells at each end of the beam. For Girders UNB3 and BON2, the prestressing tendon diameter exceeded that of the load cell; thus, strain gauges mounted on the tendon were used to monitor post-tensioning. At locations where the external initial tendon force did not exceed the load cell capacity, it was monitored by using load Figure 3-43. Midspan segment longitudinal instrumentation. Figure 3-44. Midspan segment transverse instrumentation.
Age (days) Compressive Strength, f'c (psi) Modulus of Rupture Strength, fr (psi) Splitting Strength, fsp (psi) (ksi) (ksi) Segment 9 1 2,401 7 5,241 14 6,345 28 7,689 134 (TD) 9,102 Segment 10 1 2,344 7 5,729 14 7,291 28 8,546 130 (TD) 9,538 1,251 857.7 0.405 0.278 Segment 11 1 1,867 7 5,332 14 6,977 28 8,870 126 (TD) 9,468 Note: TD = test day; shading = not available. fr f â²c fsp f â²c Table 3-8. Measured material properties for midspan segments of Girder UNB1. Age (days) Compressive Strength, f'c (psi) Modulus of Rupture Strength, fr (psi) Splitting Strength, fsp (psi) (ksi) (ksi) Segment 7 1 2,074 7 4,572 14 6,142 28 7,185 123 (TD) 8,665 1,328 845 0.451 0.287 Segment 8 1 1,446 7 4,462 14 5,662 28 7,318 119 (TD) 7,830 1,367 739 0.489 0.264 Segment 9 1 1,525 7 5,123 14 6,074 28 7,145 117 (TD) 8,477 1,334 822 0.458 0.282 Note: TD = test day; shading = not available. fr f cÌ fsp f cÌ Table 3-9. Measured material properties for midspan segments of Girder UNB2.
Age (days) Compressive Strength, f'c (psi) Modulus of Rupture Strength, fr (psi) Splitting Strength, fsp (psi) (ksi) (ksi) Segment 5 1 1,230 7 4,927 14 6,109 28 6,562 150 (TD) 8,807 1,329 727 0.448 0.245 Segment 6 1 1,186 7 4,279 14 6,029 28 6,432 141 (TD) 8,444 1,160 794.9 0.399 0.274 Segment 7 1 1,267 7 5,672 14 7,379 28 8,430 139 (TD) 9,633 1,293 881.9 0.416 0.284 Note: TD = test day; shading = not available. fr f â²c fsp f â²c Table 3-10. Measured material properties for midspan segments of Girder BON2. Age (days) Compressive Strength, f'c (psi) Modulus of Rupture Strength, fr (psi) Splitting Strength, fsp (psi) (ksi) (ksi) Segment 5 1 1,605 7 5,793 14 7,191 28 8,278 105 (TD) 9,631 1,416 839 0.456 0.270 Segment 6 1 1,051 7 5,779 14 6,967 28 8,404 102 (TD) 9,501 1,237 809.5 0.401 0.262 Segment 7 1 872 7 5,190 14 6,231 28 8,033 98 (TD) 8,844 1,383 739.5 0.465 0.249 Note: TD = test day; shading = not available. fr f â²c fsp f â²c Table 3-11. Measured material properties for midspan segments of Girder UNB3.
48 0 50,000 100,000 150,000 200,000 250,000 300,000 0 0.01 0.02 0.03 0.04 0.05 St re ss (p si) Strain (in/in) Sample Average 0.2% offset Figure 3-45. Stressâstrain diagram for the 0.6-in.-diameter prestressing strand. 0 50,000 100,000 150,000 200,000 250,000 300,000 0 0.01 0.02 0.03 0.04 0.05 St re ss (p si) Strain (in./in.) Sample Average 0.2% offset Figure 3-46. Stressâstrain diagram for the 0.5-in.-diameter prestressing strand.
49 Material properties of 0.5-in.-diameter prestressing strand: Eps = 31.200 ksi fpy = 251 ksi fpu = 268.5 ksi eu = 0.043 in./in. Additional material tests were conducted on grout speci- mens for Girder BON2 and the epoxy utilized on all girders. Grout samples for Girder BON2 were utilized to obtain the compressive strength over time. Grout compressive strength over time is presented in Figure 3-47 and Table 3-12. The aver- age compressive strength at 28 days for the epoxy was 8,183 psi. 3.4 Experimental Test Results The experimental testing led to a better understanding of the behavior of girders with reinforcement that is less than the amount required according to the AASHTO LRFD Bridge Design Specifications, 8th edition (2017). During testing, the onset of flexural cracking was carefully identified, and the corresponding modulus of rupture was established for each test girder. Figure 3-48 presents these modulus of rupture values as a function of member depth together with test data available in the literature. Also presented in the figure are the modulus of rupture values of 0.24 â²fc (ksi) and 0.37 â²fc (ksi), which represent the current and the past coefficients for modulus of rupture in AASHTO specifications. In addi- tion, the recommendation of Carpinteri and Corrado (2011) is plotted showing the possible variation in the modulus of rupture with member depth, including the ± 0.079 â²fc varia- tion based on their recommendation. Overall, it is seen that the plotted data corroborate the notion that the modulus of rupture decreases with increasing member depth. The most significant scatter in the data is seen among the modulus of rupture data that used 6-in.-deep test units. Evaluating the global responses of the members can help in assessing whether the minimum flexural reinforcement goal of ensuring adequate safety and providing sufficient warn- ing before failure is met. Table 3-13 presents a summary of responses for all test girders. Additional figures are divided by beam type: first RC, then pre-tensioned, and finally precast segmental. In addition to confirming that the members pro- vide sufficient warning before failure, it is important to verify that the cracking moment is consistently less than the maxi- mum moment resisted by the specimens. This holds true for the precast segmental girders without any bonded reinforce- ment crossing the segment joints. However, because of the 0 1000 2000 3000 4000 5000 6000 0 5 10 15 20 25 30 Co m pr es siv e St re ng th (p si) Age (days) Figure 3-47. Increase in compressive strength with time for Girder BON2 grout. Age (days) Compressive Strength, (psi) 7 3,884 15 (TD) 5,099 28 5,577 Table 3-12. Measured compressive strength of Girder BON2 grout.
50 Girder Height Span Cracking Load (kips) Failure Load (kips) (ksi) Failure Mode Net Tensile Strain Reinforced Concrete RC1 4 ft 0 in. 32 ft 0 in. 20 65 0.14 Compression 10 RC2 2 ft 6 in. 20 ft 0 in. 18 42 0.19 Compression 10.5 A34 2 ft 8 in. 34 ft 2 in. 33 79 0.22 Not available 12 Pre-tensioned BTC60 3 ft 9 in. 60 ft 0 in. 54 119 0.11 Tendon rupture 12 BTE70 5 ft 3 in. 70 ft 0 in. 75 151 0.11 Tendon rupture 16 Precast Segmental UNB1 3 ft 0 in. 66 ft 0 in. 42 45 0.19 Tendon rupturea 1.5 UNB2 3 ft 0 in. 54 ft 0 in. 91 108 0.15 Shear 1.1 UNB3 4 ft 6 in. 54 ft 0 in. 116 163 0.14 Compression 1.7 BON2 4 ft 6 in. 54 ft 0 in. 60 122 0.09 Tendon rupture N/A aRupture for UNB1 occurred at the anchor plate and not in the span. (m ) Table 3-13. Summary of responses of test girders. Figure 3-48. Modulus of rupture values from test specimens along with some recommended values, including those of Carpinteri and Corrado (2011).
51 lack of bonded reinforcement crossing the joints, the over- strength moment ratio is much closer to 1; the actual values ranged from 1.08 to 1.40. If the self-weight was included when the overstrength moment ratio was calculated, as it should be, the corresponding values ranged from 1.05 to 1.29. 3.4.1 Reinforced Concrete Girders The reinforced concrete girders, RC1 and RC2, were quasi-statically tested by applying the load monotonically as shown in Figure 3-49 and Figure 3-50. After each load step, the test was paused, visual inspection was conducted, and Figure 3-49. Load history of Girder RC1. Figure 3-50. Load history for Girder RC2. Figure 3-51. Girder RC2 prior to experiencing failure at midspan. cracks were located and marked on the front and back sides of the girder as well as on the bottom. During test observa- tions, there were reductions in loads, which were allowed to occur. The cracking and failure loads for Girder RC1 were, respectively, 20 kips and 65 kips, and the corresponding values for Girder RC2 were 18 kips, and 42.1 kips. Both girders were tested until they experienced compression failure at mid- span (see Figure 3-51 and Figure 3-52). Although compres- sion failures were not expected, they appeared to have been triggered by the localized damage resulting from the appli- cation of concentrated loads. Figure 3-53 and Figure 3-54 present the deformed Girders RC1 and RC2 at failure, respec- tively. Buckling of reinforcing bar was observed in the com- pression region for Girder RC1 and is visible in Figure 3-55. The tests were subsequently terminated. The measured Figure 3-52. Midspan of Girder RC1 before failure.
52 Figure 3-53. Girder RC1 deformation at failure. Figure 3-54. Deformation of Girder RC2 at failure. Figure 3-55. Rebar buckling observed in Girder RC1 at failure. 65 kips Location (ft) 0 5 10 15 20 25 30 -3.5 -3 -2.5 -2 -1.5 -1 -0.5 0 D ef le ct io n (in .) 60 kips 55 kips 50 kips 45 kips 40 kips 35 kips 30 kips 25 kips 20 kips 10 kips Figure 3-56. Deflection profiles obtained at various loads for Girder RC1. deflection profiles of Girders RC1 and RC2 at different loads are shown in Figure 3-56 and Figure 3-57. The values for the modulus of rupture of concrete obtained for Girders RC1 and RC2 were 0.13 â²fc and 0.19 â²fc , respec- tively. These values are lower than the values established from the 4-in.-diameter tension-split cylinders. They produced 0.238 â²fc and 0.257 â²fc for Girders RC1 and RC2, respec- tively. There were no signs of any inelastic behavior before the first flexural crack occurred. The first yielding of the Location (ft) 0 5 10 15 20 -2.5 -2 -1.5 -1 -0.5 0 D ef le ct io n (in .) 40 kips 35 kips 30 kips 25 kips 20 kips 10 kips Figure 3-57. Deflection profiles obtained at various loads for Girder RC2.
53 steel appears to have occurred when the load reached 50 kips and 23 kips for Girders RC1 and RC2, respectively, with Girder RC1 producing a higher resistance because of its larger section. The deflection profiles established for Girders RC1 and RC2 are shown in Figure 3-56 and Figure 3-57, while Fig- ure 3-58 and Figure 3-59 show the recorded longitudinal strains from extreme #5 bars at the midspan of Girders RC1 and RC2, respectively. Figure 3-60 and Figure 3-61 show the recorded longitudinal strains of a gauge as a function of applied load. For Girder RC1, the assumed yield strain of 0.25% is shown, but the data indicate that the yielding of the bars occurred at a strain of about 0.3%. For Girder RC2, the assumed yield strain of Figure 3-58. Strain history for longitudinal rebar at midspan for Girder RC1. Figure 3-59. Strain history for the longitudinal rebar at midspan for Girder RC2. Figure 3-60. Load versus midspan rebar strain plot for Girder RC1. 0.25% is shown on the basis of the yield stress of 68.61 ksi and a modulus of elasticity of 27,562 ksi, but the data indicate that the yielding of the bars occurred at a strain close to 0.3% for Bar 4C. It can also be observed from the strain versus load plots that the rebars slipped during the test in both cases. Figure 3-62 and Figure 3-63 show data obtained from a displacement sensor across the flexural crack that was first developed in Girders RC1 and RC2, respectively. These figures also confirm the cracking and yield loads reported above. After forming, the crack width gradually increased and reached a value Figure 3-61. Load versus midspan rebar strain plot for Girder RC2.
54 applied incrementally, as shown in Figure 3-66. The pausing of the loading allowed visual inspection and marking of the cracks. The first flexural cracks developed when the applied load reached 33, 54, and 75 kips for Girders A34, BTC60, and BTE70, respectively. Each girder continued to be loaded beyond experiencing flexural cracks. For Girder A34, the test was continued until the actuators reached the stroke limit of 10 in. and the movement of the girder at the roller support was excessive. For Girders BTC60 and BTE70, the test was ter- minated when it experienced a sudden failure due to fracture of all strands well after the flexural cracks were experienced. of 0.28 in. and just under 0.4 in. at the maximum load for Girders RC1 and RC2, respectively. The load versus deflec- tion curves from Girders RC1 and RC2 tests are compared in Figure 3-64. The net tensile strain for Girder RC2 was also a little higher than for Girder RC1, although the difference was insignificant, as shown in Figure 3-65. 3.4.2 Pre-tensioned Concrete Girder Specimens The pre-tensioned concrete girdersâA34, BTC60, and BTE70âwere quasi-statically tested where the load was Figure 3-62. Crack opening at the bottom of Girder RC1 as a function of load. Figure 3-63. Crack opening at the bottom of Girder RC2 for increased loading. Figure 3-64. Comparison of load versus displacement curves for Girders RC1 and RC2. Figure 3-65. Comparison of load versus strain at midspan for Girders RC1 and RC2.
55 then were reloaded after the vibration tests. The displace- ments recorded during vibration tests never exceeded 0.25 in. Despite the use of minimum reinforcement, the response of Girder A34 was very ductile. As expected on the basis of the design calculations, flexural cracks in this girder devel- oped in the middle portion, where the deck was located, as shown in Figure 3-67a. The reason for the beam sustaining much larger flexural displacement than expected is believed to be the local debonding of the strands developing in the critical region and formation of larger flexural cracks in the midspan. Consequently, the strain demand in the strands was reducing, which allowed the beam to produce larger flexural displacement. When the test was terminated, the The corresponding displacements at failure were 12 in. and 15.3 in., respectively, which were significantly higher than the predicted displacements. During the testing of Girders BTC60 and BTE70, several longer pauses can be seen, which were to allow the girder to be tested for a health-monitoring project for which approval from the NCHRP Program Officer was obtained. These tests included a series of low- amplitude vibrations in the vertical direction to obtain its dynamic properties. These tests were performed after an event such as cracking and yielding of the reinforcement occurred under quasi-static loads to ensure these tests had no impact on the NCHRP 12-94 test outcomes. Prior to the vibration tests, the actuator loads were gradually released and (b) (c) (a) Figure 3-66. Load histories for (a) Girder A34, (b) Girder BTC60, and (c) Girder BTE70.
56 (b)(a) Figure 3-67. Midspan of (a) Girder A34 and (b) Girder BTC60 before failure. (a) (b) Figure 3-68. Deformations of (a) Girder A34 and (b) Girder BTC60 at the end of testing. ratio of the girder displacement to the span length (i.e., Do/L) was about 2.5%. Girder BTC60 also exhibited similar behavior and devel- oped flexural cracks in the middle portion of the girder. When Do/L reached about 1.5%, sudden failure occurred by fracturing of all strands simultaneously. The crack at the midspan widely opened before splitting the girder into two halves below the deck, as seen in Figure 3-68b. It was also observed that some stirrups were debonded from the con- crete at failure of Girder BTC60. Girder BTE70 also exhibited very ductile behavior despite using the amount of longitudinal reinforcement below the current AASHTO minimum requirement. As expected on the basis of design calculations, flexural cracks in this girder developed in the middle portion where the deck was located when the applied load reached 75 kips with a corresponding displacement of 0.35 in., as shown in Figures 3-69 and 3-70. As the load was further increased, uniformly spaced flexural cracks continued to form, allowing the beam to experience flexural deflection well above 10 in. Increasing the deflection led to the fracturing of the strands, causing the at a displace- ment of 15.3 in., which corresponded to Do/L of about 1.8%. There was no evidence of concrete crushing on the compression zone near the top of the deck. The maximum load carried by Girder BTE70 was 151 kips, twice the cracking load. The deflection profiles for selected load levels are shown in Figure 3-71 while the load versus midspan deflection plot is shown in Figure 3-72 for all pre-tensioned girders. There was no sign of any change in stiffness until the load reached the cracking load. The corresponding load versus recorded strain curves are presented in Figure 3-73. The first yield- ing of the prestressing tendons appears to have occurred at
57 applied incrementally in a quasi-static manner. After each load step, the test was paused, visual inspection was done, and cracks were located and marked on the front (south) and back (north) sides as well as on the bottom surface of the girder. Flexural cracks first developed in Girder UNB1 at the midspan when the applied load reached 42 kips with a cor- responding displacement of just under 1 in. This crack was confined to the bottom flange. As the load was increased to 45 kips, this crack extended to the midheight of the web while another crack developed in the same precast segment (Seg- ment 10) adjacent to the epoxy interface that connected the segment on the left (Segment 11). Formation of this crack, which was located about 3 in. from the interface, is consistent with the expectation that cracking in segmental beams would not be at the epoxy interface, but rather would develop in the concrete laitance near the ends of the segment, where large aggregates are hardly present. This crack ran up the bottom flange up to the midheight of the web as a flexural crack and then as an inclined shear crack. Although the load was expected to be increased further, it was not possible to do so. Instead, the displacement increased further, which was associated with another crack forming at a distance of about 2 in. from the Segment 10âSegment 11 joint interface. The width of this crack increased approximately to 1â8 in. when the recorded beam displacement reached 1.35 in. This crack formation was nonsymmetric along the length and only occurred near the east side of the Segment 10âSegment 11 joint interface. No increase in the width of the two cracks that were formed previously was observed. At this point, the beam was unloaded. The following day, the beam was reloaded, with the load applied in 6-kip increments until it reached 1.35 in. vertical displacement. From this point onward, the beam was loaded under displacement control. At a displacement of 1.5 in., the cracking closest to the epoxy interface extended toward the top flange and then propagated horizontally at the webâ flange interface. Two other cracks also extended toward the top flange. At 1.75 in. of displacement, the larger crack seen beside the Segment 10âSegment 11 interface continued to widen. Additionally, a new crack was observed in the middle of segment 11 on the bottom flange. At a displacement of 2 in. and beyond, widening of the crack only occurred to the one adjacent to the Segment 10âSegment 11 joint interface. This crack reached a width of 0.25 in. at a midspan deflection of 2 in. As the displacement was increased to 3 in. and then 4 in., the cracks extended to the bottom of the top flange, which was unexpected and appeared to suggest that the beam response was deviating from simple beam behavior. At a dis- placement of around 4 in., one of the strands on the south side fractured at the anchorage location. From this point onward, the test was continued with a displacement control the load of approximately 55 kips for Girder A34, 90 kips for Girder BTC60, and 120 kips for Girder BTE70. It is shown that the girders reached a strain level of more than 12 me at failure. It is further seen in Figure 3-73 that strain in the strand experienced a sudden drop when the load was held at 135 kips. This drop, also seen in another strain gauge, is believed to be due to debonding of the strand that affected the strain locally. This figure further confirms the cracking load reported above. After the formation of the initial cracks, the crack width gradually increased and reached a value of 0.5 in. at the maximum load for Girder A34, whereas the crack width at the time of failure for Girder BTC60 is mean- ingless, as the girder failed and broke into two pieces. For Girder BTE70, the maximum recorded crack width before fracturing of strands was 0.2 in., as shown in Figure 3-74. 3.4.3 Post-tensioned Concrete Girder Specimens Procedures similar to those discussed for reinforced con- crete and pre-tensioned concrete girders were used to test all post-tensioned concrete girder specimens. The load was Figure 3-69. Midspan condition after failure of Girder BTE70. Figure 3-70. Global view of Girder BTE70 after failure.
58 (c) (b)(a) Location (ft) 0 5 10 15 20 25 30 35 -3 -2.5 -2 -1.5 -1 -0.5 0 D ef le ct io n (in .) 70 kips 60 kips 50 kips 40 kips 30 kips 20 kips 10 kips Location (ft) 0 10 20 30 40 50 60 70 -8 -7 -5 -6 -4 -3 -2 -1 0 D ef le ct io n (in .) 145 kips 125 kips 100 kips 75 kips 50 kips 25 kips 10 kips Location (ft) 0 10 20 40 6030 50 -3 -2.5 -2 -1.5 -1 -0.5 0 D ef le ct io n (in .) 100 kips 80 kips 60 kips 50 kips 30 kips 10 kips Figure 3-71. Deflection profiles obtained at various loads for (a) Girder A34, (b) Girder BTC60, and (c) Girder BTE70.
59 (a) (b) (c) Figure 3-72. Load versus midspan deflection curves for (a) Girder A34, (b) Girder BTC60, and (c) Girder BTE70.
60 increment of 1 in. without visual inspection, owing to safety concerns. When the midspan deflection reached approxi- mately 10 in., two other strands on the south side fractured at the anchors; the width of the main crack at this point was about 1.5 in. The test was subsequently terminated. The pro- gression of the crack development in the midspan region is shown in Figure 3-75, while the deflected shape of the beam at 10 in. of displacement is presented in Figure 3-76. When the applied load was removed, all cracks were closed, and the beam did not exhibit any significant permanent deformation. The condition of the test unit after the removal of the load is shown in Figure 3-77 and Figure 3-78. The deflection profiles at selected load levels are shown in Figure 3-79 while the load versus midspan deflection plot is presented in Figure 3-80 with the maximum recorded load of 45.45 kips. There was no sign of any change in stiffness until the load caused the first flexural cracking to develop. The applied load versus recorded strain in a prestressing strand is presented in Figure 3-81, which shows an initial prestressing strain of just over 6 me. Despite the strands experiencing frac- ture at the anchorage, it is seen that the maximum recorded strain was only about 7.5 me, which was not unexpected (Musselman et al. 2015; Abramson et al. 2017). The load versus crack opening plot is shown in Figure 3-82, confirm- ing that the maximum recorded crack width was 1.5 in. at the maximum midspan deflection. The response of Girder UNB1 produced Mo/Mcr of 1.08 with Do/Dcr of 4.17. Closely examining Figure 3-80 suggests that the (a) (b) (c) Figure 3-73. Load versus strain curves for (a) Girder A34, (b) Girder BTC60, and (c) Girder BTE70.
61 beam experienced a small stiffness change due to cracking and reached 44.8 kips with a displacement of 1.08 in., which is followed by a drop in strength. This loss is suspected to be due to the beam shifting from the conventional flexural mechanism for transferring load to what appeared to be a hinging mechanism, which is detailed further in Section 3.5.2. If the load on the beam had been at 44.8 kips when the mechanism changed, Girder UNB1 would have displaced to 3.53 in. Beyond this point, Girder UNB1 would have collapsed without much warning if there were an attempt to increase load. However, a larger displacement would be possible if the strand fracture at the anchors could be prevented, which is observed for Girder UNB2. Therefore, if the minimum reinforcement according to the code is not satisfied, it is important to accurately estimate the beam load and displace ment capacities prior to finalizing the minimum reinforce ment rather than relying solely on Leonhardtâs method, which is a common approach in design practices. DC-LVDT Dismounted Figure 3-74. Crack opening for Girder BTE70. Segment Interface (Epoxy Layer) Segment 11 Segment 10 (b) (c) (a) Figure 3-75. Progression of crack formation and opening beside the segment joint interface.
62 Girder UNB2 was loaded incrementally in designated loading steps. After each load step, testing was paused and visual inspection was completed; during this time, cracks were identified and marked. On the first test day, the girder was loaded in 3-kip load steps until 90 kips of load. The first hairline flexural cracking was observed at the midspan at the bottom of the girder during the last load step. Owing to time constraints, the girder was unloaded and testing resumed 3 days later. When testing resumed, the beam was reloaded at a load step of 6 kips until the load reached 90 kips, which was the maximum applied load on Day 1 of testing. Figure 3-76. Girder UNB1 at 10 in. of displacement. Figure 3-77. Midspan condition after removal of applied load to Girder UNB1 after the test. Figure 3-78. View of ruptured tendon on the south side of Girder UNB1. Location (ft) 0 10 20 30 40 50 60 70 -0.9 -0.8 -0.7 -0.6 -0.5 -0.4 -0.3 -0.2 -0.1 0 D ef le ct io n (in .) 40 kips 35 kips 30 kips 25 kips 20 kips 15 kips 10 kips 5 kips Figure 3-79. Deflection profiles obtained at various loads for Girder UNB1. Figure 3-80. Load versus midspan deflection curves for Girder UNB1.
63 The girder was visually inspected for damage after the application of 30, 60, and 90 kips. No further cracking was observed, except for the hairline crack from Day 1. Once 90 kips of load was reached, the load step was reduced to 3 kips. Formation and propagation of new hairline cracks occurred at a slow rate on the bottom face of the girder. Flex- ural cracking propagating from the hairline crack observed at the bottom surface first developed on the sides of the girder in the midspan segment (Segment 8) at a load of 102 kips, with a corresponding displacement of 1.315 in. Four visible cracks located near the midspan of Segment 8 propagated from the bottom flange of the beam to the midheight of the web as flexural cracks. The crack development was symmetric on the north and south sides of the girder. As the load was increased to 105 kips, new cracking occurred in Segment 8 approxi- mately 1 in. from the Segment 7âSegment 8 joint interface. This observation is consistent with cracking observed in Girder UNB1. Flexural cracking in the midspan segment began to incline as shear cracks after propagating to midheight of the web at a displacement of approximately 1.38 in. After 105 kips of load was reached, Girder UNB2 expe- rienced large displacements, which was when the hinging mechanism appears to have developed. Therefore, from this point onward, the beam was loaded under displacement control. At a displacement of 1.75 in., the cracking adjacent to the epoxy layer continued to propagate up the web into inclined shear cracking. The crack had a width of approxi- mately 0.1 in. on the bottom flange. Because of safety con- cerns, no additional visual inspection was conducted from this point onward. At a displacement of 2 in., the width of the crack had widened to approximately 0.5 in. After 2 in. dis- placement, the beam was loaded at displacement increments of 0.5 in. At 4.72 in. of displacement, shear cracking from the beam continued as a horizontal crack along the bottom of the top flange at the midspan (Segment 8). Failure of the beam occurred at 5.81 in. of displacement as a result of the large crack at the Segment 7âSegment 8 joint interface, thereby causing the midspan segment to tilt and drop. The width of the crack at the Segment 7âSegment 8 joint interface was approximately 0.75 in. The post-tensioning force compressed the segments, preventing them from falling off to the ground. The test was subsequently terminated. The progression of the crack development is shown in Figure 3-83, and the failure mode of the girder is presented in Figure 3-84. The load versus deflection graph is presented in Figure 3-85, and the deflection profile obtained for Girder UNB2 during testing is presented in Figure 3-86. The maximum recorded load was 108.05 kips. There was no sign of any change in stiffness until the load caused the first flexural cracking at 90 kips, yielding an Mo/Mcr ratio of 1.20. There was a drop of the load at approximately 103 kips, after the development of flexural cracks on the web and, presumably, the development of the hinging mechanism. This is similar to what was observed during Girder UNB1 testing. Had the test been conducted under force control, there would have been a sudden increase in displacement at 103 kips. At this point, Girder UNB2 would have had reserve capacities of 5.05 kips and 3.05 in., which are better than those observed for Girder UNB1 and which could be considered adequate. Note that Girder UNB2 did not experience failure of strands at the anchors as observed for Girder UNB1. The displacement versus recorded strain in the Figure 3-81. Load versus prestressing strand strain curve for Girder UNB1. Figure 3-82. Load versus crack opening for Girder UNB1.
64 strand at the midspan location is shown in Figure 3-87, which shows that the initial strain recorded due to prestressing was approximately 6.5 me. The tensile strain when the test was concluded was recorded to be 7.6 me. The load versus crack opening at the bottom face of the Segment 7âSegment 8 joint interface plot is shown in Figure 3-88. Girder UNB3 was loaded in a manner similar to that of the previous post-tensioned segmental beams. Flexural crack- ing first developed at the midspan of the girder, propagating from the bottom flange of the girder to the bottom of the web through the north and south loading holes. The applied load was 116 kips with a corresponding displacement of 0.27 in. The crack continued to propagate up the web as incremental loading resumed. No additional cracks were observed until an applied load of 133 kips was reached, when new cracks developed at the midspan in Segment 6. Once all cracks were marked, loading was resumed to 136 kips, with a correspond- ing displacement of 0.44 in. The girder sustained the load for approximately 30 s; then a large crack developed approxi- mately 0.5 in. from the Segment 5âSegment 6 joint interface. 102 kips 105 kips 1.75 in. 2.00 in. 4.50 in. 5.50 in. Figure 3-83. Progression of crack formation and damage concentration beside the segment interface.
65 Figure 3-84. Girder UNB2 after failure. Figure 3-85. Load versus midspan deflection curves for Girder UNB2. Location (ft) 0 10 20 30 40 50 60 -3 -2.5 -2 -1.5 -1 -0.5 0 D ef le ct io n (in .) 105 kips 90 kips 80 kips 70 kips 60 kips 50 kips 25 kips 10 kips Figure 3-86. Deflection profiles obtained at various loads for Girder UNB2.
66 Figure 3-87. Load versus prestressing strand strain curve for Girder UNB2. Figure 3-88. Displacement versus crack opening at the bottom of midspan joint interface for Girder UNB2. The development of the crack led to a drop in the load from 136 kips to 108 kips and an increase in displacement from 0.44 in. to 0.49 in., which is when the hinging mechanism is believed to have begun. The crack propagated vertically from the bottom flange to approximately halfway up the web and then began to incline as shear cracks towards midspan. These observations are consistent with those for Girders UNB1 and UNB2. Additionally, the formation of the large crack near the joint interface led to almost complete closing of other exist- ing cracks. From this point onward, the beam was loaded under dis- placement control at increments of 0.25 in. At a displacement of 0.75 in., additional cracks formed near the Segment 5â Segment 6 joint interface. At a displacement of 1.0 in., the cracks near the joint interface continued to propagate up the web and formed a concentrated crack that continued to widen with increased displacement. Figure 3-89 shows the widen- ing of the concentrated crack as the displacement increased. For reasons of safety concerns and no additional formation of cracks, no further visual inspections were conducted after displacement of 2 in. was reached. After 2 in. of displacement, the beam was loaded at a displacement increment of 0.5 in. At a displacement of 6.0 in., with a corresponding load of 158.6 kips, concrete in the top flange of the girder began to crush in Segment 6. At a displacement of 9.5 in., the actuators were stroked out. The beam was unloaded, the loading frame was tightened back down, and the beam was reloaded until failure. Failure occurred at a displacement of 9.68 in., with a corresponding load of 161.1 kips, owing to the large con- centrated crack at the Segment 5âSegment 6 joint inter- face, similar to that in Girder UNB2. The failure mode of Girder UNB3 is shown in Figure 3-90. Figure 3-91 shows the load versus midspan deflection curve for Girder UNB3. As can be seen in this figure, the formation of hinging dropped the load by 26.6 kips. If the test had been done under load control, the deflection would have increased to 2.86 in., leaving significant displacement and load-resisting capacities beyond forming the hinging mechanism. For Girder UNB3, the Mo/Mcr and Do/Dcr ratios were 1.41 and 19.6, respectively. Figure 3-92 presents the deflection profile of Girder UNB3 at various loads. The applied load versus recorded strain in a prestressing wire is presented in Figure 3-93, which shows an initial prestress- ing strain of approximately 6.3 me. The recorded strain at failure was 8 me. When the responses of Girders UNB1, UNB2, and UNB3 were compared, Girder UNB3 was found to have produced the most significant load and displacement reserve capacities beyond cracking that were not compromised by the hinging mechanism. Girder UNB3 not only satisfied the AASHTO minimum reinforcement requirement, but it was constructed with a lower amount of minimum reinforcement. This sug- gests that lowering the minimum reinforcement will not be an issue for unbonded post-tensioned segmental beams. Girders UNB1 and UNB2 did not meet the AASHTO require- ment, yet they were designed with a lower and higher amount of minimum reinforcement, respectively, than was calculated for the prototype girders. The performance of Girder UNB1 is most concerning, as it would have had limited reserve capacities following formation of the hinging mechanism if it had been loaded under force control. Girder UNB2 pro- duced more reserved capacities, but they were not as close
67 7 in.4.5 in. 0.75 in. 2 in. Figure 3-89. Progression of crack formation and damage concentration beside the segment joint interface for Girder UNB3. to those observed for Girder UNB3. If one decides to examine the reserve capacities of unbonded post-tensioned segmental girders in terms of justifying the amount of minimum reinforce- ment, it is important to realize that the response prediction should place due consideration on the hinging mechanism. Girder BON2 was tested on March 28 and 29, 2018. Incre- mental loading and visual inspection were conducted in a manner similar to that of the other post-tensioned girders. On the first day, the first cracking occurred at a load of 60 kips, with a corresponding displacement of 0.26 in. The cracking occurred at the midspan (Segment 6) on the north side of the girder as well as near the Segment 4âSegment 5 joint interface on both the north and south sides. As with Girder UNB3, the midspan crack propagated from the bottom flange through the loading. Incremental loading resumed to a load of 65 kips, when new cracks formed approximately 2 in. adjacent to the Segment 6âSegment 7 joint interface. As with the other post-tensioned girders, the cracking near the joint interface propagated approximately halfway up the web and then began to incline as shear cracks towards the midspan. After this point, the girder was loaded under displacement control at an increment of 0.25 in. No new crack formation was observed until a displacement of 1 in. was reached. At 1 in. displacement, cracks formed near the Segment 5âSegment 6 joint interface on both sides of the girder, with propagation similar to that of existing cracks near the Segment 6âSegment 7 joint interface. Cracking near the Segment 6âSegment 7 joint interface was accompanied with a load drop from 72 kips to 62 kips. Crack development was very similar on both sides of the girder and both sides of the midspan, as expected for bonded specimens. At this point, the beam was unloaded and then reloaded the following day.
68 Figure 3-90. Girder UNB3 after failure. Location (ft) 0 10 20 30 40 50 60 -8 -7 -6 -5 -4 -3 -2 -1 0 D ef le ct io n (in .) 160 kip 130 kip 100 kip 80 kip 60 kip 40 kip 20 kip 10 kip Figure 3-91. Deflection profiles obtained at various loads for Girder UNB3. Figure 3-92. Load versus prestressing strand strain curve for Girder UNB3.
69 Figure 3-93. Load versus midspan deflection curve for Girder UNB3. 0.75 in. 2.5 in. 4 in. 10 in. Figure 3-94. Progression of crack formation for Girder BON2. The following day, the beam was reloaded incrementally to the 1 in. of displacement reached the previous day, and load application under displacement control of 0.25-in. incre- ments was resumed. As the displacement increased, many new cracks developed within Segment 4 to Segment 8. Crack- ing continued to be symmetric on each side of the girder. This differed from the behavior of the unbonded segmental girders, in which a large concentrated crack dominated the response. At a displacement of 1 in., cracks developed near the Segments 7âSegment 8 joint interface, accompanied with a drop in load from 90 kips to 80 kips. After a displacement of 2 in. was reached, the loading increment was increased to 0.5 in. At a displacement of 5 in., new cracks developed near the Segment 8âSegment 9 joint interface. The cracking was again accompanied with a load drop, from 112 kips to 105 kips. At a displacement of 6 in., cracks developed near the Segment 3âSegment 4 joint interface. Cracking continued to be symmetric and similar on both sides of the girder. For reasons of safety concerns, no further visual inspection was conducted after 6 in. of displacement. Even without up close visual inspection, crack propagation was apparent as dis- placement increased. Figure 3-94 presents crack propagation over the duration of the test. At a displacement of 10 in., the actuator stroke limit was reached. The beam was unloaded, the loading frame was tightened down, and the beam was reloaded until failure. Failure of Girder BON2 occurred at a load of 119.3 kips and a center displacement of 11.66 in. The failure mode occurred at the crack near the Segment 5â Segment 6 joint interface. The failure mode of Girder BON2 is presented in Figure 3-95. Figure 3-96 presents the load versus midspan deflection curve of Girder BON2 for both days of testing. Figure 3-97 presents the deflection profile
70 Figure 3-96. Load versus midspan deflection curve for Girder BON2. Location (ft) 0 10 20 30 40 50 60 -10 -5 -4 -3 -2 -9 -8 -7 -6 -1 0 D ef le ct io n (in .) 120 kip 110 kip 100 kip 80 kip 60 kip 40 kip 20 kip 10 kip Figure 3-97. Deflection profile obtained at various loads for Girder BON2. Figure 3-95. Girder BON2 after failure.
71 of Girder BON2 at various loads. The observed response, which was similar to that of the pre-tensioned girders, exhibited no concerns for experiencing a brittle failure, despite having been designed for less than the requirement for minimum reinforcement in the current AASHTO speci- fications (AASHTO 2017). 3.5. Analytical Study For the purpose of further understanding the behavior of girders with minimum flexural reinforcement, analytical models were developed in multiple software programs. These models were validated with the experimental results before they were utilized in several parametric studies. The results of this analytical study are presented in this section. 3.5.1 Analysis Assumptions Various assumptions were used when analyses of different girder types were performed, as follows: ⢠Plane sections remain plane when they are subjected to flexural actions. ⢠No significant enhancement to concrete stress and strain capacities is possible, due to the effects of confinement. ⢠The constitutive model for mild steel reinforcement is based on an ASTM A615 Grade 60 rebar unless superseded by the measured properties, with the ultimate strain lim- ited to 0.1. ⢠The constitutive model for prestressing strand is based on an ASTM A416 Grade 270 strand unless superseded by the measured properties. ⢠The ultimate compressive strain of concrete is 0.003, in accordance with AASHTO (2017). ⢠Ultimate condition is defined as using an ultimate strain in the tendons of 43 me, mild steel reinforcement of 80 me, ultimate compressive strain in concrete of 0.003, or a 20% drop in load resistance from the peak calculated strength, whichever occurs first. ⢠The surface-to-surface interaction between the strands and deviators for external, unbonded tendons is assumed to be frictionless. 3.5.2 Validation of Analytical Model In most cases, Response 2000 (Bentz and Collins 2001) was used to carry out the analyses of reinforced concrete and pre-tensioned concrete girders; evaluation of strand debond- ing behavior in some pre-tensioned concrete girders was done with Abaqus Unified FEA (Dassault Systems Simulia 2016). Response 2000 produced moment curvature analyses, the results of which were then used to calculate the force-displacement responses with the moment area theorem. For analyses on the post-tensioned concrete girders, NRPF (Ariyawardena 2000) was used. Measured material properties were used in complet- ing all analyses presented in this section. Figure 3-98 through Figure 3-106 compare the experi- mental and analytical load versus deflection responses for all test girders. The analytical results captured the experimen- tal results satisfactorily, within the capabilities of the software. In general, the analysis results tended to underestimate the actual displacements of the girder, for two reasons. In some analyses, especially for segmental girders, the analysis did not Figure 3-98. Experimental and calculated load versus displacement curves for Girder RC1. Figure 3-99. Experimental and calculated load displacement curves for Girder RC2.
72 converge after a certain nonlinear stage was reached. In other cases, especially RC and pre-tensioned girders, the analyses underestimated the deflection capacity, sometimes by a sig- nificant amount, due to debonding of the reinforcement that took place in the critical section regions. With minimum reinforcement, these girders experienced fewer concentrated flexural cracks, in which the debonding appeared to have taken place. Despite the estimated debonding length being short, it was sufficient to reduce the demand in the steel and increase the deflection noticeably. This is demonstrated in Figure 3-102 for Girder BTE70. In this case, an assumed debonded length of 12 in. increased the displacement capacity of the girder by approximately 50%. Of the comparisons presented above, the analyses failed to capture the reduction in resistance for the unbonded seg- mental girders that happened right after formation of a major flexural crack, which was associated with formation of the hinging mechanism. The load drop accompanied the start Figure 3-103. Experimental and calculated load versus displacement curves for Girder UNB1. Figure 3-102. Experimental and calculated load versus displacement curves for Girder BTE70. Figure 3-100. Experimental and calculated load versus displacement curves for Girder A34. Figure 3-101. Experimental and calculated load versus displacement curves for Girder BTC60.
73 Figure 3-104. Experimental and calculated load versus displacement curves for Girder UNB2. Figure 3-105. Experimental and calculated load versus displacement curves for Girder UNB3. Figure 3-106. Experimental and calculated load versus displacement curves for Girder BON2. Concentrated Crack Figure 3-107. Progression of concentrated crack observed in Girder UNB1. of the hinging mechanism, which was formed about a con- centrated crack adjacent to a joint interface near the midspan region, as described in the test results. The hinge location corresponded to the centroid of the compression zone at the crack location, which was determined by evaluating light- emitting diode (LED) Optotrak data. As the displacement was increased, all deformations concentrated at this location, which resulted in continuous growth in the crack at this location. Fig- ure 3-107 through Figure 3-109 present the propagation and widening of the concentrated crack as displacement increased for Girders UNB1, UNB2, and UNB3, respectively. To confirm development of this mechanism, the measured experimental data were used to conduct a further analytical investigation, since the analyses presented above followed the conventional beam theory. For this purpose, a schematic of the hinging mechanism developed in the response of the unbonded post- tensioned segmental girders is shown in Figure 3-110. The beam segments with lengths L1 and L2 experience rotations q1 and q2, respectively, but do not undergo flexural response. Comparison of the experimental width of the concen- trated crack with an analytical crack width yields evidence to validate the proposed hinging response mechanism. As previously mentioned, the width of the experimental crack was determined by using data from LEDs mounted along the face of the girder at the location of the concentrated
74 crack. The width of the analytical crack is a function of rota- tion (q), which was calculated from a known displacement. Crack width versus midspan displacement plots for UNB1, UNB2, and UNB3 are presented in Figure 3-111 through Fig- ure 3-113, respectively. The analytical crack width, Wcr, was determined as follows: W Y -hinge sin (3-1)cr 1 2( ) ( )= q + q where Y-hinge is the distance from the centroid of the com- pression zone to the bottom of the girder and q1 and q2 are the rotation of the girder on each side of the concentrated crack due to the applied load. As seen in the figures, good agree- ment is seen for Girder UNB3, which implies that the hing- ing mechanism developed as soon as the load dropped. The results for the other cases suggest that a flexural mechanism changed to a hinging mechanism gradually as the displace- ment was increased. The two lines becoming parallel is an indication of a fully developed hinging mechanism. Figure 3-114 through Figure 3-116 present the incremental prestressing strand strain (ept) versus midspan displacement for each segmental girder as calculated with the experimental θ1(Angle) θ2(Angle) Crack near Joint Interface L1 L2 Figure 3-110. Hinging mechanism of an unbonded segmental post-tensioned girder. (a) Concentrated Crack (b) Figure 3-108. Progression of concentrated crack observed in Girder UNB2. Concentrated Crack (a) (b) Figure 3-109. Progression of concentrated crack observed in Girder UNB3.
75 0 0.1 0.2 0.3 0.4 0.5 0.6 0 0.5 1 1.5 2 2.5 3 3.5 4 4.5 Cr ac k W id th (i n. ) Midspan Displacement (in.) Experimental Data Analytical Model Figure 3-111. Crack width versus midspan displacement for Girder UNB1. 0 0.1 0.2 0.3 0.4 0.5 0.6 0.7 0.8 0.9 0 1 2 3 4 5 Cr ac k W id th (i n. ) Midspan Displacement (in.) Experimental Data Analytical Model Figure 3-112. Crack width versus midspan displacement for Girder UNB2.
76 0 0.0002 0.0004 0.0006 0.0008 0.001 0 0.5 1 1.5 2 2.5 3 3.5 4 4.5 St ai n (in ./ in .) Midspan Displacement (in.) Experimental Data Analytical Model Figure 3-114. Incremental prestressing strand strain versus midspan displacement for Girder UNB1. 0 0.5 1 1.5 2 2.5 0 1 2 3 4 5 6 7 Cr ac k W id th (i n. ) Midspan Displacement (in.) Experimental Data Analytical Model Figure 3-113. Crack width versus midspan displacement for Girder UNB3.
77 0 0.0002 0.0004 0.0006 0.0008 0.001 0 1 2 3 4 5 St ra in (i n. /i n. ) Midspan Displacement (in.) Experimental Data Analytical Model Figure 3-115. Incremental prestressing strand strain versus midspan displacement for Girder UNB2. 0 0.001 0.002 0.003 0.004 0.005 0 2 4 6 8 10 12 St ra in (i n. /in .) Midspan Displacement (in.) Experimental Data Analytical Model Figure 3-116. Incremental prestressing strand strain versus midspan displacement for Girder UNB3.
78 0 0.1 0.2 0.3 0.4 0.5 0.6 0.7 0.8 0.9 1 0 10 20 30 40 50 60 N or m al iz ed D is pl ac em en t Horizontal Location (ft) 1" Midspan Displacement 3" Midspan Displacement Figure 3-117. Comparison of normalized deflection profiles for Girder UNB1. data and the analytical model. The analytical prestressed strand strain was determined as follows, assuming the strain increase is only due to the crack opening at the hinge location: e = (3-2)pt cr pt W l where lpt is the length of the unbonded prestressed strand, in inches. The experimental data were collected with high-yield strain gauges mounted on the prestressed strands near the midspan. Again, a good agreement in the calculated and mea- sured strain is seen for Girder UNB3, which confirms that there was no flexural action as soon as the hinging mecha- nism formed. In Girders UNB1 and UNB2, the analytical strain became equal to the measured strain when the hinging mechanism was fully formed. These observations confirm that strain measured in the tendon was primarily influenced by the concentrated crack width once the hinging mecha- nism was formed. In contrast, a flexural mechanism would produce higher strains due to additional elongation in the tensile region of the girder. To provide additional evidence, one specific deflection within the flexural response region (i.e., prior to the drop in load resistance) and one from the proposed hinging response region were selected for comparison of the overall girder profile. The comparison is presented in Figure 3-117 through Figure 3-119. Deflection values were measured during the test by using string potentiometers placed underneath the girder along the length. The deflection profiles were normalized to better visually exemplify the difference in profiles. The beam profile within the flexural response region followed much more of a parabolic profile, while the profile within the hinge region was practically linear from each support to the con- centrated crack location. From the known displacement and Y-hinge location, the rotation (q) about each support can be determined. Fig- ure 3-120 presents the free-body diagram of the girder during testing after the development of the concentrated crack and the beginning of the proposed hinging response. By utilizing known section properties for each segmental post-tensioned girder, the applied load (F) can be calculated as follows: â ( ) ( ) ( ) ( ) ( ) = + q â q + ï£ï£¬   â + ï£ï£¬   q + â +ï£ï£¬   q = moments about cos sin 2 2 2 sin 2 2 cos 0 (3-3) pt 1 1 1 1 1 pt 1 C T jd F a F y wL L F wL y jd F wL L C c r
79 0 0.1 0.2 0.3 0.4 0.5 0.6 0.7 0.8 0.9 1 0 10 20 30 40 50 N or m al iz ed D is pl ac em en t Horizontal Location (ft) 1" Midspan Displacement 3" Midspan Displacement Figure 3-118. Comparison of normalized deflection profiles for Girder UNB2. 0 0.1 0.2 0.3 0.4 0.5 0.6 0.7 0.8 0.9 1 0 10 20 30 40 50 N or m al iz ed D is pl ac em en t Horizontal Location (ft) 0.25" Midspan Displacement 4" Midspan Displacement Figure 3-119. Comparison of normalized deflection profiles for Girder UNB3.
80 Rearrange Equation 3-3 to solve for the applied load (F): ( ) ( ) ( ) ( ) ( ) = + ï£ï£¬   â q + â q q + ï£ï£¬   q + +  ï£ï£¬   q â q 2 2 sin 2 cos sin 1 2 sin 1 2 cos cos (3-4) pt 1 1 1 pt 1 1 1 pt 1 1 F T jd wL L wL y jd wL L y y jd L a r c r All distance values are in feet, where h = height of girder, ypt = distance from center of prestressed strand to bottom of girder, jd = distance between centroid of compression zone and tensile force due to post-tensioning Tpt = post-tensioning, yc = distance from centroid of compression zone to bottom of girder, L = total length of girder, L1 = distance from end of girder to concentrated crack, Lr = distance from support to concentrated crack, a = distance from loading frame to concentrated crack, and w = distributed self-weight (kips/ft) of girder. To make the equation determinant, it was assumed the sup- port reaction is the sum of half total force and self-weight, that is, = + 2 2 (3-5)R F wL The applied load versus midspan displacement plots com- paring the experimental results with the calculated hinge mechanism response for all unbonded segmental girders are presented in Figure 3-121 through Figure 3-123. The analyti- cal model was only completed by using displacements after the load drop in each girder. These plots further confirm the formation of the hinge mechanism in segmental girders with unbonded post-tensioning. For Girder UNB3, the calculated resistance values were higher than the measured values. This is because the vertical slip that was experienced at the crack location in Girder UNB3 was not addressed. 3.5.3 Parametric Study Results Further analysis was completed for reinforced concrete as well as pre-tensioned and post-tensioned segmental girders for additional evaluation of the effect of the following param- eters: concrete compressive strength, area of steel, modulus of rupture, span/depth ratio, steel depth, span length, and ten- don bond at deviators. In this parametric study, the proposed minimum flexural reinforcement was used in each girder. For reinforced concrete and pre-tensioned concrete girders, Response 2000 software (Bentz and Collins 2001) was used to develop the moment versus curvature relationships. For post- tensioned segmental girders, NRPF software (Ariyawardena 2000) was used. For reinforced concrete and pre-tensioned concrete girders, constant fcâ², fy, and fpu were used. For the reinforced concrete girder, an inverted-tee cross section was used, similar to Girders RC1 and RC2, with a width of 36 in. For the pre- tensioned concrete girders, only bulb-tee girders were consid- ered, with the baseline dimensions similar to those of Girder BTC60. The span/depth ratio was also kept constant. For all cases, the theoretical value of the minimum reinforcement was provided for the girders. The results of the parametric study are summarized in Table 3-14 and Table 3-15 as well as in Figure 3-124 through Figure 3-126. It can be seen that for various member depths, the variation in Mo/Mcr, Do/Dcr, and Do/span was approximately constant for reinforced concrete inverted-tee and pre-tensioned concrete bulb-tee girdersâthe more common girder shapes used in practice. This shows that provisions for the recommended mini- mum reinforcement requirement can provide a uniform per- formance level with varying member depth, although the Figure 3-120. Free-body diagram of unbonded segmental girder after the hinging mechanism formed (Cc = compression force in concrete; Tpt = post-tensioning force).
81 0 5 10 15 20 25 30 35 40 45 50 0 1 2 3 4 5 Ap pl ie d Lo ad (k ip ) Midspan Displacement (in.) Experimental Data Analytical Model Figure 3-121. Comparison of applied load versus midspan displacement for Girder UNB1 during the response dominated by a hinging mechanism. 0 20 40 60 80 100 120 - 1.00 2.00 3.00 4.00 5.00 Ap pl ie d Lo ad (k ip ) Midspan Displacement (in.) Experimental Data Analytical Model Figure 3-122. Comparison of applied load versus midspan displacement for Girder UNB2 during the response dominated by a hinging mechanism.
82 Span (ft) Member Depth (ft) fr (psi) Mo/Mcr cr o/span Reinforced Concrete Inverted-Tee (span/depth ratio = 12) 36 3 343.43 1.65 28.59 0.018 48 4 328.93 1.68 28.33 0.019 60 5 318.10 1.67 27.81 0.018 72 6 309.52 1.67 29.37 0.018 84 7 302.44 1.68 30.34 0.018 96 8 296.45 1.67 27.75 0.018 108 9 291.25 1.70 28.36 0.019 120 10 286.69 1.69 27.47 0.019 132 11 282.62 1.70 27.65 0.019 144 12 278.95 1.69 25.38 0.018 Pre-tensioned Concrete Bulb-Tee (span/depth ratio = 18) 83.25 4.625 321.84 1.69 7.61 0.006 101.25 5.625 312.53 1.66 7.13 0.005 119.25 6.625 304.95 1.64 6.33 0.005 137.25 7.625 298.59 1.64 6.69 0.005 155.25 8.625 293.12 1.64 6.56 0.005 173.25 9.625 288.34 1.64 6.31 0.005 191.25 10.625 284.09 1.64 6.06 0.004 209.25 11.625 280.29 1.65 6.31 0.005 227.25 12.625 276.84 1.66 6.67 0.005 245.25 13.625 273.69 1.66 6.22 0.004 o/ Table 3-14. Results of parametric analyses of reinforced concrete and pre-tensioned concrete girders. 0 20 40 60 80 100 120 140 160 180 200 - 2 4 6 8 10 Ap pl ie d Lo ad (k ip ) Midspan Displacement (in.) Experimental Data Analytical Model Figure 3-123. Comparison of applied load versus midspan displacement for Girder UNB3 during the response dominated by a hinging mechanism.
83 ID Span (ft) Member Depth (ft) At Deviators Span/Depth Ratio Area of Steel Mo/Mcr 1 27 1.5 Frictionless 18 Minimum 1.024 4.15 2 54 3 Frictionless 18 Minimum 1.052 7.15 3 81 4.5 Frictionless 18 Minimum 1.046 10.00 4 108 6 Frictionless 18 Minimum 1.153 15.08 5 54 3 No Slip 18 Minimum 1.225 3.75 6 108 6 No Slip 18 Minimum 1.227 11.59 7 54 6 Frictionless 9 Minimum 1.118 16.48 8 27 6 Frictionless 4.5 Minimum 1.124 12.16 9 54 3 Frictionless 18 2 * minimum 1.061 2.35 o/ cr Table 3-15. Results of parametric analyses of unbonded post-tensioned segmental girders. 1.20 1.30 1.40 1.50 1.60 1.70 1.80 0 20 40 60 80 100 120 140 160 180 M o/ M cr Beam Height (in.) Reinforced Concrete Pretensioned Figure 3-124. Mo /Mcr versus beam height for reinforced concrete and pre-tensioned concrete girders parametric studies. 0.00 5.00 10.00 15.00 20.00 25.00 30.00 35.00 0 20 40 60 80 100 120 140 160 180 Beam Height (in.) Reinforced Concrete Pretensioned o/ cr Figure 3-125. Do /Dcr versus beam height for reinforced concrete and pre-tensioned concrete girders parametric studies.
84 rupture stress varied. Even though some variations of the Mo/Mcr ratios exist, the minimum is still 1.64, well above 1.2, which is the current acceptable limit. Several parameters of interest for the unbonded post-ten- sioned segmental girders are as follows: 1. Bond condition. The surface-to-surface interaction between the tendons and the deviators for external, unbonded tendons was determined to be a friction- less surface to cover the potential use of flexible fillers in ducts. With traditional grout used in the duct, there will be significant slip resistance at the deviators. To model what occurs with frictional effects, the bond was varied to prevent slipping at the deviators. This increased the over- strength moment ratio but reduced the final displacement and thus the displacement ductility. 2. Area of steel. When the amount of steel in an unbonded segmental beam was doubled while the tendon stress was maintained in one of the analyses, the overstrength moment ratio did not change significantly, due to the increase in the cracking moment. A common design practice to overcome the minimum flexural reinforce- ment requirements for prestressed segmental girders is to add prestressing steel while reducing the stress in each strand so that fcpe remains unchanged, thus preventing an iterative process in solving for the cracking moment. The major disadvantage to this design procedure is the decrease in the effectiveness of the materials and competi- tiveness of the prestressed girders. 3. Span length. The length of the span does not signifi- cantly vary the overstrength moment ratio. There is a slight trend that as the span length is increased, the overstrength moment ratio increases. However, the correlation is not very strong. The overstrength moment ratio versus span length for unbonded segmental girders is presented in Fig- ure 3-127. The overstrength moment ratio is less than the traditionally acceptable 1.2, but there are a few areas where change would be expected in realistic cases. With the friction accounted for at the deviators, a growth in the overstrength moment ratio of 8%â18% is expected. The most realistic span length shows overstrength moment ratios close to 1.2. These two factors show the expected overstrength moment ratio will be above 1.2 Mcr if that is controlling over the required moment demand, αMu. 0.00 0.20 0.40 0.60 0.80 1.00 1.20 1.40 0 20 40 60 80 100 120 O ve rs tr en gt h M om en t R at io Span Length (ft) Figure 3-127. Overstrength moment ratio versus span length for unbonded segmental girders. 0.000 0.005 0.010 0.015 0.020 0.025 0 20 40 60 80 100 120 140 160 180 o/ sp an Beam Height (in.) Reinforced Concrete Pretensioned Figure 3-126. Do /span versus beam height for reinforced concrete and pre-tensioned concrete girders parametric studies.
