


Below is the uncorrected machine-read text of this chapter, intended to provide our own search engines and external engines with highly rich, chapter-representative searchable text of each book. Because it is UNCORRECTED material, please consider the following text as a useful but insufficient proxy for the authoritative book pages.
24 This chapter presents the results of the analytical and experimental programs conducted to validate the full-depth precast concrete panel system proposed in Chapter 2 and to offer guide- lines for its design. The affected sections in the AASHTO LRFD Bridge Design Specifications and proposed revisions to these sections are also presented. 3.1 Analytical Program 3.1.1 Objectives of the Analytical Program As stated in Chapter 2, the goal of this project was to extend the limit for spacing between shear connector clusters to 6 ft from the current limit of 4 ft. Investigation was done using discrete connections between the deck and the girder, with the remainder of the haunch in the space between connectors kept unfilled. However, the research team has no objection to fill- ing the haunches with a flowable cementitious material. All details and conclusions reached in this research would equally apply to both options. Table 3.1 provides a summary of the design requirements and the parameters used in the analytical program. The design requirements were divided into two groups: design requirements related to the precast deck and design requirements related to the composite slabâbeam system. The analysis was conducted for spacing between the shear connector clusters ranging from 2 ft to 8 ft. In the analytical investigation, the case of 8-ft spacing was considered to have a more comprehensive understanding of trends in the results. 3.1.2 Design Requirement 1: Flexural Design of Deck 3.1.2.1 Solid Slabs Supported by Discrete Supports The purpose of this analysis was to investigate the effect of using discrete joints at 2-ft, 4-ft, 6-ft, and 8-ft spacing on the design of concrete decks. This investigation was conducted for three values of girder spacing (6 ft, 9 ft, and 12 ft), which are labeled G6, G9, and G12 in this study. An 8-in.-thick slab was considered for all cases. The concrete compressive strength of the deck was set at 6,000 psi. The number of girder lines and size of the deck considered are shown in Table 3.2. The following values of spacing for the shear connectors were considered: ⢠C0: Represents a continuous haunch. ⢠C2, C4, C6, and C8: Represent discrete joints at 2-ft, 4-ft, 6-ft, and 8-ft spacing, respectively. The analysis was conducted using a commercial finite element analysis software. The slab was modeled using 6 in. à 6 in. shell elements. The deck supports were point supports along the C H A P T E R 3 Research Findings
Research Findings 25 girder lines. The point supports allowed rotation in all directions, while restraining displacement in all directions. Loading was applied using the rear axle of an HL93 truck. It represents 32 kips per axle, or 16 kips per wheel. The tire contact area was 24 in. Ã 12 in. to match the size of the finite element mesh used in the analysis, which is close to the AASHTO recommended area of 20 in. Ã 10 in. Uniform pressure of 8 k/ft2 was applied to the contact area to provide 16 kips per wheel. Single and double trucks were used in the analysis to determine the maximum effects for each case. A multiple presence factor of 1.2 for one-lane loaded and 1.0 for two-lane loaded was applied. Dynamic load allowance of 1.33 was considered. Analysis of G6C8 using 6-in.- and 10-in.-thick slabs was also conducted to study the effect of the slab thickness on the flexural behavior. Results of the study are summarized in Table 3.3 and Table 3.4. The following observations were obtained from the finite element analysis: 1. As the spacing between the discrete joints increases, the slab behavior approaches a column- supported two-way slab. Bending moment in the transverse direction deviates from that Bridge Component Design Requirements Analysis Method Design Parameters and Corresponding Range Bridge Span (ft) Girder Spacing (ft) Span-to- Girder Depth Ratio Girder Strength (ksi) Haunch Spacing (ft) Haunch Size (in.) Haunch Thickness (in.) Deck Thickness (in.) Deck Strength (ksi) (I) Precast concrete deck 1. Flexure design FEA na 6, 9, 12 na na 2, 4, 6, 8 12 x 12, 24 x 24 na 6, 8, 10 in. (solid) and 5.5/8.5 in. (variable)a na 2. Two-way shear at discrete joints 3. Two-way shear at wheel loads na na na 4. Bearing stresses 6, 9, 12 2, 4, 6, 8 12 x 12, 24 x 24 5. One-way shear Vierendeel Model and Simplified Beam Analysis 80, 144, 216 6, 12 20, 35 6, 12 4, 8 12 x 12, 24 x 24 2, 6 7.5, 10 6 (II) Composite slabâbeam 6. Flexure design 2, 4, 6, 87. Deflection 8. Interface shear 9. Vertical shear 10. Distribution factors 3-D FEA 100, 120, 160, 216 6, 9, 10, 12.75 20, 35 6, 12 2, 4, 6, 8 12-in. long, 24-in. long 2, 6 7.5, 10 4, 8 Note: FEA = finite element analysis; na = not applicable. a5.5/8.5 in. indicates the thickness of the thin part to the thickness of the thick part of the variable thickness slab . Table 3.1. Design requirements and matrix of parameters used in the analytical investigation. Case Girder Spacing (ft) Number of Girder Lines Deck Width (ft) Deck Length (ft) G6 6 9 48 36 G9 9 7 54 36 G12 12 5 48 36 Table 3.2. Number of girder lines and size of the deck.
Case Girder Spacing (ft) Spacing Between Joints (ft) Transverse Direction Longitudinal Direction (k-ft/ft) LRFD Table A4-1 (k-ft/ft) FEA (k-ft/ft) M+ve M-ve @ 12 in. M-ve @ 6 in. M+ve M-ve @ 12 in. 24 x 24-in. haunch M-ve @ 6 in. 12 x 12-in. haunch M+ve M-ve @ 12 in. 12 x 12-in. haunch FEA % FEA % FEA % FEA M long./ M trans. (%) FEA M long./ M trans. @ 6 in. (%) G6C0 6 Uniform 4.83 -2.31 -3.5 4.533 6.1 -2.480 -7.4 -2.795 20.1 2.388 52.68 0.000 0.00 G6C2 6 2 4.558 5.6 -2.501 -8.3 -3.122 10.8 2.451 53.77 -0.985 31.55 G6C4 6 4 4.718 2.3 -2.571 -11.3 -3.811 -8.9 2.519 53.39 -2.445 64.16 G6C6 6 6 4.892 -1.3 -2.806 -21.5 -4.255 -21.6 2.557 52.27 -2.977 69.96 G6C8 6 8 4.983 -3.2 -2.933 -27.0 -4.469 -27.7 2.630 52.78 -3.813 85.32 G9C0 9 Uniform 6.29 -3.71 -5.13 5.907 6.1 -3.530 4.9 -4.475 12.8 3.554 60.17 0.000 0.00 G9C2 9 2 5.972 5.1 -3.575 3.6 -4.576 10.8 4.025 67.40 -1.325 28.96 G9C4 9 4 6.030 4.1 -3.853 -3.9 -5.228 -1.9 4.750 78.77 -3.139 60.04 G9C6 9 6 6.252 0.6 -4.234 -14.1 -6.042 -17.8 5.822 93.12 -4.394 72.72 G9C8 9 8 6.410 -1.9 -4.493 -21.1 -6.456 -25.8 6.360 99.22 -5.131 79.48 G12C0 12 Uniform 8.01 -6.74 -8.51 7.155 10.7 -4.456 33.9 -5.303 37.7 4.341 60.67 0.000 0.00 G12C2 12 2 7.241 9.6 -4.896 27.4 -5.611 34.1 4.860 67.12 -1.468 26.16 G12C4 12 4 7.246 9.5 -5.369 20.3 -6.989 17.9 5.008 69.11 -3.398 48.62 G12C6 12 6 7.431 7.2 -5.621 16.6 -7.614 10.5 6.260 84.24 -4.790 62.91 G12C8 12 8 7.658 4.4 -6.101 9.5 -8.340 2.0 6.682 87.26 -5.655 67.81 Note: M = moment; M+ve = positive moment; M-ve = negative moment; long. = longitude; trans. = transverse. Table 3.3. Maximum bending moment caused by the rear axle of HL93 truck for solid-thickness slab.
Research Findings 27 given by Table A4.1 of the AASHTO LRFD Bridge Design Specifications, where one-way slab behavior is considered. 2. Discrete joints have a more pronounced effect on the negative moment than on the positive moment. 3. Discrete joints create significant values of positive and negative moments in the longitudinal (secondary) direction and should not be ignored. 4. In all cases, the longitudinal (secondary) positive and negative moments are smaller than corresponding transverse (primary) moments. 5. Changing the thickness of the slab from 6 in. to 10 in. does not have a significant effect on the moment in both directions. 6. Since the analysis was conducted assuming that the slab behaves perfectly elastic, changing the concrete strength of the slab had no effect on the flexural behavior of the slab. 3.1.2.2 Variable-Thickness Ribbed Slabs Supported by Discrete Joints Figure 3.1 shows the longitudinal cross section of the finite element model used for analysis of the variable-thickness slab. Two longitudinal ribs between the girder lines were considered. The analysis was conducted using a commercial finite element analysis package. Parameters of the model were similar to those used in the analysis of the solid panel system. Analysis showed that the slab behaves similarly to a solid-thickness slab in the longitudinal and transverse direction. Based on the finite element analysis results, a set of design tools were developed to aid the design of solid-thickness and variable-thickness slabs. Table 3.5 summarizes the design tools. The design tools provide the longitudinal and transverse bending moments and reactions caused by the rear axle of the HL93 truck and 100 psf. Figure 3.2 to Figure 3.4 show the force effects caused by the rear axle of the HL93 truck. Figure 3.5 to Figure 3.7 show the force effects caused by 100 psf uniform load. Case Girder Spacing (ft) Slab Thickness (in) Spacing between joints (ft) Results of FEA Tranverse Direction (k-ft/ft) Longitudinal Direction (k-ft/ft) M+ve M+ve M-ve @ 12 in. 24 x 24-in. haunch M-ve @ 6 in. 12 x 12-in. haunch M+ve M-ve FEA % FEA % FEA % FEA % FEA % G6C8 6 6 8 4.944 99.2 -2.994 102.1 -4.547 101.7 2.595 98.7 -3.862 101.3 G6C8 Baseline 6 8 8 4.983 100.0 -2.933 100.0 -4.469 100.0 2.630 100.0 -3.813 100.0 G6C8 6 10 8 5.028 100.9 -2.857 97.4 -4.373 97.9 2.67 101.5 -3.763 98.7 Table 3.4. Checking the effect of the slab thickness on the behavior of slabs supported by discrete joints. Figure 3.1. Longitudinal cross section of the finite element model used for analysis of the variable-thickness slab.
28 Simplified Full-Depth Precast Concrete Deck Panel Systems Design Aid Description Figure 3.2 Transverse bending moment caused by rear axle of an HL93 truck (including multiple presence factor and dynamic allowance) Figure 3.3 Longitudinal bending moment caused by rear axle of an HL93 truck solid-thickness slab Figure 3.4 Reaction caused by rear axle of an HL93 truck (including multiple presence factor and dynamic allowance) Figure 3.5 Transverse bending moment caused by 100 psf uniform load Figure 3.6 Longitudinal bending moment caused by 100 psf uniform load Figure 3.7 Reaction caused by 100 psf uniform load (including multiple presence factor and dynamic allowance) for Table 3.5. Summary of tools developed for design of solid-thickness and variable-thickness ribbed slabs supported by discrete joints. 0.0 0.5 1.0 1.5 2.0 2.5 2 3 4 5 6 7 8 M om en t ( ki p- ft /ft ) Connector Spacing (ft) Transverse Positive Moment 6 ft GS 9 ft GS 12 ft GS -9.0 -8.0 -7.0 -6.0 -5.0 -4.0 -3.0 -2.0 -1.0 0.0 2 3 4 5 6 7 8 M om en t ( ki p- ft /ft ) Transverse Negative Moment (12 x 12 in. haunches) Connector Spacing (ft) 6 ft GS 9 ft GS 12 ft GS (a) (b) Figure 3.2. Transverse bending moment caused by the rear axle of the HL93 truck (including multiple presence factor and dynamic allowance) for solid-thickness and variable-thickness ribbed slabs (GS = girder spacing).
Research Findings 29 -7.0 -6.0 -5.0 -4.0 -3.0 -2.0 -1.0 0.0 2 3 4 5 6 7 8 M om en t ( ki p- ft /ft ) Transverse Negative Moment (24 x 24 in. haunches) Connector Spacing (ft) 6 ft GS 9 ft GS 12 ft GS (c) Figure 3.2. (Continued). 0.0 1.0 2.0 3.0 4.0 5.0 6.0 7.0 8.0 M om en t ( ki p- ft /ft ) 2 3 4 5 6 7 8 Connector Spacing (ft) Longitudinal Positive Moment 6 ft GS 9 ft GS 12 ft GS -6.0 -5.0 -4.0 -3.0 -2.0 -1.0 0.0 2 3 4 5 6 7 8 M om en t ( ki p- ft /ft ) Connector Spacing (ft) Longitudinal Negative Moment 6 ft GS 9 ft GS 12 ft GS (a) (b) Figure 3.3. Longitudinal bending moment caused by the rear axle of the HL93 truck (including multiple presence factor and dynamic allowance) for solid-thickness and variable-thickness ribbed slabs.
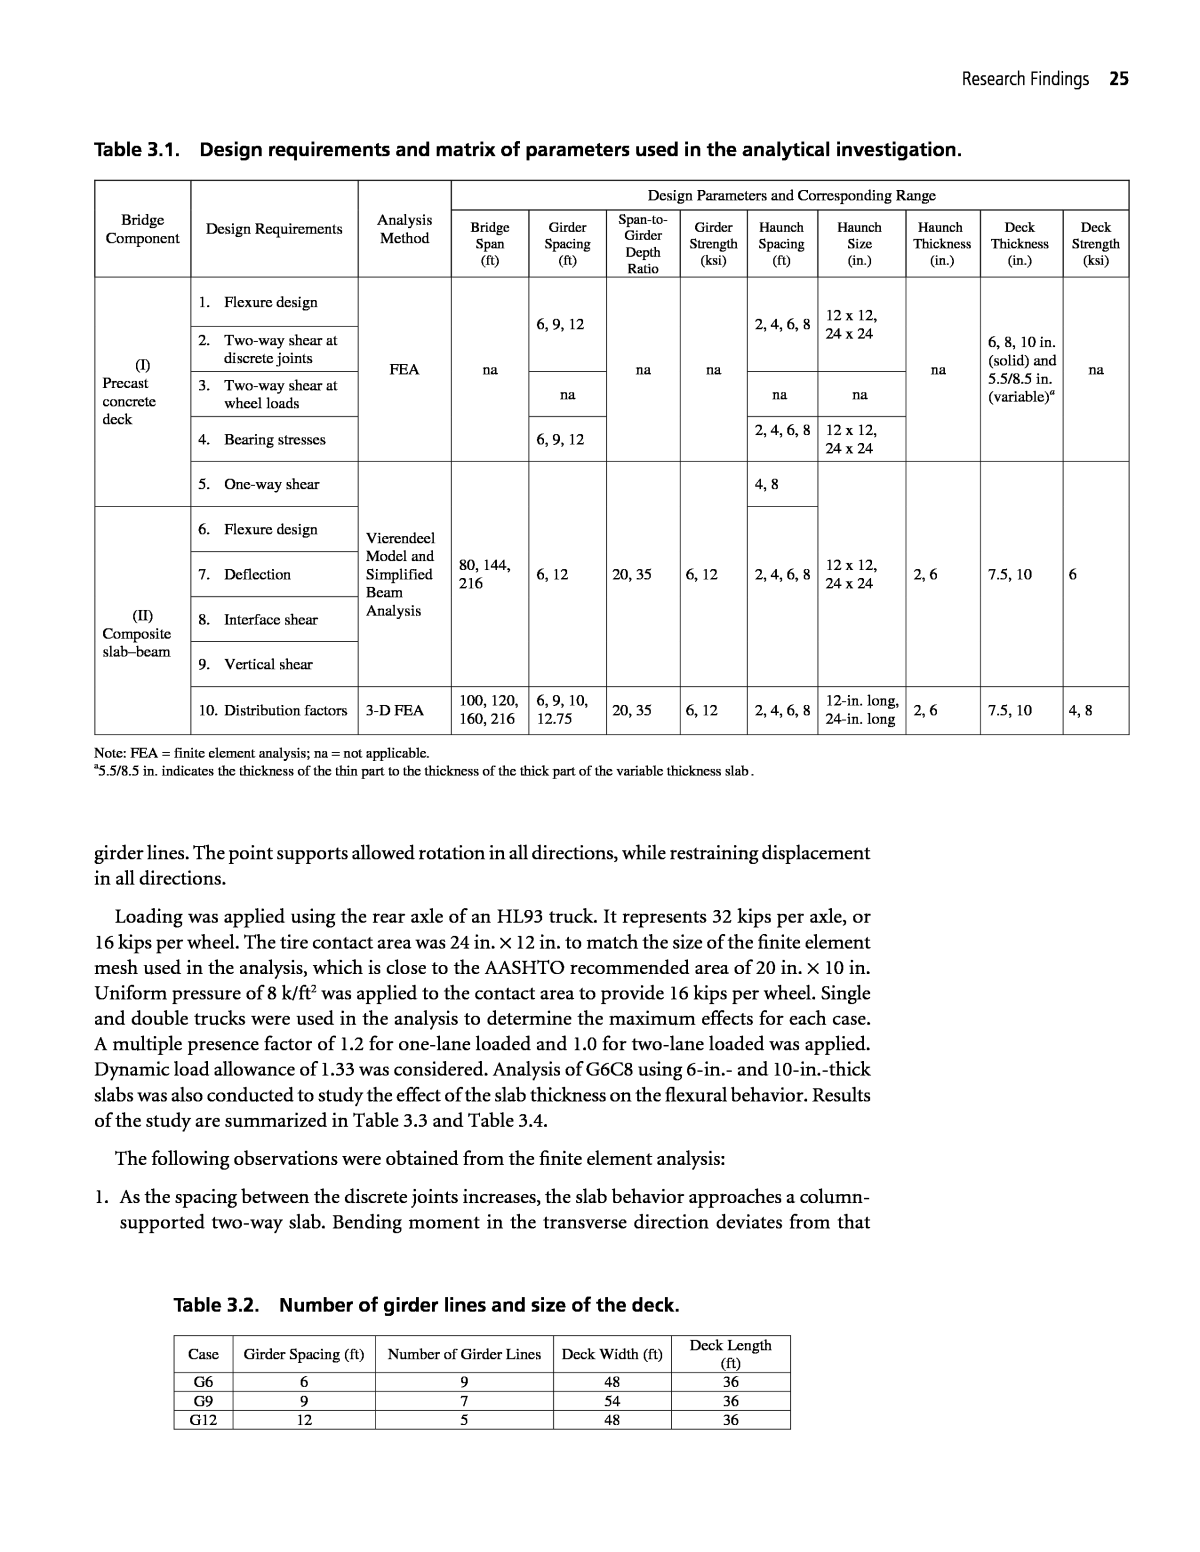
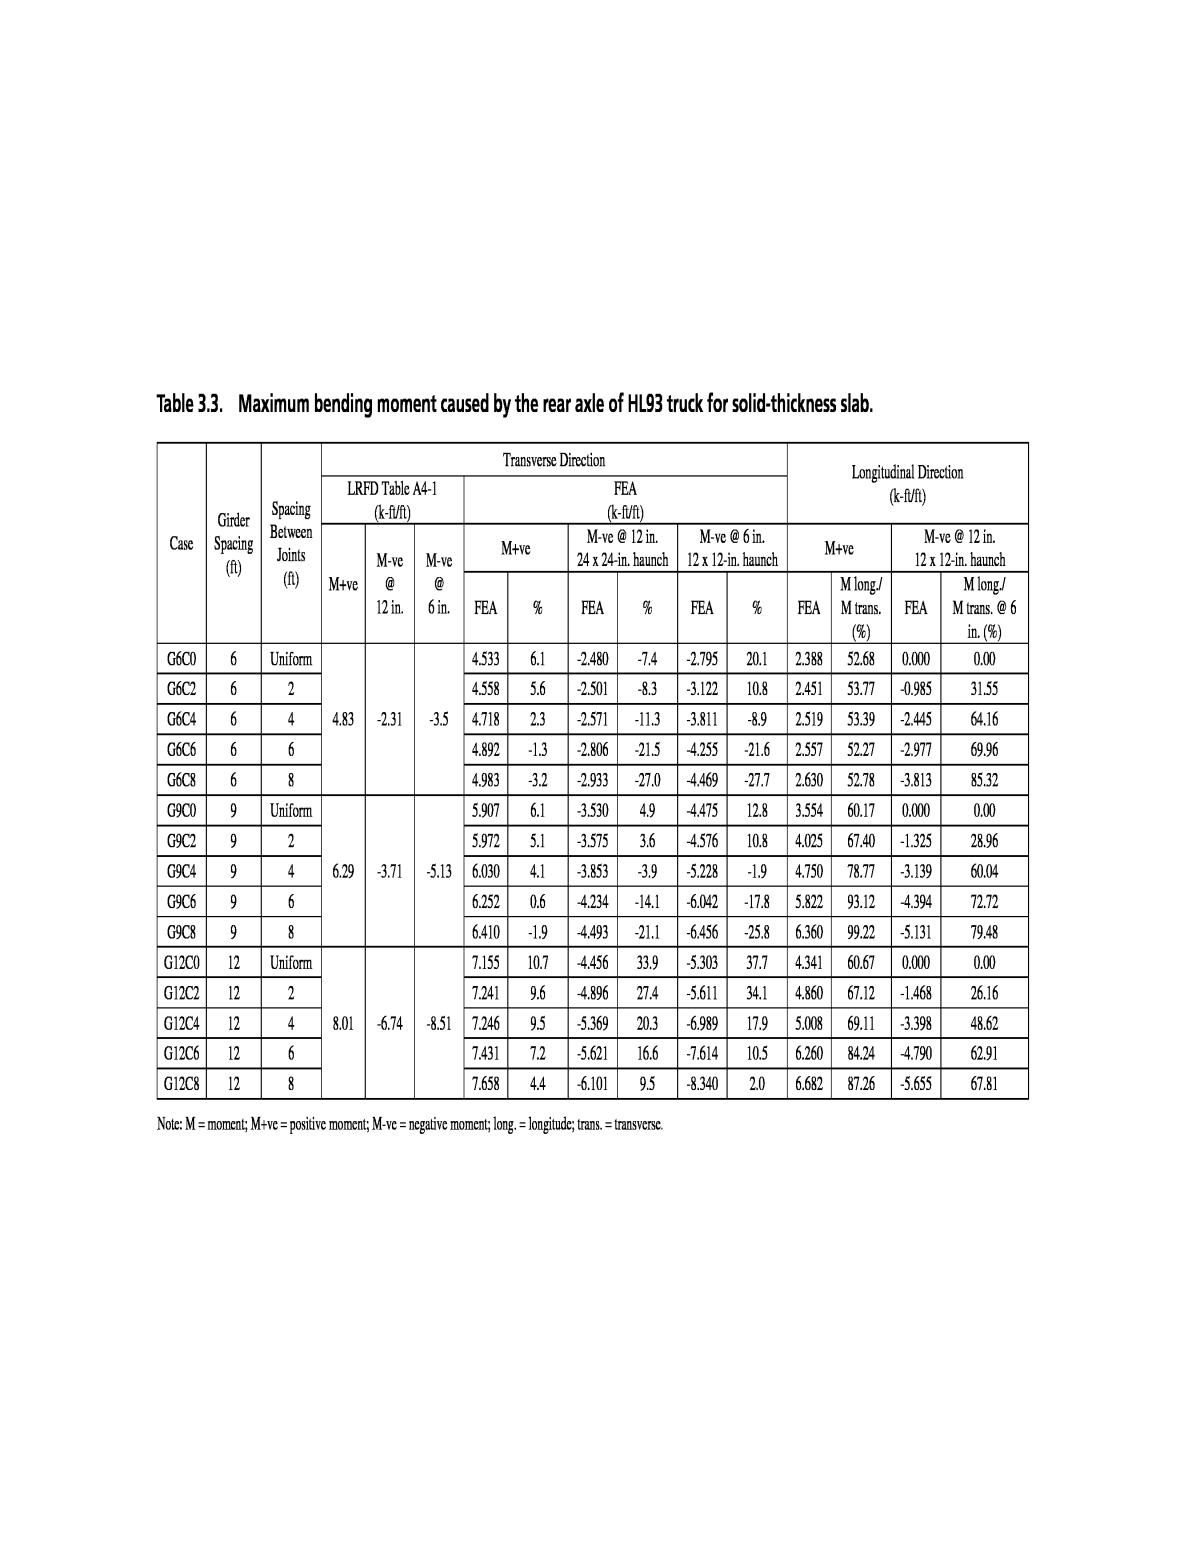
30 Simplified Full-Depth Precast Concrete Deck Panel Systems 0.0 10.0 20.0 30.0 40.0 50.0 60.0 2 3 4 5 6 7 8 Re ac tio n (k ip s) Connector Spacing (ft) Reaction 6 ft GS 9 ft GS 12 ft GS Figure 3.4. Reaction caused by the rear axle of the HL93 truck (including multiple presence factor and dynamic allowance) for solid-thickness and variable-thickness ribbed slabs. 0.0 0.5 1.0 1.5 2.0 2.5 2 3 4 5 6 7 8 M om en t ( ki p- ft /ft ) Connector Spacing (ft) Transverse Positive Moment 6 ft GS 9 ft GS 12 ft GS -2.5 -2.0 -1.5 -1.0 -0.5 0.0 2 3 4 5 6 7 8 M om en t ( ki p- ft /ft ) Connector Spacing (ft) Transverse Negative Moment at 6 in. 6 ft GS 9 ft GS 12 ft GS (a) (b) Figure 3.5. Transverse bending moment caused by 100 psf uniform load for solid-thickness and variable-thickness ribbed slabs.
Research Findings 31 0.0 0.5 1.0 1.5 2.0 2 3 4 5 6 7 8 M om en t ( ki p- ft /ft ) Connector Spacing (ft) Longitudinal Positive Moment 6 ft GS 9 ft GS 12 ft GS -2.0 -1.5 -1.0 -0.5 0.0 2 3 4 5 6 7 8 M om en t ( ki p- ft /ft ) Connector Spacing (ft) Longitudinal Negative Moment 6 ft GS 9 ft GS 12 ft GS (a) (b) Figure 3.6. Longitudinal bending moment caused by 100 psf uniform load for solid-thickness and variable-thickness ribbed slabs. -2.5 -2.0 -1.5 -1.0 -0.5 0.0 2 3 4 5 6 7 8 M om en t ( ki p- ft /ft ) Connector Spacing (ft) Transverse Negative Moment at 12 in. 6 ft GS 9 ft GS 12 ft GS (c) Figure 3.5. (Continued).
32 Simplified Full-Depth Precast Concrete Deck Panel Systems 3.1.3 Design Requirement 2: Two-Way Shear at the Discrete Joints Since the deck slab is supported by discrete joints, two-way (punching) shear of the slab should be checked around the joint. The check for the two-way shear should follow the provi- sions given by Article 5.12.8.6.3 of the AASHTO LRFD Bridge Design Specifications. The analysis showed that an 8.5-in.-thick slab with 2.0 in. of clear concrete cover provides adequate capacity to resist the two-way shear around the joint. Input criteria: 12-ft girder spacing, 6-ft haunch spacing, and 1-ft à 1-ft haunch: Case G12C6. This case was selected because it produces the highest reaction at the connection. ( ) ( ) ( )( ) ( ) ( ) ( )( ) ( ) = = = = = = + = = + Deck minimum specified concrete strength 6 ksi 8.5-in. solid-thickness panel: Slab weight 8.5 12 ft 150 pcf 106 psf Barrier weight = 2 barriers 300 lb ft barrier 5 girder lines 120 lb/ft = 120 lb ft 12-ft girder spacing 10 psf DC load 106 10 116 psf DW load: 2-inch Wearing surface load = 2 12 ft 150 pcf 25 psf LL I load: HS20 truck with multiple presence factor and dynamic allowance DC = component and attachment, DW = wearing surfaces and utilities, LL = live load, and I = dynamic allowance. Solution: Reaction due to 100 psf = 8.8 kips (Figure 3.7) Reaction due to HS20 truck (with multiple presence factor and dynamic allowance) = 45 kips (Figure 3.4) 0.0 2.0 4.0 6.0 8.0 10.0 12.0 2 3 4 5 6 7 8 Re ac tio n (k ip s) Connector Spacing (ft) Reaction 6 ft GS 9 ft GS 12 ft GS Figure 3.7. Reaction caused by 100 psf uniform load for solid-thickness and variable-thickness ribbed slabs.
Research Findings 33 Factored two-way shear: Vu ( )( ) ( ) ( ) ( ) ( )= + = + = + + = 1.25 8.8 kips DC =116 psf 100 psf 1.50 DW 25 psf 100 psf 1.75 45 kips 12.76 0.38 78.75 91.9 kips The nominal shear resistance Vn for sections without transverse reinforcement: ( )= + β  ï£ï£¬   Ⲡ⤠Ⲡâ0.063 0.126 0.126 LRFD Equation 5.12.8.6.3 1V f b d f b dn c c o v c o v Footprint of the discrete joint = 14 in. à 20 in. 20 14 1.43, 8.5 2.0 6.5 ., 2(14 20) 68 in.d in bc v oβ = = = â = = + = Therefore: 0.126 0.126 6 68 6.5 136.4 kips 0.9 136.4 122.8 kips 91.9 kips V f b d V OK n c o v n ( )( ) ( ) = â² = = Ï = = > where βc = ratio of long side to short side of the rectangle through which the concentrated load or reaction force is transmitted, f â²c = compressive strength of concrete for use in design (ksi), bo = the perimeter of the critical section for shear (in.), dv = effective shear depth (in.), and ÏVn = design shear capacity. 3.1.4 Design Requirement 3: Two-Way Shear at Wheel Loads for Variable-Thickness Ribbed Slab Two-way shear caused by the 16-kips wheel load of the rear axle of the HL93 truck should be checked according to Article 5.12.8.6.3 of the AASHTO LRFD Bridge Design Specifications. The footprint of the wheel load should be determined using Article 3.6.1.2.5 Tire Contact Area of the AASHTO LRFD Bridge Design Specifications. The analysis showed that a 5-in.-thick slab with 2.0 in. of clear concrete cover provides adequate capacity to resist the two-way shear generated by the 16-kip wheel load. Tire contact area (LRFD Article 3.6.1.2.5): Tire width P 0.8 16 kips 0.8 20 in. 1.66 ft Tire length = 6.4 1 IM 100 6.4 1.75 1 0.33 14.90 in. 1.24 ft Thickness of thin slab 5 in. due to HL93, DC and DW loads 1.25 0.116 k ft 1.66 1.24 ft 1.5 0.025 k ft 1.66 1.24 ft 1.75 16 kips 1+33 100 = 37.62 kips 2 2 2 2 Vu ( ) ( ) ( ) ( ) ( )( ) ( ) ( ) ( ) ( ) = = = = γ + = + = = = = à + à +
34 Simplified Full-Depth Precast Concrete Deck Panel Systems 1.34, 5.0 3.0 2.0 in., (at level of reinforcement assuming 45-degree distribution) = 2 20 4 14.90 4 85.8 in. 0.126 0.126 6 85.8 2.0 53.0 kips 0.9(53.0) 47.7 kips 37.62 kips d b Therefore: V f b d V OK c v o n c o v n [ ]( ) ( ) ( )( ) β = = â = + + + = = â² = = Ï = = > 3.1.5 Design Requirement 4: Bearing Stresses Since the slab is supported by discrete joints, bearing stresses between the joint and the sup- porting girders should be checked. Bearing stress resistance should be determined according to Article 5.6.5 of AASHTO LRFD Bridge Design Specifications. The analysis showed that haunches and concrete girders made with 6-ksi minimum specified concrete strength provide adequate capacity to resist the bearing stresses. Factored reaction at the connection (Section 3.1.3) = 91.9 kips 0.85 6 (as a conservative approach) (bearing area, i.e., size of the joint) 14 20 = 280 in. 1.0 (as a conservative approach) 0.85 6 280 1.0 1428 kips 0.7 1428 = 999.6 kips 91.9 kips 1 1 2 P f A m f ksi A m P P OK n c c n n ( )( )( )( ) ( )( ) = â² â² = = à = = = Ï = >> where Pn = nominal bearing resistance (kips), A1 = area under bearing device (in.2), m = confinement modification factor, ÏPn = factored bearing resistance, and f â²c = compressive strength of concrete for use in design (ksi). 3.1.6 Analytical Model Used to Investigate Design Requirements 5 to 9 The goal of the following analysis is to investigate whether it is reasonable to use the Eulerâ Bernoulli Beam Theoryâgenerally used by designersâor whether correction factors would be required because of the use of discrete joints between the beams and the slab at the shear connectors. A slabâgirder systemâwhere the deck slab is supported by discrete jointsâcan be modeled as a Vierendeel structure, as shown in Figure 3.8. The top cord of the Vierendeel represents the slab
Research Findings 35 at its own centroid. Geometrical properties of the top chord are determined based on the slab thickness and effective flange width. The bottom cord of the Vierendeel represents the girder at its own centroid. Area and inertia of the bottom chord are taken as the geometrical properties of the girder. Vertical members of the Vierendeel structure are located at the joints. The vertical members are modeled in three individual parts: (1) a rigid link that spans the distance from the centroid of the girder (i.e., bottom chord) to the bottom surface of the haunch, (2) a flexible member that spans the height of the joint, and (3) a rigid link that spans the distance from the top surface of the haunch to the centroid of the slab (i.e., top chord). Area and moment of inertia of the rigid links are set to infinity (relatively very large values), while the area and inertia of the flexible ver- tical member that represents the haunch are determined based on of the footprint dimensions of the haunch. Supports of the Vierendeel Model are assumed to be provided at the bottom surface of the girder. Therefore, additional rigid links are provided at ends of the Vierendeel Model to span the distance between the centroid of the girder (i.e., bottom chord) and bottom surface of the girder. The bottom node of these rigid links represents a roller support at one end and a pin support at the other end of the Vierendeel Model to emulate a simply supported span bridge. The proposed Vierendeel Model is similar to a simplified spine model used to design highway bridges (i.e., the superstructure and the supporting abutments and piers of bridges) (California DOT 2015). The proposed Vierendeel Model was calibrated using Example 9.1(a) of the PCI Bridge Design Manual (Precast/Prestressed Concrete Institute 2011B), where the EulerâBernoulli Beam Theory is used. The calibration showed that the Vierendeel Model was able to represent the composite action with a high degree of accuracy, as shown in Table 3.6. The Vierendeel Model was used to study the effect of using the discrete joint system on the following design requirements listed in Table 3.1: ⢠One-way shear in deck (Design Requirement 5), ⢠Flexural design (Design Requirement 6), ⢠Deflection (Design Requirement 7), ⢠Interface shear (Design Requirement 8), and ⢠Vertical shear (Design Requirement 9). Figure 3.8. Vierendeel Model of a slabâgirder composite system with discrete joints.
36 Simplified Full-Depth Precast Concrete Deck Panel Systems In addition, the Vierendeel Model was used to study the effect of varying the following param- eters on the design requirements: ⢠Span length = 80 ft to 216 ft, ⢠Span-to-girder depth ratio = 15 to 35, ⢠Girder spacing = 6 ft to 12 ft, ⢠Girder material = concrete girders (6 ksi and 12 ksi) and steel girders, ⢠Spacing between shear connectors = 2 ft to 8 ft, ⢠Size of the bearing area at shear connections = 12 in. à 12 in. and 24 in. à 24 in., ⢠Thickness of the haunch = 2 in. to 6 in., and ⢠Thickness of the slab = 7.5 in. to 10 in. The following procedure was used in the parametric study to select the girder size and deter- mine its properties: 1. A span length was selected. 2. A span-to-girder depth ratio was selected. 3. The depth of the girder was determined using information from Steps 1 and 2. 4. The type of girder was selected as follows: â Concrete. The baseline for concrete strength is set at 6 ksi. The geometrical properties of the girder were determined using the area and inertia of typical top and bottom flangesâWashington State wide flange girder, for exampleâand the depth of the girder determined in Step 3. â Steel. The following dimensions were used to determine the geometrical properties of the girder: top and bottom flanges of 1.25-in.-thick à 20-in.-wide plates, respectively. Web: 0.75-inch thick. Height was determined from Step 3 after subtracting the thickness of the top and bottom flanges. 5. The following parameters were selected as the baseline: 6-ft girder spacing (concrete girder: f â²c = 6 ksi steel girder: yield strength Fy = 50 ksi), 24-in. à 24-in. joint bearing, 2-in.-thick haunch, and 7.5-in.-thick slab with f â²c = 6 ksi. 6. The analysis was conducted for a group of selected values for the joint spacing (between 2 ft and 8 ft). 7. Based on the results obtained from the baseline assumptions (Step 5), one of the parameters was changed to the opposite extreme to study the effect of that parameter on the behavior. For example, change the thickness of the slab from 7.5 in. to 10 in., or change the thickness of the haunch from 2 in. to 6 in., and so on. 8. In all cases, the results obtained from the Vierendeel Model were compared with those obtained from the simple EulerâBernoulli Beam Theory that is typically used by designers. The EulerâBernoulli Beam Model parameters were determined by assuming full composite action between the slab and the beam. Table 3.7 shows the criteria used for the parametric study. Condition (A) EulerâBernoulli Beam Theory (B) Vierendeel Model (B â A)/A (%) Moment caused by lane load only (kip-ft) 843.30 843.259 0.0 Deflection caused by HL93 truck (in.) 0.41 0.405 -1.2 Maximum horizontal shear caused by superimposed dead and live load (kip/in) 2.86 2.83 -1.0 Table 3.6. Comparison between the results obtained from the Vierendeel Model and those reported in Example 9.1(a) of the PCI Bridge Design Manual.
Research Findings 37 3.1.7 Design Requirement 5: One-Way Shear in the Slab The Vierendeel Model was loaded with the following combination of factored loads: DC Loads: Slab weight = (area of the slab ft2)(0.150 kcf) Barrier weight = (2 barriers)(0.3 k/ft/barrier)/(6 beams) DW Loads: Wearing surface = (girder spacing)(2-in.-thick layer)(0.150 kcf) LL: HS20 truck with distribution factor for shear determined using the AASHTO LRFD Bridge Design Specifications. The HS20 load was applied as a movable load with 1.33 dynamic allowance and 1.2 multiple presence factor. Strength I Limit State was used to determine the load effect. The vertical shear force in the top cord (i.e., the slab) was recorded at a distance dv from the face of the joint, where dv is the shear depth. The shear depth dv was set to 6 in. for the 7.5-in.-thick slabs and 8.5 in. for the 10-in.-thick slabs. The results obtained from the Vierendeel Model were compared with those obtained from a Simple Beam Model that was built assuming the slab behaves as a multispan beam supported by a group of point supports at every joint. The vertical shear obtained from the simplified model was reported at the critical section and at the center line of the end support. Table 3.8 and Table 3.9 show the results of the Vierendeel and simplified models. The comparison showed that it is reasonable to use the Simple Beam Model to determine the one-way shear in the slab, where the shear force is to be determined at the center line of the support. Span Length 80 ft 144 ft 216 ft Span-to-girder depth ratio 20 35 20 35 20 35 Girder type Concrete Concrete Concrete Concrete Steel Steel Girder depth (in.) 48.00 27.43 86.40 49.37 129.60 74.06 Area of girder (in.2) 767 641 1,002 776 145 104 Inertia of girder (in.4) 257,356 62,565 1,075,089 275,803 334,254 89,167 Table 3.7. Design criteria for the parametric study using the Vierendeel Model. Parameter Vertical Shear (kips) by Vierendeel Model (at critical section) Vertical Shear (kips) by Simplified Model (at critical section/at center line) Haunch spacing 4 ft 8 ft 4 ft 8 ft Span to depth = 20 80-ft-span bridge Concrete girder, 'cf = 6 ksi 2-in.-thick haunch 24-in. x 24-in. x 2-in. haunch 7.5-in. slab thickness 6-ft girder spacing 59.28 63.78 45.44/64.29 58.23/66.88 Change haunch thickness to 6 in. 59.05 63.23 Change haunch to 12 in. x 12 in. x 2 in. 65.32 67.10 Change slab thickness to 10 in. 69.15 69.41 45.80/64.85 59.50/68.02 Change span length to 144 ft 64.59 65.15 45.44/64.29 58.23/66.88 Change girder spacing to 12 ft 97.31 98.34 67.63/95.36 81.15/98.54 Change 'cf to 12 ksi 54.81 62.26 45.44/64.29 58.23/66.88 Table 3.8. Results of vertical shear in the slab.
38 Simplified Full-Depth Precast Concrete Deck Panel Systems 3.1.8 Design Requirement 6: Flexural Stresses of Composite Member Service I Limit State was used to determine the load effects. The following procedure was used to obtain the flexural stresses from the Vierendeel Model. At the section where the highest moment in the girder was recorded, moment in the top chord (slab) and in the bottom chord (beam) was recorded. The moment was used to determine the flexural stresses in the slab and the girder using their individual inertia and geometrical properties. Table 3.10 shows the matrix used in the parametric study. Details of the study and comparison tables are given in Appendix B. Comparison between the Vierendeel and simplified models showed that the Simple Beam Model gives very comparable results to the Vierendeel Model, where the average difference was ±3%. Therefore, it is reasonable to use the Simple Beam Model to determine the flexural stresses in the composite beam due to the superimposed dead and live loads. 3.1.9 Design Requirement 7: Deflection of Composite Member The Vierendeel Model was loaded only with the live load (i.e., HL93 model) with distribu- tion factor for moment (DFM) = 1.0, 1.33 dynamic effect added to the HL93 truck, and 1.0 load factor. The load was applied on the top chord of the Vierendeel Model. The matrix shown in Table 3.10 was used in the investigation. Details of the study and comparison tables are given in Appendix B. 8-ft haunch spacing 2-in.-thick haunch 24 in. x 24 in. x 2 in. joint 6-ft girder spacing Vierendeel Model (at critical section) Simplified Model (at critical section/at center line) 80 ft (concrete girder) 144 ft (concrete girder) 216 ft (steel girder) 80 ft (concrete girder) 144 ft (concrete girder) 216 ft (steel girder) Span-to-girder depth ratio = 20 63.78 kips 65.15 kips 56.06 kips 58.23/66.88 Span-to-girder depth ratio = 35 66.23 kips 65.99 kips 56.66 kips Table 3.9. Vertical shear in the slab: Effect of changing the span length, girder type, and span-to-girder depth ratio on vertical shear of the slab. Case No. Span-to- Depth Ratio Span (ft) Girder Spacing (ft) Slab Thickness (in.) Haunch Thickness (in.) Joint Size (ft x ft) Joint Spacing (ft) 1 (Baseline) 20 80, 144, and 216 6 7.5 2 2 x 2 2, 4, 6, and 8 2 6 7.5 6 2 x 2 3 6 7.5 2 1 x 1 4 12 7.5 2 2 x 2 5 6 10 2 2 x 2 6 6 10 6 2 x 2 7 (Baseline) 35 6 7.5 2 2 x 2 8 6 7.5 6 2 x 2 9 6 7.5 2 1 x 1 10 12 7.5 2 2 x 2 11 6 10 2 2 x 2 12 6 10 6 2 x 2 Table 3.10. Matrix of the parametric study for flexure design of the composite section.
Research Findings 39 Comparison between the Vierendeel and simplified models revealed that the Vierendeel Model showed a 5% to 7% increase in the deflection, compared to the Simple Beam Model when: (1) a thicker deck or haunch was used, (2) a higher span-to-depth ratio was used, and (3) wider spacing between the shear connector joints was used. This observation showed that the Simple Beam Model still can be used to determine the deflection of the composite beam after considering a proper reduction factor for the composite beam stiffness. This observation is acknowledged by the Steel Construction Manual (American Institute of Steel Construction 2017), where Section I3 states that, âComparison to short-term deflection tests indicate that the effective moment of inertia, Ieff, is 15% to 30% lower than that calculated based on linear elastic theory, Iequiv. Therefore, for realistic deflection calculations, Ieff should be taken 0.75 Iequiv.â This issue was further investigated in the experimental program and a more accurate reduction factor of the composite beam stiffness was developed, as shown in Section 3.2 and Section 3.3 of the report. 3.1.10 Design Requirement 8: Interface Shear Strength I Limit State was used to determine the load effects. The matrix shown in Table 3.10 was used in the investigation. Comparison between the Vierendeel Model and Simple Beam Model showed that the interface shear determined by the Simple Beam Model was always higher than the interface shear determined by the Vierendeel Model. Ratio of shear flow determined by the Simple Beam Model to the shear flow determined by the Vierendeel Model was about 1.15 to 1.30 across the board. Therefore, it is reasonable to use the simplified model as an approximate approach. In this case, it is expected that the horizontal shear reinforcement will be somewhat overestimated. A more accurate estimate of the interface shear can be determined using the Vierendeel Model. 3.1.11 Design Requirement 9: Vertical Shear of Composite Beam In a typical bridge, the noncomposite loads (i.e., beam, haunch, and slab weight) are supported by the girder, while the composite loads (i.e., parapet, wearing surface, and transient loads) are supported on the composite slabâgirder system. The shear force caused by the noncomposite loads can be easily determined using the simple EulerâBernoulli Beam Theory. The shear force caused by the composite loads can be determined using one of the following models. The first model is the Vierendeel Model, as discussed earlier. This model gives a more realistic picture of the behavior of the slabâbeam system because the slab is connected with the girder only at the locations of the discrete joints. In this case, the shear force that is reported in the bottom chord of the Vierendeel Model (i.e., the girder) should be used to design for the vertical shear in the girder. The second model is the simplified model using the simple EulerâBernoulli Beam Theory. Details of the study and comparison tables are given in Appendix B. Analysis of the results showed that the shear force caused by the composite loads obtained from the Simple Beam Model is about 10% higher than the shear forces obtained from the Vierendeel Model, regardless of the haunch spacing, haunch dimensions, girder spacing, or thickness of the slab. However, this increase has a small effect on the spacing of the shear reinforcement. Therefore, it is reason- able to use the simplified model to determine the vertical shear caused by composite loads. As will be shown from the full-scale experiments, separation between the girder and the deck when the haunches are not filled with concrete did not cause a deficiency in the shear capacity of the slabâbeam system. Until additional evidence is available, it may be prudent to count on the beam depth alone in calculating the vertical shear reinforcement.
40 Simplified Full-Depth Precast Concrete Deck Panel Systems 3.1.12 Design Requirement 10: Distribution Factors DFM and shear are key components for design of a bridge superstructure. Article 4.6.2.2 of the AASHTO LRFD Bridge Design Specifications provides a group of tables that are used to determine these factors for interior and exterior beams of slabâbeam bridges. Provisions of this article come primarily from the research conducted by Zokaie et al. (1991), where the slab was assumed to be supported by a continuous haunch. The following investigation was conducted to make sure that the provisions of Article 4.6.2.2 are reasonable to be used with slabâbeam bridges where the slab is supported by discrete joints. 3.1.12.1 Analytical Model A 3-D finite element model was used in the investigation. In this model, the full super- structure of a bridge was modeled. The slab and the haunch were modeled using the eight-node linear reduced-integration brick elements (C3D8R). Each supporting girder was modeled using a set of equivalent beams spread over a distance equal to the width of the top flange of the girder. The equivalent beams were modeled using 3-D frame elements that take into consideration the shift of the girder centroid from the bottom soffit of the haunch in their stiffness matrix. Geometrical properties of each set of equivalent beamsâincluding height, moment of inertia, and cross-sectional areaâwere equal to those of a single beam line. The contact surfaces between the slab and the discrete joints and between the discrete joints and the girders were fully tied to emulate full-composite action. Figure 3.9 shows a schematic of the Finite Element Model used in the investigation. Discrete joints were spaced on center at 2 ft, 4 ft, 6 ft, and 8 ft. The models were built with an advanced commercial finite element package. The following steps were used to determine the live load DFM: 1. Each Finite Element Model was analyzed because of noncomposite and composite dead loads plus the LRFD HL93 live load. Three live load scenarios were considered: one lane loaded, two lanes loaded, and three lanes loaded. In each live load scenario, stresses at the point of maximum bending moment of the interior girder were collected and the resulting bending moment was calculated. 2. DFM was determined as follows: DFM M m M j j i i n â ( )( )= =1 Figure 3.9. Details of the Finite Element Model used in the investigation for the distribution factors.
Research Findings 41 where DFMj = live load distribution factor for moment of girder j, Mj = live load bending moment of girder j (determined from Step 1), M i n iΣ =1 = sum of live load moment for all girders, and m = LRFD multiple presence factor = 1.2 for one lane loaded, 1.0 for two lanes loaded, and 0.85 for three lanes loaded. The steps used to determine the live load distribution factor for shear (DFV) were similar to the steps used to determine the DFM, except that the location of the HL93 live load model was adjusted to maximize the shear force toward the end of the girder. DFV was calculated as follows: DFV V m V j j i i n â ( )( )= =1 where DFVj = live load distribution factor for shear of girder j, Vj = live load shear of girder j, V i n iΣ =1 = sum of live load shear for all girders, and m = LRFD multiple presence factor = 1.2 for one lane loaded, 1.0 for two lanes loaded, and 0.85 for three lanes loaded. 3.1.12.2 Parametric Study Four design examples that represent a wide range of parameters that are commonly used on bridges today were selected. Table 3.11 summarizes the basic design criteria of these examples. Example 2 was adopted from Design Example 9.1(b) of the PCI Bridge Design Manual (Precast/Prestressed Concrete Institute 2011B), and Example 3 was adopted from Design Example 1 2 3 4 Span (ft) 100 120 160 216 SpanâGirder depth ratio 33 20 26 30 Subcriteria Thickness (in.) 7.5 7.5 9.0 8.0 Sacrificial slab (in.) 0.5 0.5 0.5 0.5 Concrete strength (ksi) 4 4 6 5 Inertia (in.4 ) 2,531.25 3,796.88 9,294.75 5,120.00 Modulus of elasticity (ksi) 3,834.25 3,834.25 4,695.98 4,286.83 Joint Criteria Thickness (in.) 2.0 0.5 2.0 2.0 Width (in.) 48 42 23 24 Length (in.) 12 12 12 12 Concrete Strength (ksi) 4 4 4 5 Girder Criteria Material Concrete Concrete Steel Steel Type New FIB-36 PCI BT-72 Built up Built up Spacing (ft) 6 9 12.75 10 Depth (in.) 36 72 73 86.5 Table 3.11. Basic criteria of the design examples used in the distribution factor investigation.
42 Simplified Full-Depth Precast Concrete Deck Panel Systems Example 1 of Highway Structures Design Handbook (American Iron and Steel Institute 1999), with some minor changes. The DFM and DFV determined for the four examples were compared with the distribution factors determined according to the AASHTO LRFD Bridge Design Specifications. For each case, the analysis was conducted for a case with a continuous haunch and joint spacing from 2 ft to 8 ft. To study the effect of changing some of the basic criteria on the distribution factors, a parametric investigation was also conducted, as shown in Table 3.12. Appendix B includes the calibration of the Finite Element Model, details of the study, and comparison tables and figures. The finite element investigation of the distribution factors showed that the DFM and shear of the AASHTO LRFD Bridge Design Specifications were always higher than the DFM and shear obtained by the finite element analysis, regardless of the number of loaded lanes, spacing between the discrete joints, type of the supporting girders, and span length of the bridge. Therefore, it is conservative and reasonable to use the DFM and shear given by the AASHTO LRFD Bridge Design Specifications for slabâI-beam bridges, where the slab is supported by discrete joints up to 8-ft spacing. This observation is consistent with the results obtained from similar previous studies, including May (2008) and Gheitasi and Harris (2014). Modeling the slab as a continuum using solid brick elements allowed the analysis to capture the arching effect inside the slab and to realistically distribute the live load to a relatively large number of girders. In addition, the grillage analysis that was used in the early 1990s to develop the formulas for the distribution factors and adopted by the AASHTO LRFD Bridge Design Specifications modeled the slab as a wire frame element and, therefore, did not fully capture the multidimensional behavior of the slab (Zokaie et al. 1991). It provided relatively conservative values of distribution factors. 3.1.13 Flexural Strength The design at failure typically uses the Whitney Equivalent Compression Block on the com- pression side of the section and the resultant of the tensile force on the other side. Therefore, the slabâbeam composite systemâwhich used discrete jointsâwill follow this typical behavior, and the flexural capacity of the system can be determined using the same procedure that is currently used with regular slabâbeam composite systems. This issue was confirmed by the results obtained from the experimental program and is discussed later in this chapter. 3.1.14 Top Flange Buckling In slabâbeam bridges built with precast deck panels and discrete joints, there are two stages at which buckling of the top flange of steel girders need to be checked. Stage 1: After the precast deck is installed on the bridge but not connected with the steel girders. At this stage, the steel girder will support the slab weight, its self-weight, and the construction load. The unsupported buckling length of the top flange is almost the full length Parameters Example Considered in Investigation Change 1âGirder concrete strength 1 8 ksi to 12 ksi 2âSlab concrete strength 1 4 ksi to 8 ksi 3âSlab thickness 1 7.5 in. to 10 in. 4âHaunch length 3 12 in. to 24 in. 5âHaunch thickness 3 2 in. to 6 in. Table 3.12. Criteria of the parametric investigation on the distribution factor.
Research Findings 43 of the span. This stage is typically checked, regardless of whether a continuous or discrete joint system is used. Stage 2: After the deck is connected with the steel girder and the bridge is open to traffic. The superimposed dead and live loads will create additional compressive stresses in the flange, but the unsupported buckling length of the flange will be the 6-ft spacing between haunches. The following sections provide discussion related to buckling of the top compression flange of steel and concrete girders for this stage. 3.1.14.1 Composite Beams with Steel Girders The top flange should be checked against lateral torsional buckling (LTB), as stated in Article 6.10.8.2.3 of the AASHTO LRFD Bridge Design Specifications; and flange local buckling (FLB), as stated in Article 6.10.8.2.2 of the AASHTO LRFD Bridge Design Specifications, as follows: LTB: Article 6.10.8.2.3 of the AASHTO LRFD Bridge Design Specifications states that the compression flange is considered compact if: L r E F p t yc ( )⤠1.0 LRFD Equation 6.10.8.2.3-4 where Lp = unbraced length of the compression flange (6 ft, in this case), E = modulus of elasticity of the top flange = 29,000 ksi, Fyc = yield strength of the top flange = 50 ksi, and rt = effective radius of gyration for LTB b D t b t fc c w fc fc ( )= + ï£ï£¬   12 1 1 3 LRFD Equation 6.10.8.2.3-9 If D t b t c w fc fc is taken conservatively as a representative value of 2.0 (LRFD C6.10.8.2.3), then r bt fc= 0.22 where bfc = the width of the top flange, Dc = depth of the web in compression in the elastic range (in.), tw = web thickness (in.), and tfc = thickness of the compression flange (in.). Therefore, to protect the top compression flange from LTB when the shear connector clusters are provided at 6 ft (i.e., 72 in.), the following condition must be satisfied: in b b in fc fc ( )( )⤠⥠72 1.0 0.22 29,000 50 13.39 . For most practical cases of highway bridges, width of the top flange of the steel girder is greater than 13.39 in.
44 Simplified Full-Depth Precast Concrete Deck Panel Systems FLB: Article 6.10.8.2.2 of the AASHTO LRFD Bridge Design Specifications states that the compression flange is considered compact if: b t E F b t t b fc fc yc fc fc fc fc ( )⤠⤠⥠2 0.38 LRFD Equation 6.10.8.2.2-3 and LRFD Equation 6.10.8.2.2-4 2 0.38 29,000 50 0.055 where bfc = full width of the compression flange (in.), E = modulus of elasticity of the deck concrete (ksi), and Fyc = specified minimum yield strength of a compression flange (ksi). Therefore, the minimum thickness of the compression flange will be as shown in Table 3.13. 3.1.14.2 Composite Beams with Concrete Girders The AASHTO LRFD Bridge Design Specifications do not provide any limits on the thickness or width of the compression flange to protect it against buckling. The following limits were found in the literature. Article 9.2.3.1(a) of the ACI318-14 Building Code: 50L bb ⤠where Lb = unbraced length of the compression flange Lb (72 in., in this case) and b = least width of the compression flange or face. It is presumed that this provision was intended to safeguard the compression flange against lateral instability failures. This provision has been in the ACI318 Building Code since the 1956 edition. However, no discussion has been provided on the background of this limit. b ⥠= ï£ï£¬   72 50 1.44 in. This limit is satisfied for all types of I-shape girders used on highway bridges (Timoshenko 1936). Parameter Case 1 Case 2 Case 3 Case 4 bfc (in.) 13.39 15 20 25 tfc (in.) 0.74 0.825 1.10 1.38 Table 3.13. Flange width and corresponding thickness.
Research Findings 45 Timoshenko has shown that the bending moment that is required to cause lateral bending can be expressed as follows: (1)M L EI GKbuckling b y t= Î where Lb = unbraced length of the compression flange Lb (6 ft, in this case), E = modulus of elasticity, G = shear modulus = E v( )+2 1 , n = Possion ratio (about 0.2 for concrete), Iy = moment of inertia of the beam about its vertical axis, and Kt = torsional constant = b ti i 1 3 3Σ for I-shape beam, where bi and ti are the long and the short dimensions of the top and bottom flanges and vertical web. Since this equation is only applicable for homogeneous uncracked beams, a reduction factor of 0.35 is presented to Iy and Kt to account for a cracked concrete beam. Therefore, Equation 1 can be rewritten in the following form: 0.41 3M E L I b tbuckling b y i iâ( )= In order to see the magnitude of Mbuckling, Example 9.1b of the PCI Bridge Design Manual (Precast/Prestressed Concrete Institute 2011B) was used: Concrete girder: BT-72 Span = 120 ft E = 4,617 ksi Lb = 72 in. Iy = 37,971 in.4 âbi t i3 = 28,803 in.4 (The following dimensions were considered: top flange = 42 in. à 4.5 in., vertical web = 54 in. à 6 in., and bottom flange = 26 in. à 8 in.) Then, Mbuckling = 72,367 k-ft The flexural design capacity of the beam ÏMn = 11,364 k-ft Comparing Mbuckling with ÏMn shows that this beam will fail in flexure a long time before it fails from lateral buckling. 3.1.15 Finite Element Analysis of Push-Off Specimens Nonlinear finite element analysis was used to investigate the behavior of the tested push-off specimens. The results obtained from the finite element analysis were compared with the results
46 Simplified Full-Depth Precast Concrete Deck Panel Systems obtained from the push-off specimens and the predicted capacity. An advanced commercial finite element package was used in the analysis (ABAQUS 6.13 package). The analysis was conducted at the Colonial One High-Performance Computing Facility at George Washington University. All elements of the modelâconcrete deck, concrete or steel girder, and shear connectors (steel studs or threaded rods)âwere modeled using the eight-node C3D8R brick elements, where âCâ denotes concrete, â3Dâ denotes three dimensional, â8â denotes total number of nodes, and âRâ denotes a reduced integration element, which brings down the number of integration points reducing running time without an unreasonable sacrifice of accuracy. Each node has three displacement degrees of freedom in the x, y, and z directions. The âxâ direction is parallel to the girder longitudinal axis, the âyâ direction is transverse to the girder longitudinal axis, and the âzâ direction is parallel to the girder height. The stress-strain relationships for the deck panels and grout shown in Figure 3.10 were used. Tension softening of the deck and grout material enabled the simulation of cracking. Once the tensile stress reaches the tensile limit, the material relieves its stress. A very steep release path will create instability, whereas too shallow a curve will slow down the stress release. In addition to the stressâstrain relationship, the Concrete Damage Plasticity Model used in ABAQUS for the deck and grout material requires defining the following parameters (Stephen 2006, Arab et al. 2011): ⢠Dilation angle in degrees, β: f f f f f f c r c r c r β = Ï â Ï ï£« ï£ï£¬   Ï = â²â â²+  ï£ï£¬   â² â âtan 6sin 3 sin , tan = Specified compressive strength = Modulus of rupture 1 1 where f f f f f f c r c r c r β = Ï â Ï ï£« ï£ï£¬   Ï = â²â â²+  ï£ï£¬   â² â âtan 6sin 3 sin , tan = Specified compressive strength = Modulus of rupture 1 1 Figure 3.10. Stressâstrain relationship for the deck panel concrete mix and grout used for the finite element analysis.
Research Findings 47 ⢠Ratio of the second stress invariant on the tensile meridian to that on the compressive meridian at initial yield, Kc: Kc< = â Ï + Ï <0.5 3 sin 3 sin 1.0 ⢠Flow potential eccentricity e: A default value of 0.1 was used. ⢠Ratio of initial equibiaxial compressive yield stress to initial uniaxial compressive yield stress: A default value of 1.16 was used. ⢠Viscosity parameter: A default value of 0.00001 was used. A contact surface was used at the interface between 1. The shear connectors (studs or threaded rods) and surrounding grout, 2. The threaded rods and the surrounding concrete of the girder (only for specimens supported by concrete girders), 3. The bottom face of the grout in the shear pocket and top surface of the grout in the haunch (deckâhaunch interface), and 4. The bottom face of the haunch and top surface of the supporting girder (girderâhaunch interface). The input parameters of the contact surface include the coefficient of friction and cohesion. The magnitude of these parameters was taken from Article 5.7.4.5 (Shear Friction Theory) of the AASHTO LRFD Bridge Design Specifications, as shown in Table 3.14. The contact surface allows relative slippage between the neighboring components once the shear stresses become higher than the specified cohesion strength. The size of the finite element mesh was optimized by creating a fine mesh at the shear con- nection area and a relatively course mesh in the supporting girders. Figure 3.11 shows an overall view of the finite element mesh used for the model with steel girders, while Figure 3.12 shows the finite element mesh inside the shear pocket of the same specimen. Boundary conditions of the model are: ⢠Pin supports at all of the nodes of the bottom surface of the supporting girder. These supports restrain all vertical and horizontal movement of bottom surface of the girder. ⢠Line of pin supports on the left side of the supporting girder. These supports were positioned at mid height of the reaction plate provided in the test setup. The load was applied as pressure on the right-hand face of the deck. Figure 3.13 shows the boundary conditions and pressure load applied on the deck. 3.1.16 Effect of Simplification of Deck Post-Tensioning Post-tensioning of precast concrete deck panels in the longitudinal direction is an effective way of controlling transverse cracking, which is a common problem with cast-in-place decks. Contact Surface Coefficient of Friction Cohesion (ksi) Shear connectors and surrounding grout or concrete of the supporting girder 0.7 0.025 Deckâhaunch interface 1.4 0.400 Steel girderâhaunch interface 0.7 0.025 Concrete girderâhaunch interface 1.0 0.240 Table 3.14. Coefficient of friction and cohesion of the contact surfaces.
48 Simplified Full-Depth Precast Concrete Deck Panel Systems Figure 3.11. Overall view of the finite element mesh of CD3 on a steel girder. Figure 3.12. The finite element mesh inside the shear pocket of CD3 on a steel girder.
Research Findings 49 However, the common method of deck panel post-tensioning has created challenges. The common method requires that multistrand ducts be placed in the precast panels. Because of the relatively small thickness of the panels, the maximum number of strands per tendon cannot exceed three or four strands in order to allow a 2-in.- to 3-in.-diameter duct to be used. As a result, a large number of multistrand tendons are used. When the panels are placed in the field, often the duct ends do not align well, and splicing becomes time-consuming, difficult, and a cause for additional friction losses. In addition, the pockets needed for workers to splice the ducts cause a large area of the deck at the transverse joints to require grouting. After the transverse joints are made and cured, post-tensioning is performed. Another stepâto grout the post-tensioning ductsâis often required. These multiple steps have caused contractors to question the speed of construction claimed by the full-depth precast deck panel system. These multiple steps are also a primary reason for initiation of this project. The commentary to Article C9.7.5.3 of the AASHTO LRFD Bridge Design Specifications encourages use of this sequencing by stating that, âpost-tensioning should be applied before the panel-to-girder connection is established.â This recommendation is called into question in the analysis that follows. It will be shown that designers should actually try to avoid multistage field grouting created by this sequencing, even if the cost is a few extra strands in the beam, the deck, or both. The research team for this project has decided to introduce a novel system that has been used successfully on a number of bridges for transverse post-tensioning of adjacent box beams. Sun et al. (2018) provide an example. Two unique features are introduced: 1. Post-tensioning employs duct-in-duct and unbonded greased strand tendons, as described in Chapter 2. 2. If the bridge is constructed as simple spans, post-tensioning is introduced after all grouting has taken place in a single operation. Thus, the girder is already fully composite with the deck at the time of post-tensioning. In this case, some of the prestressing effect is lost to the beam and not fully introduced to the deck. Table 3.15 shows the ratio of post-tensioned deck stresses in a composite deck (post- tensioning is applied after the deck becomes composite with concrete girder) to post- tensioned stresses of noncomposite deck (post-tensioning is applied before the deck becomes composite with concrete girder). In this table, the ratio is calculated for girders ranging from NU900 to NU2000 and girder spacing ranging from 8 ft to 12 ft. Figure 3.13. Boundary conditions and pressure load applied on the deck.
50 Simplified Full-Depth Precast Concrete Deck Panel Systems Table 3.15 shows that this ratio is dependent on the girder stiffness and girder spacing. However, the smallest ratio in this table is 80%, which means that at the most only 20% of post-tensioning effect is lost to the girder because of the composite action. Thus, it is advisable to simplify construction by applying the deck post-tensioning after all field grouting is completed. In all calculations, it is assumed that girder compressive strength is 8 ksi, precast deck compressive strength is 6 ksi, total losses are 20%, and post-tensioning is required to maintain a minimum of 250 psi across the transverse joints. 3. If the bridge is constructed as continuous span at the time of deck post-tensioning, the effect of applying post-tensioning to the composite member may be significantly different than that for simple spans. Statically indeterminate secondary moments caused by deck post-tensioning may create detrimental negative moments at the interior pier supports. This situation would need careful analysis on a case-by-case basisâincluding possible adjustments of the tendon profileâbefore a decision is made on whether to post-tension the deck before or after it is connected with the girder. 3.1.17 Summary and Conclusions 1. The analytical investigation shows the viability of increasing the shear connection spacing to 6 ft without significant change in behavior. 2. For two-way decks that are only supported at discrete joints along the girder lines, design aids are given in Section 3.2.2.3 of this report to facilitate design of the reinforcement, especially in the longitudinal direction. 3. The analytical investigation shows that the behavior of the beam in the longitudinal direction is reasonably predicted using the EulerâBernoulli Beam Theory, which is the common design practice at this time. However, there is one exception. In calculating live load deflection, a reduction factor of the composite member stiffness may be required to provide accurate deflection estimate. This issue is further investigated in the experimental program. 4. Because the system is less stiff with unfilled haunches, as shown from the Vierendeel Model, the research team concluded that the experimental investigation could be conducted with unfilled haunches. 5. Finite element analysis indicates that the strength of the grouting material of the shear con- nection joints is the most critical factor in ensuring adequate structural capacity. Therefore, the research team decided to employ UHPC as the final recommended joint material. 6. Two options were studied with regard to the longitudinal reinforcement. â The first option was to use longitudinal post-tensioning to provide adequate design against transverse cracking. For that option, the research team determined that (a) post- tensioning can be applied after all field cast joints are made, without significant loss of Girder Section Girder Spacing (ft) 8 10 12 NU900 95% 98% 100% NU1100 91% 94% 97% NU1350 87% 91% 93% NU1600 84% 88% 91% NU1800 82% 86% 89% NU2000 80% 84% 87% Table 3.15. Ratio of deck post-tensioned stress in composite simple-span bridge compared to deck post-tensioned stress in noncomposite deck (post-tensioning is applied before the deck is connected to the girder).
Research Findings 51 effective prestress; and (b) it is not necessary to fill the transverse joint with more than the conventional concrete used for the deck material. However, UHPC is still used to fill the shear connector pockets. â The second option was to eliminate field post-tensioning. In this option, the research team recommended the use of UHPC to fill the transverse joints, as well as the shear connector pockets and overlapped reinforcing bars in the transverse joint. 3.2 Experimental Program 3.2.1 Introduction to the Experimental Program As demonstrated in the analytical investigation in Section 3.1, the research team developed an experimental program to verify the developed system shown in Chapter 2 and confirm the design guidelines established in the analytical phase. Two parallel experimental studies were conducted. The first study presents the work on the precast concrete girderâdeck system. The second study is on the structural steel girderâdeck system. The developed system has the unique feature of allowing horizontal shear connection spacing to be as wide as 6 ft. It has retained the 6-ft-long precast ribbed-slab deck to avoid shear blockouts within the panel. However, a deck panel that is 12-ft long can still be used with one blockout at mid length of the panel and with the same exact connection hardware being tested as reported in the following sections. Another feature of the system retained for further evaluation is to allow the option of not filling the girderâdeck haunch space between connection joints. This would allow the research team to show evidence that filling that haunch is not critical for the system and that no need exists for requiring high-strength grout or UHPC to fill the haunch. Table 3.16 shows the details of the experimental program, which consists of testing six push- off specimens and two large-scale composite beams. Half of the specimens were supported on concrete girders, and the second half of the specimens were supported on steel girders. The objective of the push-off testing is to determine the interface shear resistance of the proposed UHPC connection between the deck and I-girders. Push-off specimens generally give low interface shearing resistance, as they do not fully represent the highly redundant conditions in a composite beam (Issa et al. 2003, Issa et al. 2006, Badie and Tadros 2008). Also, push-off Girder Push-Off Specimens Large-Scale Composite Beam Concrete Three specimens each Variable-depth ribbed panels Tested for strength Without longitudinal post-tensioning One beam Variable-depth ribbed panels Tested for strength With longitudinal post-tensioning Steel One beam Variable-depth ribbed panels Tested for fatigue and strength Without longitudinal post-tensioning Table 3.16. Plan of the experimental program.
52 Simplified Full-Depth Precast Concrete Deck Panel Systems specimens, as designed for this testing program, inherently have overturning forces that tend to have an opposite effect on the compression induced by the deck weight and additional loads in a composite beam test. Thus, results of push-off specimens are shown here to be on the low side, which is consistent with testing done in previous projects. The goals of testing full-scale specimens of precast concrete deck panels and I-girders are to verify the interface shearing capacity from the push-off testing and to evaluate the structural behavior of the composite girder in beam flexure and shear when discrete connections are used at 6-ft spacing. Stresses and strains in different system componentsâas well as displacementsâ are measured and compared with those predicted using analytical methods and the simpler push-off specimens. In addition, failure modes and ultimate load capacity are measured and compared with theoretical values. The precast panels used in the specimens were professionally fabricated by Coreslab Structures, Inc., a certified precast concrete plant in Omaha, Nebraska. Shop drawing details and pictures taken during fabrication of the precast panels are provided in Appendix C. Two-inch-nominal diameter schedule 80 PVC pipes were used in each panel as ducts for the longitudinal post-tensioning. The precast concrete panels were made using normal weight self-consolidated concrete (SCC) that has a specified stripping strength of 3.5 ksi and 28-day compressive strength of 6 ksi. Measured average concrete strength of the precast deck panel was 7.7 ksi at 28 days. The shear keys and pockets were sandblasted in the storage yard to provide better bond with the UHPC mix filling the transverse joints between panels. The precast prestressed concrete girder used for the large-scale composite beam with concrete girder was fabricated by Concrete Industries, Inc., a certified precast concrete plant in Lincoln, Nebraska. The steel studs used for the push-off specimens on steel girders were welded by a certified welder using a Nelson stud gun. The studs used for the large-scale composite beam with steel girder were also welded by a certified welder. 3.2.2 Investigation of Precast Deck System with Concrete Girders 3.2.2.1 Push-Off Specimens The current AASHTO LRFD Bridge Design Specifications does not have provisions for use of UHPC for deck-to-girder connections in composite systems. The interface shear resistance provisions in Section 5.7.4 of the AASHTO LRFD Bridge Design Specifications were developed for conventional concrete and are not applicable without revisions. However, these provisions, as well as additional fundamental analysis, were used to estimate the connection capacity prior to testing. The predicted horizontal shear capacity was found to be 236 kips. Three identical push-off specimens were tested, and the results were compared with the predicted capacity. Because the connector hardware developed in this project was used for the first time, fundamental theory and finite element analysis were also used to attempt to understand and verify its behavior. Table 3.17 shows the configuration of the three push-off specimens tested to evaluate the constructability and structural performance of the revised connection. Specimen ID Girder Type Connector Type and Size Deck Panels UHPC C1 Concrete block Two 1.5-in.-diameter A193 B7 threaded rods held by a steel collar and washers Two 4 ft x 3 ft x 8.5 in. precast concrete panels UHPC C2 Concrete T-section UHPC C3 Concrete T-section Table 3.17. List of the push-off specimens on concrete girders.
Research Findings 53 Figure 3.14 and Figure 3.15 show the dimensions of the three push-off specimens. The first specimen, shown in Figure 3.14, was made using a concrete block that was lightly reinforced. Although the UHPC connection far exceeded expectations, failure occurred in the concrete block and controlled the maximum load applied on the specimen. As a result, the design of the concrete block was changed from a rectangular block to a T-section beam that was adequately reinforced compared to the block in UHPC C1. Figure 3.15 shows the second and third speci- mens. In all specimens, a discrete 20-in. Ã 14-in. Ã 3-in. haunch joint was formed around the shear connector. The concrete girders were cast at the laboratory using a ready-mixed SCC with an average slump flow of 22 in. The average 28-day compressive strength was 6.8 ksi, 8.3 ksi, and 8.3 ksi for the first, second, and third specimens, respectively. Average measured concrete strength at 28 days was 7.9 ksi. The UHPC used in grouting the new connection was mixed by the research team at the laboratory using the commercial mix Ductal JS1000 produced by Lafarge North America. For each push-off specimen, 2.6 ft3 was made using seven bags of Ductal JS1000. Table 3.18 shows Figure 3.14. Details of the first push-off test specimen.
54 Simplified Full-Depth Precast Concrete Deck Panel Systems Figure 3.15. Details of the second and third push-off test specimens. Ingredients Quantity Ductal JS1000 50 lbs (one bag) Water/Ice 2.96 lbs HRWRA 0.69 lbs Steel fibers 3.6 lbs Yield volume 0.37 ft3 NOTE: HRWRA = high-range water- reducing admixture. Table 3.18. UHPC mix proportions per bag. the ingredients of the mix per bag. The mixed UHPC had a slump flow of 10 in., according to ASTM C1856, at a temperature of 80°F and relative humidity of 50%. A trial mix was tested prior to casting the three connections to evaluate the mechanical properties of the UHPC mix. The results of testing three cylinders and prisms according to ASTM C1856 indicated that UHPC has an average compressive strength of 14.8 ksi at 4 days and 26.3 ksi at 28 days, 1.6 ksi precracking splitting strength, 2.67 ksi postcracking splitting, and 2.6 ksi flexural strength.
Research Findings 55 Figure 3.16 shows the compressive strength versus age for the UHPC mix used in each of the three push-off specimens. This figure indicates consistency of the UHPC performance. The 1.5-in.-diameter threaded rods used as shear connectors were made of ASTM A193 Grade B7 steel with yield strength of 105 ksi and ultimate strength of 125 ksi. All other steel components (collars and washer plates) were made of Grade 50 A572 steel with E70 electrode welding. Figure 3.17 and Figure 3.18 show the setup used for push-off testing of the three specimens. The hydraulic jack and load cell were aligned to apply a horizontal force at the center of the concrete deck panels. To avoid specimen rotation caused by eccentricity between the applied force and the reaction, hold-down straps were used to anchor the specimen to the floor, as shown in Figure 3.17 and Figure 3.18. All specimens were instrumented to measure the relative displacement between the concrete deck panels and the supporting girder at the connection location using linear variable differen- tial transformers (LVDTs) in both horizontal and vertical directions. Two LVDTs were installed on each side, as shown in Figure 3.19. Electric resistance strain gauges were also installed diago- nally on one side at the center of the steel collar to monitor the strain during testing, as shown in Figure 3.20. 0 5 10 15 20 25 30 0 7 14 21 28 C om pr es si ve S re ng th ( ks i) Age (days) Specimen 1 Specimen 2 Specimen 3 Figure 3.16. Compressive strength of UHPC used in push-off specimens. Figure 3.17. Setup showing the rectangular block used in testing of the first specimen.
56 Simplified Full-Depth Precast Concrete Deck Panel Systems Figure 3.18. Setup showing the tee-section beams used in testing the second and third specimens (LVDT = linear variable differential transformer). Figure 3.20. Diagonal steel strain gauge on the steel collar. Stain Gauge Figure 3.19. Location of vertical and horizontal LVDTs.
Research Findings 57 Specimen UHPC C1: In this test, the load was applied incrementally at an approximate rate of 5 kips/s. The UHPC compressive strength at the time of testing (4 days old) was 15.7 ksi. During testing and before reaching the predicted capacity, the concrete block started to bend upward, forming vertical cracks at the edge of the connection, as shown in Figure 3.21. These flexural cracks are likely caused by the bending moments generated by the clamping force on the concrete block and the lack of longitudinal reinforcement provided in the concrete block. In a typical bridge I-girder, it is expected that longitudinal and transverse reinforcement exist, especially at the highly concentrated forces imparted by the connection. Unfortunately, the unusually high capacity with UHPC was not anticipated, and the concrete block was not properly reinforced. Therefore, before testing the remaining specimens, the design of the concrete block was revised where a T-shape was selected instead of the rectangular block, and significant reinforcement was added in the tee-section beam flange. Figure 3.22 shows the load-displacement plots for the horizontal and vertical relative dis- placements at the deckâhaunch interface of the specimen. The maximum recorded load was 232 kips, which is slightly lower than the 236-kip predicted capacity. The maximum measured strain in the steel collar was 341 microstrain (i.e., 9.8 ksi). Figure 3.23 shows the two parts of the damaged specimen during disposal. The top portion includes the deck panels, UHPC connection, and threaded rods. Visual inspection indicated no sign of cracking in the UHPC connection and some cracking at the bottom of the deck. The Figure 3.21. Concrete block premature failure in push-off Specimen UHPC C1. - 50 100 150 200 250 300 350 0.00 0.01 0.02 0.03 0.04 0.05 0.06 0.07 0.08 0.09 0.10 L oa d (k ip ) Displacement (in.) Horizontal Displacement Vertical Displacement Figure 3.22. Horizontal and vertical relative displacement for push-off Specimen UHPC C1.
58 Simplified Full-Depth Precast Concrete Deck Panel Systems bottom portion includes the damaged concrete block with significant cracking. This behavior indicated that the use of lightly reinforced concrete block was inadequate, and the specimen anchorage system to the floor needs to be revised to reduce the bending moment resulting from load eccentricity. These changes were implemented in the second and third push-off specimens. Specimen UHPC C2: The compressive strength of UHPC at the time of testing (3 days old) was 13.5 ksi. The deck panels were supported by a concrete T-girder that had top flange reinforcement and web reinforcement similar to that of a typical concrete bridge I-girder. In addition, the girder was tied down to the strong floor using nylon straps at both ends to prevent it from moving up. Failure happened when wide cracks were generated in the concrete deck panel at the loading side, as shown in Figure 3.24. Again, the extremely strong UHPC was not the weak link, and failure shifted from the beam to the deck panels. At this moment, the measured load started to drop. The maximum recorded load was 312 kips, which exceeded the 236 kip predicted capacity. No visible cracks on either the UHPC connection or the T-girder were reported. Figure 3.25 shows the load-displacement plots for the horizontal and vertical relative dis- placement at the deckâhaunch interface. The maximum measured strain in the steel collar was 310 microstrains (8.99 ksi), which is very small. (a) Deck panels (b) Concrete block Girder cracks Deck panel cracks Grouted haunch Threaded rods Figure 3.23. Damaged push-off Specimen UHPC C1. Deck Panel Cracks Figure 3.24. Concrete deck panel failure in push-off Specimen UHPC C2.
Research Findings 59 Specimen UHPC C3: In this test, the load was also applied incrementally at an approximate rate of 5 kips/s. The compressive strength of UHPC at the time of testing (4 days old) was 15.1 ksi. The specimen had the same concrete T-girder and anchorage system used in Specimen UHPC C2. As predicted, based on Specimen 2 testing, failure happened in the deck panels. Wide cracks were generated in the concrete deck panel at the loading side, as shown in Figure 3.26. At this moment, the measured load started to drop. The maximum recorded load was 342 kips, which again exceeded the theoretical 236 kip predicted capacity, with no visible cracks occurring in either the UHPC connection or the T-girder. Figure 3.27 shows the load-displacement plots for the horizontal and vertical relative displace- ment at the deckâhaunch interface. The displacements and strains were consistent with those obtained from Specimen C2. Table 3.19 presents the summary of test results of the push-off specimens. Finite element analysis was conducted to study the behavior of the UHPC joint and areas of stress concentration. The finite element analysis was conducted using ABAQUS (V6.13-3). - 50 100 150 200 250 300 350 0.00 0.01 0.02 0.03 0.04 0.05 0.06 0.07 0.08 0.09 0.10 L oa d (k ip ) Displacement (in.) Horizontal Displacement Vertical Displacement Figure 3.25. Horizontal and vertical relative displacement of push-off Specimen UHPC C2. Deck Panel Cracks Figure 3.26. Concrete deck panel failure in push-off Specimen UHPC C3.
60 Simplified Full-Depth Precast Concrete Deck Panel Systems Figure 3.28 shows the load-displacement plots of the three push-off specimens, as well as the one obtained from finite element analysis. The figure indicates the accuracy of the Finite Element Model in representing the behavior of the tested specimen and, therefore, its reliability. The developed model was then used to evaluate stress levels in the various components of the con- nection. Figure 3.29 shows the stress contours of the steel threaded rods, collar, washer plate, and nuts. This plot indicates that the highest stresses occur at the collar tube attached to the threaded rod that is located on the loading side. Figure 3.30 shows the stress contours of the concrete components (deck panels, UHPC connec- tion and haunch, and girder). This plot indicates that the highest stresses are bearing compressive stresses that occur at the UHPC surrounding the steel collar. It also showsâas expectedâhigh compressive stresses at the concrete girder top flange around the shear connectors. 3.2.2.2 Large-Scale Composite Beam The NU900 precast prestressed concrete girder used for the large-scale composite beam was fabricated by Concrete Industries Inc., a certified precast concrete plant in Lincoln, Nebraska. The NU900 girder was reinforced with sixteen 0.6-in.-diameter strands in the bottom flange, and four ½-in.-diameter strands in the top flange. Details and photos taken during fabrication of the precast panels are provided in Appendix C. The NU900 girder was fabricated using SCC with specified compressive strength at release of 6 ksi and 8 ksi at 28 days. Figure 3.31 shows the average compressive strength measured for the girder over time. When the girder was tested, its compressive strength was 8.8 ksi. The composite beam specimen was 40-ft long. NU900 precast prestressed concrete girder with seven shear connectors was used to support the precast deck panels. Figure 3.32 shows the elevation and cross-section views of the NU900 girder. Eight precast concrete deck panels Figure 3.27. Horizontal and vertical relative displacement of push-off Specimen UHPC C3. - 50 100 150 200 250 300 350 0.00 0.01 0.02 0.03 0.04 0.05 0.06 0.07 0.08 0.09 0.10 L oa d (k ip ) Displacement (in.) Horizontal Displacement Vertical Displacement Specimen ID Failure Load and UHPC Strength Average Prediction Capacity UHPC C1 on concrete block 232 kips, 15.7 ksi 295.3 kips, 14.8 ksi 236 kipsUHPC C2 on concrete tee-section beam 312 kips, 13.5 ksi UHPC C3 on concrete tee-section beam 342 kips, 15.1 ksi Table 3.19. Summary of the results obtained from the push-off specimens.
Research Findings 61 0 50 100 150 200 250 300 350 0.00 0.01 0.02 0.03 0.04 0.05 0.06 0.07 0.08 0.09 0.10 Lo ad (k ip ) Horizontal Displacement (in.) Specimen 1 Specimen 2 Specimen 3 FE Figure 3.28. Loadâdisplacement relationships of the three push-off specimens and Finite Element Model. Figure 3.29. Finite element stress contours in the steel components. were used for this specimen. Eight precast concrete deck panels were used for this specimen, including six 6-ft-long panels between the seven connectors and two 2-ft-long end panels with the post-tensioning anchor blocks. Figure 3.33 shows plan and sectional views of the typical and end panels. These deck panels do not have steel reinforcement projecting into the transverse joints as the panels of push-off specimens did because they are longitudinally post-tensioned. Two 2-in.-diameter Schedule 80 PVC pipes were used in each panel as ducts for longitudinal post-tensioning. The panels were installed on 20-in. Ã 14-in. Ã 3-in. haunches that were around each connector. Wood forms, backer rods, and liquid nails were used to make watertight haunch forms. The bottom gaps between transverse joints were closed using backer rods, and the ends of transverse joints were formed using plywood bulkheads. All seven discrete joints at the shear connection and all transverse joints were grouted using UHPC. The longitudinal post-tensioning strands, which were greased and enclosed in continuous rubber sheathing, were installed and nominally tensioned at 10% of final prestress before the concrete surfaces were pre-wet and
(a) Von Mises stresses in the deck and girder (b) Von Mises stresses in the UHPC (c) Von Mises stresses in the deck panels Figure 3.30. Stress contours in the concrete components. 0 1 2 3 4 5 6 7 8 9 10 0 7 14 21 28 35 42 49 56 C om pr es si ve S tre ng th (k si) Age (days) Figure 3.31. Compressive strength of NU900 concrete girder.
Figure 3.32. Elevation (top) and cross-section (bottom) views of the NU900 girder.
64 Simplified Full-Depth Precast Concrete Deck Panel Systems (a) 6-ft-long precast panel (b) 2-ft-long precast panel Figure 3.33. Details of the 6-ft- and 2-ft-long precast concrete deck panels.
Research Findings 65 UHPC placed. Each transverse joint was overfilled with UHPC using ¾-in. plywood forms to ensure adequate filling of joints after the UHPC settlement. The joints were covered with plywood sheets for curing. Excess UHPC was ground immediately after curing. Four 0.6-in.-diameter Grade 270 low-relaxation strands (two strands in each duct) were used to post-tension the full-scale specimen. The strands were tensioned to only 53% of their ultimate strength to achieve an effective stress of 250 psi across the transverse joints after considering prestress losses. It is important to note that the final post-tensioning was applied after the panels have been made composite with the girder. This is a deviation from the standard practice where transverse joint concrete is poured and cured, post-tensioning is applied, and then the shear connections are grouted to achieve the composite section. The proposed procedure is expected to reduce construction time, as the grouting of the transverse joints and shear connections is conducted using a single pour. Analysis of the effect of post-tensioning on the composite section indicated the adequacy of this procedure with respect to deck compressive stresses and girder tensile stresses. Composite section properties were used in calculating post-tensioning stresses as the post- tensioning force was applied after the deck panels were made composite with the girder. Having the strands greased and sheathed with rubber tubes not only allowed post-tensioning to be applied after grouting the transverse joints and shear pockets but also simplified the precast deck production and increased the level of protection to these strands. In addition, the PVC tubes that house the post-tensioned tendons do not have to be extended beyond the edges of the precast panels or coupled at the transverse joints, which increases the construction speed. Sheathing was removed from the ends of each strand, and a grease-removing agent was applied to achieve proper gripping between strands and seating wedges. Each of the four strands was post-tensioned individually. Figure 3.34 shows post-tensioning of the last strand. Figure 3.35 shows the stresses measured at different locations of the composite section while post-tensioning the last strand out of the four post-tensioned strands. These plots indicate the effectiveness of post-tensioning the composite system, as they show stress values up to 100 psi in the deck due to one strand. Therefore, it was estimated that the four strands would result in net com- pressive stress = 4 à 100 à 0.7 = 280 psi, which was more than the minimum desired 250 psi. The 0.7 reduction factor was used to account for the elastic-shortening losses caused by staged post-tensioning process and time-dependent losses. Figure 3.34. Post-tensioning of the last strand.
66 Simplified Full-Depth Precast Concrete Deck Panel Systems Table 3.20 lists the cracking moment, cracking deflection, ultimate moment, and ultimate vertical shear predicted according to AASHTO LRFD Bridge Design Specifications for both fully composite and noncomposite sections. The corresponding midspan point load for each case is also listed. These values were compared against those obtained from testing. The UHPC existing in the discrete haunches was conservatively ignored in calculating the composite section properties discrete joint system used. At the time of testing, the concrete strength of the NU900 girder was 8.7 ksi, and the average concrete strength of the precast deck panel was 7.7 ksi. The seven UHPC discrete joints and transverse joints were cast in five batches of 3.6 ft3 each, using the same proportions given in Table 3.18. The ambient temperature and relative humidity during mixing were 55°F and 84%, respectively. The slump flow test and preparation of 3-in. à 6-in. cylinders were conducted according to ASTM C1856. UHPC cylinders were kept inside the molds and air cured in the same conditions of the specimen, which resulted in slower and lower strength gainâcompared to the UHPC mix used for the push-off specimensâcaused by the low ambient temperature and relative humidity of the laboratory. Time (s) Figure 3.35. Concrete strains at Section 2 caused by post-tensioning of last strand. Table 3.20. Predicted capacities of the specimen for both composite and noncomposite cases. Property Composite Section Noncomposite Section Predicted Values Corresponding Applied Load at Midspan (kip) Predicted Values Corresponding Applied Load at Midspan (kip) Cracking moment (kip-ft) 2,200 226 1,275 131 Cracking deflection (in.) 0.32 226 0.47 131 Ultimate moment (kip-ft) 3,401 327 2,508 236 Ultimate vertical shear (kip) 221 415 163 300
Research Findings 67 Figure 3.36 shows the average compressive strength of UHPC with age. This figure indicates that compressive strength reached 18.3 ksi after 28 days, which is significantly lower than that of the push-off specimens. Figure 3.37 shows the test setup and instrumentation of the full-scale specimen. A vertical load was applied to the top surface of the composite girder at the midpoint of the 39-ft span. The girder was simply supported by two rollers on two concrete blocks. Concrete strain gauges were applied at the two sections on the top of the deck, bottom of the deck, top of the girder, and bottom of the girder, as shown in Figure 3.38. Electric resistance strain gauges were installed diagonally on one side of the collar at three steel connectors similar to that in the push-off test specimens. The relative displacement in both horizontal and vertical directions between the deck panels and girder were measured using six LVDTs, as shown in Figure 3.39. Also, the deflection of the girder at midpoint and quarter point were measured using two LVDTs. Bearing plates, bearing pads, a 430-kip hydraulic jack, a load cell, and a spreader beam were used to load the full-scale specimen at the midspan, as shown in Figure 3.40. Test 1 (Flexure Test): The load was applied in 25-kip increments, and the cracks were marked on the specimen. Diagonal shear cracks were observed at a 200-kip load, as shown in Figure 3.41, while vertical flexure cracks in addition to diagonal shear cracks were observed at a 225-kip load, as shown in Figure 3.42. When the applied load reached 338 kips, deflection increased with no significant increase in the applied load, which indicates yielding of flexure reinforcement. This load resulted in an ultimate moment of 3,505 kip-ft, which is higher than the 3,401 kip-ft predicted capacity shown in Table 3.20. The LVDT was unable to record deflection higher than 3.3 in. at the midpoint. Therefore, the test was stopped without visible failure. Figure 3.43 and Figure 3.44 show the loadâdeflection and loadâdisplacement relationships, respectively, measured using LVDTs. The loadâdeflection relationship indicates that the cracking load was approximately 225 kips, which was very close to the predicted value for the fully composite section, as listed in Table 3.20. The loadâdisplacement relationships indicated that the relative displacement between the deck panels and girder are negligible (<0.01 in.) under cracking load (i.e., service load), which proves the efficiency of the proposed connection in preventing slippage between the precast components under service loads. The horizontal relative displacements significantly increased as the load reached the ultimate flexural capacity, which was indicative of desirable ductile behavior. This test resulted in a horizontal shear force of 325 kips per joint with no signs of cracking or failure at any of the shear connectors, which is higher than the average capacity reached in the push-off specimens (i.e., 295.3 kips). 0 2 4 6 8 10 12 14 16 18 20 0 7 14 21 28 A ve ra ge C om pr es si ve S tre ng th (k si ) Age (day) Figure 3.36. Compressive strength of UHPC used in grouting the large-scale beam.
1 2 43 North Side South Side 1 2 3 4 North Side South Side Figure 3.37. Flexure test setup and location of LVDTs and strain gauges.
Research Findings 69 South Side Figure 3.38. Applied concrete strain gauge at two sections of the specimen. Vertical and Horizontal LVDTs Vertical LVDT Horizontal LVDT South Side Figure 3.39. Applied horizontal and vertical LVDTs between panels and girder. North Side Midspan Figure 3.40. Spreader beam used in loading the full-scale specimen.
70 Simplified Full-Depth Precast Concrete Deck Panel Systems North Side South Side Midspan Figure 3.41. Shear cracks at 200 kips at midspan. North Side South Side Midspan Midspan Figure 3.42. Flexural and shear cracks at load greater than 225 kips at midspan. - 50 100 150 200 250 300 350 400 0.00 0.50 1.00 1.50 2.00 2.50 3.00 3.50 Lo ad (k ip ) Deflection (in.) Quarter Point Mid Point Figure 3.43. Loadâdeflection relationship of Flexure Test.
Research Findings 71 - 50 100 150 200 250 300 350 400 0.00 0.02 0.04 0.06 0.08 0.10 0.12 0.14 0.16 0.18 0.20 Lo ad (k ip ) Displacement (in.) H2-3 H3 H4 V2-3 V4 Figure 3.44. Load-relative horizontal and vertical displacement relationships of Flexure Test 1 (H = relative horizontal displacement, V = relative vertical displacement). Table 3.21 shows the horizontal shear capacity obtained from the push-off specimens and large-scale beam and average recommended capacity of the CDR shear connector. Test 2 (First Vertical Shear Test): The load achieved in the first test produced flexural strength comparable to theory. But, it resulted in a total vertical shear force of 191 kips, which is less than the 221-kips predicted shear capacity for a fully composite section, as presented earlier in Table 3.20. Therefore, it was decided to decrease the span from 39 ft to 24 ft to force higher shear compared to flexure. Figure 3.45 shows the new setup. All the instrumentation of the first test remained the same for this test except for the quarter-point deflection LVDT that was removed. This shear test was conducted in the same manner as the Flexure Test with load increasing incrementally until it reached the capacity of the hydraulic jack, which was 430 kips. The test was stopped without any signs of failure, and it was decided to add another hydraulic jack. Figure 3.46 and Figure 3.47 show the loadâdeflection and loadâdisplacement relationships obtained from this test. Test 3 (Second Vertical Shear Test): In this test, a second 430-kip hydraulic jack was added to the loading frame, as shown in Figure 3.48. The load increased incrementally until it reached 538 kips when the girder suddenly failed in vertical shear, as shown in Figure 3.49. At that load, larger diagonal cracks extended from the bottom flange to the top flange of the girder as the shear reinforcement yielded and the precast concrete deck panel above the failed section rotated significantly at its ends and cracked, as shown in Figure 3.50. The seven UHPC Nominal Shear Capacity of CDR (kips) Push-Off Specimens Large-Scale Beam Average Predicted 295.3 325.0 310.0 236 Table 3.21. Horizontal shear capacity obtained from the push-off specimens and large-scale beam.
North Side South Side Midspan 1 2 3 4 Figure 3.45. Setup of the first vertical shear test. - 50 100 150 200 250 300 350 400 450 500 - 0.2 0.4 0.6 0.8 1.0 1.2 1.4 1.6 1.8 2.0 Lo ad (k ip ) Deflection (in.) Figure 3.46. Loadâdeflection relationship of first Vertical Shear Test at midspan. - 50 100 150 200 250 300 350 400 450 500 0.00 0.01 0.02 0.03 0.04 0.05 0.06 0.07 0.08 0.09 0.10 L oa d (k ip ) Displacement (in.) H2-3 H3 H4 V2-3 V3 V4 Figure 3.47. Load-relative horizontal and vertical displacement relationships of first Vertical Shear Test.
Research Findings 73 North Side Midspan Figure 3.48. Test 3: Second Vertical Shear Test setup. South Side Midspan Figure 3.49. Girder vertical shear failure at Section 1. North Side Midspan South Side South Side Figure 3.50. Rotation and cracking of the deck panel at the UHPC connections.
74 Simplified Full-Depth Precast Concrete Deck Panel Systems connections remained intact with no signs of cracking or separation from the girder. The loadâ deflection relationship for this test is very similar to that for Test 2. The achieved maximum load corresponds to an ultimate vertical shear force of 282 kip, which is significantly higher than the predicted value for the fully composite section, as listed in Table 3.20. This was an indication that using the proposed UHPC connection at 6-ft spacing provided a vertical shear capacity higher than that of a fully composite member, despite the beam depth being smaller than the connection spacing. Thus, the current provision of limiting the connec- tion spacing to the girder depth may be considered too conservative when the proposed UHPC horizontal shear connection is used. 3.2.2.3 Summary and Conclusions Based on the results obtained from the push-off specimens and large-scale specimen, the fol- lowing conclusions can be made: 1. Full composite action is expected in flexure design at all Service and Strength Limit States when UHPC is used for the panel-to-girder connection. 2. Full composite action is expected in vertical shear design, even when the spacing between the shear connectors exceeded the girder depth but was not greater than 6 ft. 3. Nominal shear capacity of the CDR shear connector assembly = 310.0 kips. 4. Girder deflection under service load is higher than predicted for a fully composite girder using the Elastic Beam Theory. It appears that the Elastic Beam Theory does not fully cap- ture the behavior of the beam, and possibly a shear strain effect may need to be included. However, it should be noted that deflection almost never governs the design of precast pre- stressed I-beams. Measured values have been found to be still within the acceptable limits of AASHTO LRFD Bridge Design Specifications. All tests were intentionally conducted with unfilled haunches. With filled haunches, the loss of stiffness would not exist. 5. The horizontal shear capacity of the proposed connection can be estimated as the average capacity of the push-off specimens (295 kips) and large-scale specimen (325 kips). This comes to a value of 310 kips. This results in a horizontal shear strength of 4.3 kip/in. This capacity is higher than the demand for most prestressed concrete girder bridges, as shown in the design examples in Section 3.3. 6. For deflection calculations (using full composite elastic beam analysis), it is recommended to use 0.75 EI to allow for possible reduction in stiffness when the haunch between the deck slab and the beam is not grouted. If the haunch is grouted, as would be expected in most practices, no reduction in stiffness should be used. 3.2.3 Investigation of Precast Deck System with Steel Girders 3.2.3.1 Push-Off Specimens Figure 3.51 shows the details of the push-off specimens. Nine 1-in.-diameter steel studs were installed in three rows, three studs per row. Spacing between the studs was 5 in. in the longitu- dinal direction and 4 in. in the transverse direction, which satisfied the AASHTO LRFD Bridge Design Specificationsâ minimum spacing of four times the stud diameter. Figure 3.52 shows the calculations of the predicted capacity of the connection. Formulas of Article 5.7.4 (i.e., shear friction formula) and Article 6.10.10.4.3 of the AASHTO LRFD Bridge Design Specifications were used. Since the factors K1 and K2 of Article 5.7.4 were developed as lower limits for regular concrete mixes that do not contain steel fiber, the predicted capacity using these factors was ruled out, as shown in Figure 3.52. The shear friction formula of Article 5.7.4 produces lower capacity than that by Section 6.10.10.4.3 of Chapter 6 of the AASHTO LRFD Bridge Design Specifications. Article 5.7.4 in the âConcreteâ chapter of the AASHTO LRFD Bridge
Figure 3.51. Details of the push-off specimen.
Figure 3.52. Predicted capacity of the connection.
Research Findings 77 Design Specifications was used here based on previous research work by Issa et al. (2003) and Badie and Tadros (2008). In these studies, it was reported that nominal capacity of a group of studs is smaller than that obtained by Article 6.10.10.4.3 and closer to that obtained by the Shear Friction Theory using Article 5.7.4. Provines and Ocel (2014A and 2014B) suggested a reduction factor of 0.8 to the nominal capacity determined by Article 6.10.10.4.3. The push-off specimens were built and tested at the structural testing facility at George Washington University. The studs were welded by a certified welder using a Nelson stud gun, as shown in Figure 3.53. Properties of the studs were as follows: ASTM C1015 steel, ultimate strength = 71.84 psi, and yield strength = 54,100 psi. Ductal JS1000 mix was supplied by Lafarge North America. The mix had four components: 1. Premix: silica fume, ground quartz, sand, and cement. 2. High-tensile steel fibers: 0.2-mm (0.008-in.) diameter à 14-mm (0.5-in.) long (>2,000 MPa/ 290 psi). 3. Admixture: high-range water reducer/third generation. 4. Water and ice. The following proportions of mix components were used, based on the supplierâs recommendations: 1. Premix: 3,700 lbs/yd3. 2. Steel fiber: 263 lbs/yd3. 3. Super plasticizer liquid: 51 lbs/yd3. 4. Water: 219 lbs/yd3 (one-third of the water was replaced with ice). The mixed UHPC had a slump flow of 10 in., according to ASTM C1856, at a temperature of 78°F and relative humidity of 55%. The research team prepared 3 in. à 6 in. cylinders of the mix to monitor the concrete strength of the mix over 28 days, as shown in Figure 3.54. The UHPC reached the desired strength for testing (12 ksi to 14 ksi) in about 3 to 4 days. Figure 3.55 shows the setup used for the push-off testing of the three specimens. The hydraulic jack and load cell were aligned to apply a horizontal force at the center of the Figure 3.53. Welding the steel studs using a Nelson stud gun.
78 Simplified Full-Depth Precast Concrete Deck Panel Systems concrete deck panels, while the steel girder was restrained against horizontal movement using a horizontal steel frame. To avoid specimen rotation caused by eccentricity between the hydraulic jack and the horizontal frame, vertical steel frames were built around both ends of the precast deck. A ½-in.-thick steel bearing plate was installed in front of the load cell to distribute the load uniformly across the width of the panel. The push-off specimens were tied back to the wall using two 1¼-in.-diameter, 120-ksi-yield strength bars. The 1¼-in.-diameter bars were the maximum size bars that could be fed through the sleeves provided in the strong wall. The capacity of the setup was controlled by the 295-kips yield strength of the bars, which was 7% higher than the predicted shear capacity of the connection. Strain gauges were installed on five studs, as shown in Figure 3.56. In addition, strain gauges were installed on the vertical Dywidag bars holding the panel close to the applied load to monitor 0 4 8 12 16 20 24 28 0 2 4 6 8 10 12 14 16 18 20 22 24 26 28 A ve ra ge S tr en gt h (k si ) Age (days) UHPC Mix at GWU_Push-Off Specimens Figure 3.54. UHPC strength versus time. Figure 3.55. Setup of the push-off specimens (N = north; S = south).
Research Findings 79 the tension force generated in these bars. Two LVDTs were installedâone LVDT at each side of the specimenâto measure the relative horizontal displacement between the panels and the top surface of the steel beam. Specimen UHPC S1: The UHPC mix was 4 days old when the specimen was tested. Load was applied continu- ously at 2 kips/s until failure or maximum capacity of the setup was reached. At 265 kips, the measured load started to decline and the specimen was not able to receive any more load because the steel bearing plate in front of the load cell was bent. As a result, the concrete panel in front of the hydraulic jack was split horizontally, as shown in Figure 3.57. No signs of distress were observed in the UHPC joint between the panels and the steel beam or in the transverse connection between the panels. Figure 3.58 shows the relationship between the applied load and the relative displacement between the bottom surface of the precast panel and the top surface of the steel beam, obtained from the test and compared with the finite element simulation. The parameters of the UHPC in the finite element simulation were taken as follows: compressive strength = 14 ksi, and modulus of elasticity = 6,500 ksi. The test and finite element results showed linear elastic behavior up to 150 kips and plastic behavior afterward. The finite element results were consistent with the test results up to the 150-kip end of the linear elastic stage. Figure 3.59 shows the axial tensile stresses in the studs at the panelâhaunch interface, obtained from the strain gauges installed on the studs. Figure 3.59 shows that the applied load was not uniformly distributed between the nine studs. Stud N, the center stud on the first row, carried more load than the corner studs. The maximum stress was about 37 ksi. The strain gauges installed on the vertical Dywidag bars used to tie down the panels to the strong floor showed maximum stress of 0.4 ksi, which was equivalent to 1.6 kips of axial tensile force per bar. Specimen UHPC S2: The UHPC was 3.5 days old when the specimen was tested. Load was applied continuously at 2 kips/s until failure or maximum capacity of the setup was reached. The research team pro- vided two 1-in.-thick plates between the load cell and the panel to distribute the applied load Figure 3.56. Strain gauges installed on the steel studs (NW = northwest; SW = southwest; NE = northeast; and SE = southeast).
80 Simplified Full-Depth Precast Concrete Deck Panel Systems (a) Steel bearing plate was bent (b) Precast panel split horizontally Applied load (d) No signs of distress or failure observed in the UHPC joint Applied load (c) Crushing failure of the loaded panel Applied load Figure 3.57. Reported failure mode of Specimen UHPC S1.
Research Findings 81 Push-Off, Steel Girder, Sp. No. 1 Figure 3.58. Loadârelative displacement relationship obtained from the test and finite element simulation. Figure 3.59. Axial tensile stress in the studs at the panelâhaunch interface.
82 Simplified Full-Depth Precast Concrete Deck Panel Systems uniformly across the width of the panel. The research team loaded the specimen up to 295 kips, which was the yield capacity of the Dywidag bars tying the specimen to the strong wall. No signs of distress or failure were reported at the UHPC joint, the transverse joint, or the panels, as shown in Figure 3.60. The research team stopped the test at this point because the Dywidag bars started to show unequal plastic deformation, and the specimen started to rotate horizontally. Figure 3.61 shows the relationship between the applied load and the relative displacement between the bottom surface of the precast panel and the top surface of the steel beam, obtained from the test and the finite element simulation. The test results showed linear elastic behavior up to 295 kips, while the finite element simulation showed some plastic behavior starting at 220 kips. The test results showed higher relative displacement than the finite element results. Figure 3.62 shows the axial tensile stresses in the studs at the panelâhaunch interface. The applied load was not uniformly distributed between the nine studs. Stud N, the center stud of (a) (b) Applied Load Applied Load Figure 3.60. Specimen UHPC S2: No signs of distress or failure were reported at the UHPC joint or the panels at 295 kips. Push-Off, Steel Girder, Sp. No. 2 Figure 3.61. Loadârelative displacement relationship obtained from the test and finite element simulation.
Research Findings 83 the first row, carried more load than the corner studs. The maximum reported stud stress at the panelâhaunch interface was about 27 ksi. Specimen UHPC S3: UHPC was 4 days old when the specimen was tested. Load was applied continuously at 2 kips/s. The research team provided two 1-in.-thick plates between the load cell and the panel to distribute the applied load uniformly across the width of the panel. The specimen was loaded up to 278.1 kips. At that load, the top flange of the steel beam at the far end of the specimen, where the reaction beam was located, started to bend and the specimen started to rotate horizontally. The rotation developed uneven force in the horizontal Dywidag bars, and the Dywidag bar on the east side started to show some plastic deformation. Therefore, the test was stopped at this point. No signs of distress or failure were reported in the UHPC joint, the transverse joint, or the panels up to 278.1 kips, as shown in Figure 3.63. Figure 3.64 shows the relationship between the applied load and the relative displacement between the bottom surface of the precast panel and the top surface of the steel beam, obtained from the test and the finite element simulation. The test showed linear elastic behavior up to 150 kips, while the finite element simulation showed linear elastic behavior up to 220 ksi and plastic behavior afterward up to 278.1 kips. The test results showed relatively higher displace- ment than the finite element results. Figure 3.65 shows the axial tensile stresses in the studs at the panelâhaunch interface. This figure shows that the applied load was not uniformly distributed between the nine studs. Stud N, the center stud of the first row, carried more load than the corner studs. The maximum reported stress at this elevation was about 31 ksi. Table 3.22 gives a summary of the test results. The test results showed that the connection was able to sustain a capacity at least equal to that predicted by Article 5.7.4 of the AASHTO LRFD Bridge Design Specifications, with an average measured capacity of 279.4 kips. However, as the Push-Off, Steel Girder, Sp. No. 2 Figure 3.62. Axial tensile stress in the studs at the panelâhaunch interface.
84 Simplified Full-Depth Precast Concrete Deck Panel Systems (a) (b) Figure 3.63. Specimen UHPC S3 after testing: No signs of distress or failure were reported at the UHPC joint or the panels at 278.1 kips. Push-Off, Steel Girder, Sp. No. 3 Figure 3.64. Loadârelative displacement relationship obtained from the test and finite element simulation (FE = finite element). table shows, the three tests could not result in failure of the connection itself. Thus, the true connection capacity, as will be further illustrated in the beam testing, is higher than that obtained from the push-off tests. It also illustrates that UHPC causes the weak link to be away from the connection and into the conventional concrete connected elements. To monitor the stress distribution in the UHPC joint and the steel studs, the finite element simulation was used to run up to 279.4 kips. Figure 3.66 and Figure 3.67 show the Von Mises stresses in the UHPC joint and in the panels, respectively. The maximum-recorded stress in the UHPC joint and the precast panels was about 10 ksi and 6 ksi, respectively. The Von Mises stress is the equivalent uniaxial tensile/compression stress of a multiaxial state of stress. It is typically used to accurately detect stress distribution in 3-D continuum.
Research Findings 85 Figure 3.65. Axial tensile stress in the studs at the panelâhaunch interface. Push-Off, Steel Girder, Sp. No. 3 Specimen UHPC S1 UHPC S2 UHPC S3 Nominal Capacity by AASHTO LRFD Bridge Design Specifications Capacity 265.0 kips 295.0 kips 278.1 kips Article 5.7.4, 276.5 kips Article 6.10.10.4.3, 510.79 kips Average capacity = 279.4 kips Mode of failure Crushing of the precast panel in front of the hydraulic jack Reaching maximum capacity of the test setup Instability of the test specimen Relative horizontal displacement 0.095 in. 0.058 in. 0.065 in. Average relative horizontal displacement = 0.073 Table 3.22. Summary of the test results of the push-off specimens. Applied Load Figure 3.66. Von Mises stresses in the UHPC joint at 279.5 kips.
86 Simplified Full-Depth Precast Concrete Deck Panel Systems Figure 3.68 and Figure 3.69 show the Von Mises stresses in the steel studs at the panelâhaunch interface and the base of the studs, respectively. These figures show that the maximum tensile stress in the studs was at the base, and it was about 33 ksi in the center stud of the first row. 3.2.3.2 Large-Scale Composite Beam The composite beam was made of a 34-ft, 6-in.-long W24 Ã 104, A992-50 steel beam that supports seven 4-ft-wide precast panels. The steel beam was provided with stiffeners at the midspan and at the location of the end supports. Mechanical properties of the steel were tensile strength = 67.8 ksi and yield strength = 50.3 ksi. The steel beam was provided with six groups of steel studs at 6-ft spacing. Each group had nine 1-in.-diameter studs. The studs within each group were provided at 5-in. and 4-in. spacing in the longitudinal and transverse directions, Figure 3.67. Von Mises stresses in the UHPC joint at 279.4 kips. Figure 3.68. Von Mises stresses (psi) in the studs at panelâhaunch interface at 279.5 kips.
Research Findings 87 respectively. Height of the studs was 8 in. after welding. Studs were made of ASTM C1015 steel. Properties of studs were as given earlier in the push of testing description. The beam was fabri- cated by a certified steel fabrication company. Quality of the welding was checked by successfully bending four test studs to 45 degrees, as shown in Figure 3.70. Details of the composite beam and final setup are shown in Figure 3.71. The composite beam was supported on two end supports resulting in a simply supported 33-ft, 5-in. span. Load was applied at the midspan point. A concrete pad was provided between the panel and the steel beam at the midspan location to protect the center panel from flexural failure. Figure 3.72 shows the UHPC connections between the steel beam and the precast deck. Figure 3.69. Von Mises stresses (psi) at the base of the studs at 279.5 kips. Figure 3.70. Quality control test of the stud welding.
(a) (b) Figure 3.71. Test setup of the large-scale beam.
Research Findings 89 Ductal JS1000 mix was produced by Lafarge North America. The mix is the same as has been used for the push testing and for the concrete girder-to-deck panel testing. Stress gain was monitored using 3-in. à 6-in. cylinders, as shown in Figure 3.73. The following instruments were installed in the specimen: ⢠Strain gauges on the steel studs (Figure 3.74a): The strain gauges were installed on the steel studs (Stud Groups A, B, and C) on the west side of the beam. ⢠Horizontal LVDTs (Figure 3.74a): Three LVDTs were installed on the west side of the beam to measure the relative horizontal displacement between the precast slab and the stop surface of the steel beam. ⢠Vertical LVDT (Figure 3.74b): An LVDT was installed on the west side of the beam to measure the relative vertical displacement between the precast slab and the stop surface of the steel beam. ⢠String pots (Figure 3.74c): Five string pots were installed on the west side of the beam to measure the vertical displacement of the composite beam. ⢠Strain gauges on the composite beam (Figure 3.74d): Three groups of strain gauges were installed on the west side of the beam to measure the normal stresses of the composite beam. Each group contains five gauges. Figure 3.72. UHPC connection between the steel beam and the precast deck. 0 4 8 12 16 20 24 28 0 2 4 6 8 10 12 14 16 18 20 22 24 26 28 A ve ra ge S tr en gt h (k si ) Age (days) UHPC Mix at Large-Scale Composite Beam Figure 3.73. UHPC strength versus time.
(a) Locations of the strain gauges on the steel studs and horizontal LVDTs (b) Location of the vertical LVDT String Pot D5 String Pot D4 String Pot D3 String Pot D2 String Pot D1
Figure 3.74. Instrument installed on the large-scale beam. (c) Locations of the string pots (d) Locations of the strain gauges on the composite beam String Pot D5 String Pot D4 String Pot D3 String Pot D2 String Pot D1
92 Simplified Full-Depth Precast Concrete Deck Panel Systems Modes of failure: Three modes of failure were investigated: (1) flexural failure based on the plastic flexural capacity of the composite beam, (2) vertical shear failure based on the shear capacity of the web of the steel beam, and (3) horizontal shear failure based on the plastic flexural capacity of the composite beam, as shown in Table 3.23. For the first and second modes of failure, the cor responding horizontal shear force generated for each group of studs was calculated. For the third mode of failure, the horizontal shear capacity was determined using Article 5.7.4 and Article 6.10.10 of the AASHTO LRFD Bridge Design Specifications. In addition, Table 3.23 shows the corresponding concentrated applied load at midspan of the test specimen for every mode. Table 3.23 shows thatâif full composite action is maintained between the precast deck and the steel beamâthe specimen would fail in flexure. The corresponding applied horizontal shear force would be 432.4 kips per cluster of studs. This horizontal shear force is 156% and 85% of the capacity determined by Article 5.7.4 and Article 6.10.10 of the AASHTO LRFD Bridge Design Specifications, respectively. Fatigue testing: The large-scale beam was subjected to fatigue load and was then tested for strength. The fatigue load range was determined using an actual 60-ft bridge that would deliver a flexural strength equal to the plastic moment strength of the composite beam (3,581.95 kip-ft). Other criteria of this bridge were as follows: girder spacing = 9 ft, slab thickness = 8.5 in., slab com- pressive strength = 7.06 ksi, haunch thickness = 2.5 in., steel beam built-up section = W24 à 104 + PL (11 in. à 0.75 in.), Grade 50 steel, groups of nine 1-in.-diameter studs at 72-in. spacing. Moment due to Fatigue I Limit State was determined. It corresponded to a 49.55-kip load range applied at midspan. To expedite the fatigue test, this load was magnified by a factor of 1.534. This approach was used by NCHRP Project 10-72 (Connor et al. 2012). The magnified load range = 1.534 à 49.55 = 76.0 kips. To maintain stability of the test setup, a minimum load of 5 kips was applied. Therefore, the maximum and minimum applied fatigue loads were 81.0 kips and 5.0 kips, respectively. Article 6.6.1.2.5 of the AASHTO LRFD Bridge Design Specifications states that, with regard to cycles, the fatigue resistance above the constant amplitude fatigue threshold is inversely proportional to the cube of the stress range, as follows: (LRFD Eq. 6.6.1.2.5-2) 1 3 F A Nn ( )â =  ï£ï£¬   Mode of Failure Horizontal Shear per Group of Studs (kips) Corresponding Load at Midspan (kips) 1. Flexure plastic moment Composite behavior = 3,581.9 k-ft Noncomposite behavior = 1,632.6 k-ft 432.4 na 428.7 195.4 2. Vertical shear strength = 360.0 kips 726.2 720.0 3. Horizontal shear Article 5.7.4 AASHTO LRFD Bridge Design Specifications = Article 6.10.10 AASHTO LRFD Bridge Design Specifications = Based on push-off test results = 276.5 510.8 279.4 274.0 505.0 277.0 Note: na = not applicable. Table 3.23. Comparison between possible modes of failure.
Research Findings 93 Therefore, if the fatigue test is conducted for 1,900,000 cycles (according to ASTM D6275-98) at the magnified load level, it is equivalent to = (1.900 Ã 106) (1.534)3 = 6.86 Ã 106 design fatigue cycles. The magnified applied load range that was applied on the test specimen resulted in 8.52 kips of horizontal shear force per stud. This was higher than the nominal fatigue resistance given by the AASHTO LRFD Bridge Design Specifications for Fatigue I and Fatigue II Limit States. Analysis has shown that the studs in the experimental investigation were stressed beyond the limits given by Fatigue I and Fatigue II Limit States of the AASHTO LRFD Bridge Design Speci- fications. Thus, the current AASHTO fatigue limits are conservative. The fatigue load was applied at 1.5 cycles/s. The composite beam was visually inspected for signs of distress every 50,000 cycles. Measurement data from the LVDTs, strain gauges, and string pots were collected at zero cycles, and then at every 250,000 running cycles. The data were collected while the composite beam was loaded with a monotonic load at 1 kip/s up to 81.0 kips. At 800,000 cycles, while the composite beam was exposed to the magnified fatigue load (equivalent to 2,888,000 cycles of design fatigue load), some hairline cracks developed on the top surface of the deck at the transverse joints at Stud Group B and Stud Group F, as shown in Figure 3.75. Also, at 800,000 cycles, a crack extended on the top surface of the deck and on the bottom surface of the thin slab on the north end of the deck, as shown in Figure 3.76. (a) At Stud Group B (b) At Stud Group F Figure 3.75. Top deck cracks developed at 800,000 running cycles at Stud Group B and Stud Group F.
94 Simplified Full-Depth Precast Concrete Deck Panel Systems East Side West Side Midspan Midspan Midspan Figure 3.76. Deck cracks developed at 800,000 running cycles at midspan. No further cracks were observed when 1,900,000 cycles were reached, which is equivalent to 6,860,000 unmagnified fatigue cycles. At the full fatigue limit of 1,900,000 magnified cycles, a crack started to appear at the bottom face of the steel beam. It propagated quickly to mid height of the web, as shown in Figure 3.77. The test was immediately stopped. Temporary supports were installed on both sides of the crack. A professional welding company was called to fix the crack, as shown in Figure 3.78 and Figure 3.79. The quality of the weld was carefully checked using ultrasonic inspection. Steel plates were welded on both sides of the web, and steel bars were welded to the bottom flange, as shown in Figure 3.80. The steel bars were extended only 4 ft on each side of the crack. There- fore, the flexural capacity of the composite beam at midspan was not affected.
Research Findings 95 East SideWest Side Midspan String Pot D5 String Pot D4 String Pot D3 String Pot D2 String Pot D1 Figure 3.77. Fracture fatigue crack developed in the steel beam. Figure 3.81 to Figure 3.85 show the change in the measurements collected versus the number of cycles. Examining these figures shows clearly that no significant change of the behavior of the composite beam occurred because of application of the fatigue load. No cracks were observed in the UHPC filling the transverse joints between panels or the discrete joints filling the haunch between the deck and the steel beam. Figure 3.86 shows the distribution of flexural stresses at Locations 1, 2, and 3. The figure presents a comparison between the flexural stresses obtained from analysis, assum- ing full composite action and the average flexural stresses obtained from the fatigue test. Figure 3.86 also shows that the stress distribution obtained from the fatigue test has a single neutral axis, which is an indication that the full composite action was maintained at the three locations.
96 Simplified Full-Depth Precast Concrete Deck Panel Systems Figure 3.78. Preparation of the crack before welding. Figure 3.79. The crack after welding.
Research Findings 97 Figure 3.80. The steel beam after welding the web plates and the bottom steel bars. Number of Cycles (millions) (fatigue design load) String Pot D5 String Pot D4 String Pot D3 String Pot D2 String Pot D1 Vertical Deflection Versus Number of Cycles Figure 3.81. Deflection of the composite beam versus the number of cycles (D = deflection).
98 Simplified Full-Depth Precast Concrete Deck Panel Systems Number of Cycles (millions) (fatigue design load) Relative Vertical Displacement Versus Number of Cycles Figure 3.82. Vertical separation between the steel beam and the deck versus the number of cycles (VS = vertical separation). Number of Cycles (millions) (fatigue design load) Relative Horizontal Displacement Versus Number of Cycles Figure 3.83. Relative horizontal movement between the steel beam and the deck versus the number of cycles.
Research Findings 99 Number of Cycles (millions) (fatigue design load) Flexural Stresses G1 Versus Number of Cycles Fl ex ur al S tr es s (k si ) Figure 3.84. Flexural stresses in the composite beam at Location 1. String Pot D5 String Pot D4 String Pot D3 String Pot D2 String Pot D1 Number of Cycles (millions) (fatigue design load) Axial Tensile Stresses in Studs of Group A Figure 3.85. Axial tensile stresses in studs of Group A.
West Side Midspan A B C D Figure 3.86. Flexural stresses of the composite beam (81 kips).
Research Findings 101 Figure 3.87 shows a comparison between the deflection obtained by analysis (using the EulerâBernoulli Beam Theory, along with the full composite section properties) and the fatigue test. The comparison between the measured and predicted deflection shows that an 80% reduc- tion of the beam model stiffness would bring the analytical results close to the experimental result. This observation is acknowledged by the Steel Construction Manual (American Institute of Steel Construction 2017), where Section I3 states that âcomparison to short-term deflection tests indicate that the effective moment of inertia, Ieff, is 15 to 30% lower than that calculated based on linear elastic theory, Iequiv. Therefore, for realistic deflection calculations, Ieff should be taken 0.75 Iequiv .â Strength test: After the fatigue test was completed, the composite beam was exposed to a monotonic load until failure. The load was applied using a 500-kip hydraulic jack, as shown in Figure 3.88. The applied load was monitored using a load cell installed at the hydraulic jack and a pressure gauge installed on the hydraulic pump. The load was applied at 2 kips/s until the maximum capacity of the setup was reached at 450 kips. At 322 kips, some hairline cracks started to appear on the north side of the deck at Joint B. A single crack appeared on the bottom surface of the deck around the shear pocket, one vertical crack on the side of the deck in the UHPC joint, and one crack on top of the deck in the UHPC joint, as shown in Figure 3.89. At 375 kips, wide cracks started to develop on the bottom surface of the deck at Joints C, D, and E. Figure 3.90 shows the cracks formed on the bottom surface of the deck by the end of the test. The test was stopped at 450 kips when the applied load reached the maximum capacity of String Pot D5 String Pot D4 String Pot D3 String Pot D2 String Pot D1 Number of Cycles (millions) (fatigue design load) Vertical Deflection at Midspan (D1) Figure 3.87. Deflection at midspan caused by fatigue test and composite beam analysis.
102 Simplified Full-Depth Precast Concrete Deck Panel Systems Figure 3.88. Setup of the strength test. East West B East West B East West East West North (a) (b) (c) (d) Figure 3.89. Hair cracks appeared on the north side of Joint B at 305 kips.
Research Findings 103 (a) Joint B (south side) (b) Joint D (south side) (d) Joint E (north side) (e) Joint D (north side) (f) Joint C (north side) East West B EastWest D East West E (c) Joint E (south side) EastWest E East West D East West C Figure 3.90. Cracks appeared on the bottom surface of the deck at 450 kips.
104 Simplified Full-Depth Precast Concrete Deck Panel Systems the setup. No cracks were observed on the top surface of the deck except the crack that appeared at Joint B at 322 kips. In addition, no cracks were observed around Joints A and F. In all cases, the UHPC material filling the transverse joints between panels and the discrete joints between the slab and the beam appeared to shift distress away from it. The recorded deflection at midspan was 2.377 in. The beam showed 0.665 in. residual deflection after the applied load was fully removed. Measurements obtained from the strength test are shown in the following figures: (1) Figure 3.91 shows the deflection of the beam at midspan, (2) Figure 3.92 shows the relative horizontal displacement between the bottom surface of the deck and the top surface of the steel beam, and (3) Figure 3.93 shows the relative vertical displacement between the bottom surface of the deck and the top surface of the steel beam. In these figures, the corresponding load to Service I, Service II, and Strength I Limit States of the 60-ft bridge are presented for comparison. Figure 3.91 shows that the beam continues to show elastic behavior up to 380 kips, where the recorded stresses at the bottom face of the steel built-up section reached the yield strength 50 ksi. In addition, Figure 3.91 shows the predicted deflection at midspan using EulerâBernoulli String Pot D5 String Pot D4 String Pot D3 String Pot D2 String Pot D1 Deflection at Midspan Figure 3.91. Deflection at midspan.
Research Findings 105 Elastic Beam Analysis with 100% EI, 80% EI, and 75% EI, where EI is the stiffness of the composite beam. The comparison between the measured and predicted deflection shows that an 80% reduction of the stiffness should be used in the beam model to accurately predict the short-term deflection. This observation is consistent with the observation reported during the fatigue test and the recommendation given by the American Institute of Steel Construction (2017). Figure 3.92 and Figure 3.93 show an insignificant amount of relative horizontal and vertical displacement between the deck and the steel beam at Fatigue, Service, and Strength Limit States. 3.2.3.3 Summary and Conclusions Based on the results obtained from the push-off and the large-scale beam specimens, the following conclusions are drawn: 1. Fatigue load has no detrimental effect on the composite action of the slabâbeam system. 2. No changes are proposed for the fatigue design of the shear connectors given in Article 6.10.10.2 of the AASHTO LRFD Bridge Design Specifications. 3. Table 3.24 gives a summary of the shear connector capacity. The push-off specimens had an average capacity of 279.4 kips. When averaged with the horizontal shear capacity of a stud cluster in the beam specimen, the overall experimental connection capacity is 366.6 kips. This capacity can be well represented by Equation 6.10.10.4.3-1 of the AASHTO LRFD Load Versus Relative Horizontal Displacement Figure 3.92. Relative horizontal displacement between the deck and the steel beam.
106 Simplified Full-Depth Precast Concrete Deck Panel Systems Load Versus Relative Vertical Displacement Figure 3.93. Relative vertical displacement between the deck and the steel beam. Criteria Push-Off Specimens (average of 3 specimens) Large-Scale Beam Specimens Nominal Capacity by AASHTO LRFD Bridge Design Specifications (Qn) Capacity 279.5 kips 453.8 kips Article 5.7.4 (276.5 kips)Average = 366.6 kips 366.6 kips = 133% of Qn by LRFD Article 5.7.4 366.6 kips = 72% of Qn by LRFD Article 6.10.10.4.3 ( Article 6.10.10.4.3 510.79 kips) Mode of Failure Crushing of precast panel in front of hydraulic jack Reaching maximum capacity of test setup Instability of test specimen Reaching maximum capacity of test setup Relative Horizontal Displacement 0.073 in. 0.100 in. Average = 0.086 in. Table 3.24. Summary of the test results of push-off specimens and large-scale beam specimens.
Research Findings 107 Bridge Design Specifications if a group effect factor of 0.72 is applied. Thus, the modified formula is 0.5 0.72Q A f E A Fn sc c c sc u= Ⲡ⤠where Qn = nominal shear resistance of the stud shear connectors in the cluster (kips), Asc = cross-sectional area of the stud shear connectors in the cluster (in.2), Ec = modulus of elasticity of the deck concrete (ksi), and Fu = specified minimum tensile strength of the stud shear connectors (ksi). 4. Full composite action is expected at all Service and Strength Limit States. No reduction of the full composite beam stiffness is warranted. 5. For deflection calculations, a 75% factor should be applied to the full composite beam stiffness. 3.3 Design Examples 3.3.1 Design of the Precast Deck Slab System 3.3.1.1 Design Criteria Figure 3.94 to Figure 3.96 show the details of the deck. The deck is made of ribbed precast con- crete panels. The panels are 6-ft long and 51-ft wide. The precast deck panels are pretensioned transversely and post-tensioned longitudinally. Girder spacing = 9 ft. Actual thickness of the panel = 9.0 in. The top ½ in. of the panel thickness is assumed to be a wearing surface and is not included in the structural resistance. Structural thickness: Top skin ts = 5.0 and total rib depth = 8.5 in. The cantilevers are made of a solid section. Concrete: Normal-weight concrete, unit weight = 150 pcf; concrete strength at pretension release = 4 ksi; concrete strength at 28 days = 6 ksi; and relative humidity, H = 70%. Figure 3.94. Cross section of the bridge.
108 Simplified Full-Depth Precast Concrete Deck Panel Systems Figure 3.95. Details of the precast deck (transverse section). Figure 3.96. Longitudinal cross section of the precast panel.
Research Findings 109 3.3.1.2 Loads Deck weight (DC): Deck weight between girders: Volume= 9 12 6 12 9 2 12 4 12 3.5 = 69,984 12,096 = 57,888 in. = 33.50 ft Deck weight = 33.50 ft 0.150 kcf = 5.025 kips = 5.025 6 9 = 0.093 k/ft Deck weight at the cantilever = 6 ft 8.5 12 ft 0.150 kcf = 0.638 k ft 6-ft long panel 0.106 k/ft 3 3 3 2 2 kips ft ft( )( ) ( )( ) ( )( ) ( ) ( ) ( ) ( ) ( ) ( ) à â²â² à â²â² â²â² â à â²â² à â²â² â²â² â  ï£ï£¬   = Wearing surface DW : DW 6 ft 2 12 ft 0.150 kcf = 0.150 k ft 6-ft long panel= 0.025 k/ft LL: Rear axle of the AASHTO HL93 standard truck. 2( ) ( )( ) =  ï£ï£¬   3.3.1.3 Flexural Design in the Transverse Direction Positive transverse moment: Figure 3.2 and Figure 3.5 give the transverse moment due to HL93 (including the multiple presence factor and dynamic allowance) and 100 psf, respectively. ( ) ( ) =  ï£ï£¬   = =  ï£ï£¬   = DC loads: Panel weight: M 0.75 93 100 0.70 k-ft/ft DW loads: Wearing surface: M 0.75 25 100 0.20 k-ft/ft DC DW LL: HS20: MLL+I = 6.2 k-ft/ft Mservice I = 0.70 + 0.20 + 6.2 = 7.10 k-ft/ft = 42.6 k-ft/6-ft long panel Mservice III = 0.70 + 0.20 + 0.8 à 6.2 = 5.86 k-ft/ft = 35.2 k-ft/6-ft long panel Mstrength I = 1.25 à 0.7 + 1.5 à 0.2 + 1.75 à 6.2 = 12.1 k-ft/ft = 72.2 k-ft/6-ft long panel Negative transverse moment: Figure 3.3 and Figure 3.6 give the transverse moment due to HL93 (including the multiple presence factor and dynamic allowance) and 100 psf, respectively. DC loads: Panel weight: M 1.20 93 100 1.11 k-ft/ft DW loads: Wearing surface: M 1.20 25 100 0.30 k-ft/ft DC DW ( ) ( ) =  ï£ï£¬   = =  ï£ï£¬   = LL: HS20 MLL+I = 6.0 k-ft/ft
110 Simplified Full-Depth Precast Concrete Deck Panel Systems Mservice I = 1.11 + 0.30 + 6.0 = 7.41 k-ft/ft = 44.46 k-ft/6-ft long panel Mservice III = 1.11 + 0.30 + 0.8 à 6.0 = 6.21 k-ft/ft = 37.26 k-ft/6-ft long panel Mstrength I = 1.25 à 1.11 + 1.5 à 0.30 + 1.75 à 6.0 = 12.34 k-ft/ft = 74.03 k-ft/6-ft long panel Geometrical properties of the panel in positive moment zone between girder lines: Variable-thickness panel (Figure 3.96): Ag = (6 à 12â³)(8.5â³) â (4 à 12â³)(3.5â³) = 612 â 168 = 444 in.2 Using the bottom fiber as the reference line: Moment of the area about the bottom fiber = 612 8.5 2 168 3.5 2 2307 in. y = 2307 444 = 5.20 in., y = 8.5 2307 444 3.30 in. I = 612 5.2 8.5 2 6 12 8.5 12 168 5.2 3.5 2 4 12 3.5 12 2066 in. S = 2066 3.3 626.1 in. , S = 2066 5.2 = 397.3 in. 3 bottom g 2 3 2 3 4 top 3 bottom 3 top ( ) ( ) ( ) ( )( ) ( ) à â à = â = â ï£ï£¬   + à â²â² â â ï£ï£¬   â à â²â² â²â² = = where Ag = gross section area, ybottom = distance from the centroid to the bottom fiber, ytop = distance from the centroid to the top fiber, Ig = moment of inertia, Stop = section modulus at top fiber, and Sbottom = section modulus at bottom fiber. The panel is reinforced transversely with six 1/2-in.-diameter, 270-ksi strands per panel, placed on two layers, as shown in Figure 3.96. Centroid of the six strands is at 3.92 in. from the top fiber of the panel. Therefore, the centroid of the strands is below the centroid of the cross section. ep = 3.92 â 3.30 = 0.62 in., where ep is the distance from the centroid to the top fiber. Geometrical properties of the panel in the negative moment zone (8.5-in.-thick solid section): = 6 12 8.5 = 612 in. 4.25 in. 6 12 8.5 12 = 3684.8 in. 3684.8 4.25 = 867 in. 2 3 4 3 A y y I S S g top bottom g top bottom ( )( ) ( )( ) à = = = à = =
Research Findings 111 Centroid of the six strands is at 3.92 in. from the top fiber of the panel. Therefore, the centroid of the strands is above the centroid of the cross section. e 4.25 3.92 0.33 in.p = â = Prestress losses. (a) Elastic shortening losses: LRFD Equation 5.9.3.2.3a-1f E E fpES p ct cgp ( )â = ï£ï£¬   where Dfpes = prestress loss due to elastic shortening (ksi), Ep = modulus of elasticity of prestressing strands = 28,500 ksi, Ect = modulus of elasticity of panel at transfer = 3,834 ksi, and fcgp = the concrete stress at the center of gravity of the prestressing strands due to the prestressing force immediately after transfer and self-weight of the member at the section of maximum moment. The Commentary to Article 5.9.5.2.3a of the AASHTO LRFD Bridge Design Specifications states that fcgp may be assumed to be 90% of the initial prestress before transfer and the analysis iterated until acceptable accuracy is achieved. However, because of the very light prestress used, 1% initial loss is assumed and then checked. Strand stress immediately after release = 202.5 (1.00 â 0.01) = 200.475 ksi total prestressing force at release 6 strands 0.153 in. strand 200.475 ksi 184.036 kips 184.036 444 184.036 0.62 2066 3.97 12 0.62 2066 0.415 0.034 0.014 0.435 ksi 2 2 2 P f P A Pe I M e I i cgp i g i p g deck p g ( )( )( ) ( ) ( ) = = = = + + â = + + à â à = + + â = Therefore, loss due to elastic shortening: 28000 3834 0.435 3.177 ksi Initial prestress loss 3.177 202.5 100 1.57% f pES ( )= ï£ï£¬   = = à = The initial prestress loss is very close to the assumed value, so a second iteration is not necessary. Strand stress immediately after release = 202.5 â 3.177 = 199.323 ksi Pi = total prestressing force at release = (6 strands)(0.153 in.2/strand)(199.323 ksi) = 182.979 kips
112 Simplified Full-Depth Precast Concrete Deck Panel Systems (b) Long-term prestress losses: Using Section 5.9.3.3 of the AASHTO LRFD Bridge Design Specifications, time-dependent losses can be estimated as follows: 10.0 12.0 LRFD Equation 5.9.3.3-1f f A A fpLT pi ps g h st h st pR ( )â = γ γ + γ γ + â where fpi = Prestress immediately prior to transfer = 2020.5 ksi, Aps = Area of prestress reinforcement = 6 à 0.153 = 0.918 in.2, Ag = Gross concrete section area = 444 in.2, gh = 1.7 â 0.01(H) = 1.7 â 0.01(70) = 1.0, gst = 5 1 5 1 4 1.0 f ci( ) ( )+ â² = + = , fci = concrete strength at release = 4.0 ksi., DfpR = 2.4 ksi, and ( )( )( ) ( )( )â = à + + =10 202.5 0.918 444 1.0 1.0 12 1.0 1.0 2.4 18.586 ksifpLT Total prestress losses at service = 3.177 + 18.586 = 21.764 ksi Effective prestress at service fpe = 202.5 â 21.794 = 180.736 ksi Effective prestress force Ppe = (6 strands)(0.153 in.2/strand)(180.736 ksi) = 165.916 kips Check of concrete stresses at service at the positive moment area. Effective prestress force at service Ppe = 165.916 kips Stress limits for concrete (LRFD Article 5.9.4.2): Compression stress, Service I, top fiber. Compression stress limit due to LL and 50% of the sum of effective prestress and permanent loads = 0.40 f â²c = (0.40)(6.0) = + 2.4 ksi 0.5 0.7 0.5 0.2 6.2 6.65 k-ft/ft 39.90 k-ft/6-ft-long panel 0.5 0.5 0.5 165.916 444 0.5 165.916 0.62 3.3 2066 39.90 12 3.3 2066 0.5 0.374 0.5 0.164 0.764 0.869 ksi 2.4 ksi Compression stress limit due to sum of effective prestress and permanent loads 0.45 0.45 6.0 2.7 ksi 0.7 0.2 0.9 k-ft/ft = 5.40 k-ft/6-ft-long panel M f P A P e y I M y I f M service I top pe g pe p top service top c service I ( ) ( ) ( ) ( )( ) ( ) ( ) ( ) = à + à + = = = + à â à + = + à â à à + à =+ à â à + = + < = â²= = + = + =
Research Findings 113 165.916 444 165.916 0.62 3.3 2066 5.40 12 3.3 2066 0.374 0.164 0.104 0.314 ksi 2.7 ksi Compression stress limit due to effective prestress, permanent loads, and transient loads 0.6 0.6 6.0 3.6 ksi 0.70 0.20 6.2 7.10 k-ft/ft = 42.60 k-ft/6-ft-long panel 165.916 444 165.916 0.62 3.3 2066 42.60 12 3.3 2066 0.374 0.164 0.817 1.027 ksi 3.6 ksi f P A P e y I M y I f M f P A P e y I M y I top pe g pe p top service top c service III top pe g pe p top service top ( ) ( ) ( ) ( ) ( ) ( ) ( ) ( ) ( ) ( )( ) ( ) ( ) ( ) = + â + = + â Ã + Ã = + â + = < = â² = = + = + + = = + â + = + â Ã + Ã = + â + = + < Tensile stress, Service III, bottom fiber: Tensile stress limit 0.19 0.19 6.0 0.465 ksi 0.7 0.2 0.8 6.2 5.86 k-ft/ft = 35.16 k-ft/6-ft long panel 165.916 444 165.916 0.62 5.2 2066 35.16 12 5.2 2066 0.374 0.259 0.674 0.041 ksi 0.465 ksi f M f P A P e y I M y I c service III bottom pe g pe p bottom service bottom( ) ( ) ( ) ( ) ( ) ( ) = â² = = â = + + Ã = = + + â = + + Ã â Ã = + + â = â < â Check of concrete stresses at service at the negative moment area: Prestressing force at service Ppe = 165.916 kips ep = 4.25 â 3.92 = 0.33 in. Stress limits for concrete (LRFD Article 5.9.2.3): (a) Compression stress, Service I, bottom fiber: Compression stress limit due to live load and 50% of the sum of effective prestress and permanent loads = 0.40 = 0.40 6.0 2.4 ksi 0.5 1.11 0.5 0.30 6.0 6.71 k-ft/ft = 40.23 k-ft/6-ft long panel 0.5 0.5 0.5 165.916 612 0.5 165.916 0.33 4.25 3684.8 40.23 12 4.25 3684.8 0.5 0.271 0.5 0.063 0.556 0.660 ksi 2.4 ksi f M f P A P e y I M y I c service I bottom pe g pe p bottom service bottom( ) ( )( ) ( ) ( ) ( ) ( ) ( ) â² = + = Ã + Ã + = = + Ã â Ã + = + Ã â Ã Ã + Ã = + Ã â Ã + = + <
114 Simplified Full-Depth Precast Concrete Deck Panel Systems Compression stress limit due to sum of effective prestress and permanent loads 0.45 0.45 6.0 2.7 ksi 1.11 0.30 1.41 k-ft/ft = 8.46 k-ft/6-ft-long panel 165.916 612 165.916 0.33 4.25 3684.8 4.77 12 4.25 3684.8 0.271 0.063 0.066 0.274 ksi 2.7 ksi f M f P A P e y I M y I c service I bottom pe g pe p bottom service bottom( ) ( ) ( ) ( )( ) ( ) ( ) ( ) = â² = = + = + = = + â + = + â Ã + Ã = + â + = + < Compression stress limit due to effective prestress, permanent loads, and transient loads 0.6 0.6 6.0 3.6 ksi 1.11 0.30 6.0 7.41 k-ft/ft = 44.46 k-ft/6-ft-long panel 165.916 612 165.916 0.33 4.25 3684.8 44.46 12 4.25 3684.8 0.271 0.063 0.615 0.823 ksi 3.6 ksi f M f P A P e y I M y I c service I bottom pe g pe p bottom service bottom( ) ( ) ( ) ( )( ) ( ) ( ) ( ) = â² = = + = + + = = + â + = + â Ã + Ã = + â + = + < (b) Tensile stress, Service III, top fiber: Tensile stress limit 0.19 0.19 6.0 0.465 ksi 1.11 0.30 0.8 6.0 6.21 k-ft/ft = 37.26 k-ft/6-ft-long panel 165.916 761 165.916 0.33 4.25 3684.8 37.26 12 4.25 3684.8 0.218 0.063 0.516 0.235 ksi 0.465 ksi f M f P A P e y I M y I c service III top pe g pe p top service top( ) ( ) ( ) ( ) ( ) ( ) = â² = = â = + + Ã = = + + â = + + Ã â Ã = + + â = â > â Strength Limit State at the positive moment area: Mstrength I = 1.25 Ã 0.7 + 1.5 Ã 0.2 + 1.75 Ã 6.2 = 12.03 k-ft/ft = 72.18 k-ft/6-ft-long panel Using Strain Compatibility analysis: Depth of the equivalent compression block = 0.636 in. Depth of the neutral axis = 0.636/0.75 = 0.847 in. Nominal flexural strength Mn = 72.383 k-ft/6-ft-long panel ÏMn = 1.0 Ã 72.383 = 72.383 k-ft/6-ft-long panel
Research Findings 115 Strength Limit State at the negative moment area: Mstrength I = 1.25 à 1.11 + 1.5 à 0.30 + 1.75 à 6.0 = 12.34 k-ft/ft = 74.03 k-ft/6-ft-long panel Cross section: 8.5-in. solid section Using Strain Compatibility analysis: Depth of the equivalent compression block = 0.625 in. Depth of the neutral axis = 0.625/0.75 = 0.833 in. Nominal flexural strength Mn = 86.173 k-ft/6-ft-long panel ÏMn = 1.0 à 72.383 = 86.173 k-ft/6-ft-long panel 3.3.1.4 Flexural Design in the Longitudinal Direction Positive longitudinal moment: Figure 3.4 and Figure 3.7 give the longitudinal moment caused by the HL93 truck (including the multiple presence factor and dynamic allowance) and 100 psf, respectively. DC loads: Panel weight: M 0.6 93 100 0.56 k-ft/ft DW loads: Wearing surface: M = 0.6 25 100 0.15 k-ft/ft Live load: HS20 truck: M = 5.95 k-ft/ft DC DW LL+I ( ) ( ) =  ï£ï£¬   =  ï£ï£¬   = Mservice I = 0.56 + 0.15 + 5.95 = 6.66 k-ft/ft = 59.94 k-ft/9-ft Mservice III = 0.56 + 0.15 + 0.8 à 5.95 = 5.47 k-ft/ft = 49.23 k-ft/9-ft Mstrength I = 1.25 à 0.56 + 1.5 à 0.15 + 1.75 à 5.95 = 11.34 k-ft/ft = 102.04 k-ft/9-ft Negative longitudinal moment: Figure 3.3 and Figure 3.6 give the longitudinal moment due to HL93 (including the multiple presence factor and dynamic allowance) and 100 psf, respectively. DC loads: Panel weight: M 0.80 93 100 0.75 k-ft/ft DW loads: Wearing surface: M = 0.80 25 100 0.20 k-ft/ft Live load: HS20: M = 4.2 k-ft/ft DC DW LL+I ( ) ( ) =  ï£ï£¬   =  ï£ï£¬   =
116 Simplified Full-Depth Precast Concrete Deck Panel Systems Mservice I = 0.75 + 0.20 + 4.2 = 5.15 k-ft/ft = 46.35 k-ft/9-ft Mservice III = 0.75 + 0.20 + 0.8 à 4.2 = 4.31 k-ft/ft = 38.79 k-ft/9-ft Mstrength I = 1.25 à 0.75 + 1.5 à 0.20 + 1.75 à 4.2 = 8.59 k-ft/ft = 77.29 k-ft/9-ft Geometrical properties of the panel in positive moment zone (Figure 3.95, shaded area): Height = 8.5 in., Area = 618 in.2, Inertia = 2782.5 in.4, ytop = 3.125 in., ybottom = 5.375 in. The panel is post-tensioned longitudinally with twelve ½-in.-diameter, 270-ksi encapsulated strands per girder spacing. The strands are provided in four ducts, three strands per duct. The centroid of the ducts is at 4.25 in. from the top and bottom fiber of the panel. Therefore, the centroid of the strands is below the centroid of the cross section. e 5.375 â 4.25 1.125 in.p = = Geometrical properties of the panel in negative moment zone (8.5-in.-thick solid section): (9 12 )(8.5) 918 in. 4.25 in. (9 12)(8.5) 12 5527.1 in. 5527.1 4.25 1300.5 in. 2 3 4 3 A y y I S S g top bottom g top bottom = à â²â² = = = = à = = = = The centroid of the 12 strands is at the same level as the centroid of the cross section. Therefore: ep = zero Prestress losses: In this example, it is assumed that the four groups of strands will be tensioned one group at a time. In addition, the strands are post-tensioned from both ends of the 120-ft-long span. (a) Elastic shortening losses: 1 2 LRFD Equation 5.9.3.2.3b-1f N N E E fpES p ct cgp ( )â = â ï£ï£¬   where N = number of identical tendons = 4, Ep = modulus of elasticity of prestressing strands = 28,500 ksi, Ect = modulus of elasticity of panel at transfer = 3,834 ksi, and fcgp = concrete stress at the center of gravity of the prestressing strands due to the prestressing force after jacking and self-weight of the member at the section of maximum moment. In this example, 1% initial loss is assumed and then checked later. Strand stress immediately after release = 202.5 (1.00 â 0.01) = 200.475 ksi Pi = total prestressing force at release = (12 strands)(0.153 in.2/strand)(200.475 ksi) = 368.1 kips
Research Findings 117 368.1 618 368.1 1.125 2782.5 0.56 12 1.125 2782.5 0.760 ksi 2 2 f P A Pe I M e I cgp i g i p g deck p g ( ) ( )= + + â = + + à â à = + Therefore, loss due to elastic shortening: 4 1 2 4 28000 3834 0.745 2.119 ksi Initial prestress loss 2.119 202.5 100 1.04% f pES ( )= â à  ï£ï£¬   = = à = The initial prestress loss is very close to the assumed value, so a second iteration is not necessary. Strand stress immediately after release = 202.5 â 2.119 = 200.381 ksi Pi = total prestressing force at release = (12 strands)(0.153 in.2/strand)(200.381 ksi) = 367.9 kips (b) Friction losses: 202.5 1 2.415 ksi0.0002 60 0 f = f 1 e f = e pF pj Kx+ pF ( ) ( ) â â â â = â( ) ( ) µ α â à + where DfpF = losses due to friction, fpj = stress in the prestressing steel at jacking (ksi), x = length of a prestressing tendon from the jacking end to any point under consideration (ft), K = wobble friction coefficient (per ft of tendon), µ = friction factor, α = sum of the absolute values of angular change of prestressing steel path from jacking end, or from the nearest jacking end if tensioning is done equally at both ends to the point under investigation (rad), and e = base of natural logarithms. (c) Anchorage seating losses: 0.25 60 12 28500 9.896 ksi f = L E f = pA A ps pA ( ) â â â à = where Dfpa = losses due to anchorage seating, DA = anchor set, L = length of the post-tensioned strand, and Eps = modulus of elasticity of the strand.
118 Simplified Full-Depth Precast Concrete Deck Panel Systems (d) Long-term losses: Using Section 5.9.5.3 of the AASHTO LRFD Bridge Design Specifications, the time-dependent losses can be estimated as follows: 10.0 12.0 LRFD Equation 5.9.3.3-1f f A A fpLT pi ps g h st h st pR ( )â = γ γ + γ γ + â where fpi = Prestress immediately prior to transfer = 2020.5 ksi, Aps = Area of prestress reinforcement = 12 à 0.153 = 1.836 in.2, Ag = Gross concrete section area = 618 in.2, gh = 1.7 â 0.01(H) = 1.7 â 0.01(70) = 1.0, gst = + â² = + =5 (1 ) 5 (1 4) 1.0 f ci , DfpR = 2.4 ksi, and ( )( )( ) ( )( )â = à + + =10 202.5 1.836 618 1.0 1.0 12 1.0 1.0 2.4 20.416 ksif pLT Total prestress losses at service = 2.119 + 2.415 + 9.896 + 20.416 = 34.846 ksi Effective prestress fpe = 202.5 â 34.846 = 167.654 ksi Effective prestress force Ppe = (12 strands)(0.153 in.2/strand)(167.654 ksi) = 307.812 kips DfpR = an estimate of relaxation loss taken as 2.4 ksi for low relaxation strand, and DfpLT = long-term prestress loss. Check of the post-tensioned (PT) effective prestress: Section 9.7.5.3 of the AASHTO LRFD Bridge Design Specifications states that minimum average effective prestress shall not be less than 0.25 ksi. Solid section area = 918 in.2 Minimum required effective PT force = (918 in.2)(0.250 ksi) = 229.5 kips Minimum required PT area = (229.5 kips)/(167.654 ksi) = 1.37 in.2 Number of ½-in.-diameter strands = (1.37 in.2)/(0.153 in.2) = 8.95 strands In this example, 12 â ½-in.-diameter, 270-ksi strands are used that will deliver effective prestress = (250 ksi)(12/8.95) = 335 ksi OK Check of concrete stresses at service at the positive moment area: (a) Compression stress, Service I, top fiber: Compression stress limit due to effective prestress, permanent loads, and transient loads 0.6 0.6 6.0 3.6 ksif c ( )( )= â² = = +
Research Findings 119 0.56 0.15 5.95 6.66 k-ft/ft = 59.94 k-ft/9-ft 307.812 618 307.812 1.125 3.125 2782.5 59.94 12 3.125 2782.5 0.498 0.389 0.808 0.917 ksi 3.6 ksi M f P A P e y I M y I service I top pe g pe p top service top( ) ( ) ( ) ( ) ( ) ( ) = + + = = + â + = + â Ã + Ã = + â + = + < (b) Tensile stress, Service III, bottom fiber: ( ) ( ) ( ) ( ) ( ) ( ) = â² = = â = + + Ã = = + + â = + + Ã â Ã = + + â = + < Tensile stress limit 0.19 0.19 6.0 0.465 ksi 0.56 0.15 0.8 5.95 5.47 k-ft/ft = 49.23 k-ft/9-ft 307.812 618 307.812 1.125 5.375 2782.5 49.23 12 5.375 2782.5 0.498 0.669 1.141 0.026 ksi 3.6 ksi f M f P A P e y I M y I c service III bottom pe g pe p bottom service bottom Check of concrete stresses at service at the negative moment area: (a) Compression stress, Service I, bottom fiber: Compression stress limit due to effective prestress, permanent loads, and transient loads 0.6 0.6 6.0 3.6 ksi 0.75 0.20 4.2 5.15 k-ft/ft = 46.35 k-ft/9-ft 307.812 918 46.35 12 4.25 5527.1 0.335 0.428 0.763 ksi 3.6 ksi f M f P A M y I c service I bottom pe g service bottom ( ) ( )( ) ( ) ( ) = â² = = + = + + = = + + = + + Ã = + + = + < (b) Tensile stress, Service III, bottom fiber: Tensile stress limit 0.19 0.19 6.0 0.465 ksi 0.75 0.20 0.8 4.2 4.31 k-ft/ft = 38.79 k-ft/9-ft 307.812 918 38.79 12 4.25 5527.1 0.335 0.358 0.023 ksi 0.465 ksi f M f P A M y I c service III bottom pe g service bottom ( )( ) ( ) = â² = = â = + + Ã = = + â = + â Ã = + â = â > â Strength Limit State at the positive moment area: Mstrength I = 1.25 Ã 0.56 + 1.5 Ã 0.15 + 1.75 Ã 5.95 = 11.34 k-ft/ft = 102.04 k-ft/9-ft Cross section: Ribbed section (Figure 3.96)
120 Simplified Full-Depth Precast Concrete Deck Panel Systems Using Strain Compatibility analysis: Depth of the equivalent compression block = 0.855 in. Depth of the neutral axis = 0.855/0.75 = 1.14 in. Nominal flexural strength Mn = 149.857 k-ft/9-ft Strain at extreme tensile layer of reinforcement = 0.0141 ÏMn = 1.0 à 149.857 = 149.857 k-ft/6-ft-long panel Strength Limit State at the negative moment area: Mstrength I = 1.25 à 0.75 + 1.5 à 0.20 + 1.75 à 4.2 = 8.59 k-ft/ft = 77.29 k-ft/9-ft Cross section: 8.5-in. solid section Depth of the equivalent compression block = 0.855 in. Depth of the neutral axis = 0.855/0.75 = 1.14 in. Nominal flexural strength Mn = 149.857 k-ft/9-ft Strain at extreme tensile layer of reinforcement = 0.0141 ÏMn = 1.0 à 149.857= 149.857 k-ft/6-ft-long panel 3.3.1.5 Two-Way Shear (Punching Shear) Two-way shear at the discrete joints: Since the deck slab is supported by a discrete system of haunches, two-way shear of the slab should be checked around the haunches. The check for the two-way shear should follow the provisions given by Article 5.12.8.6.3 of AASHTO LRFD Bridge Design Specifications. The factored two-way shear force caused by the HL93 truck and 100 psf uniform distributed load can be determined using Figure 3.4 and Figure 3.7. Reaction due to HL93 truck (with multiple presence factor and dynamic allowance) = 37.2 kips Reaction due to 100 psf = 6.5 kips As a conservative approach and to simplify the calculations, the following assumptions were made for this section: (1) the slab is an 8.5-in.-thick solid slab, and (2) the haunch is 12 in. à 12 in. Factored two-way shear: 1.25 6.5 106.3 100 1.5 6.5 25 100 1.75 37.2 76.2 kipsVu ( ) ( ) ( )= ï£ï£¬   +  ï£ï£¬   + = The nominal shear resistance Vn: ( )= + β  ï£ï£¬   Ⲡ⤠â²0.063 0.126 0.126 LRFD Equation 5.12.8.6.3-1V f b d f b dn c c o v c o v
Research Findings 121 βc = 1.0 dv = 6 in. bo = 4(12 + 6) = 72 in. Therefore: 0.126 0.126 6 72 6 133.3 kipsV f b dn c o v ( )( )= â² = = The design shear resistance: ÏVn = 0.9(133.3) = 119.9 kips > 76.2 kips OK Two-way shear at wheel loads: Two-way shear of the thin slab (i.e., 5-in. slab) caused by the 16-kip wheel load of the HL93 truck should be checked according to Article 5.12.8.6.3 of the AASHTO LRFD Bridge Design Specifications (2017). The footprint of the wheel load is determined using Article 3.6.1.2.5 âTire Contact Areaâ of the AASHTO LRFD Bridge Design Specifications (2015), where the wheel load of the design truck is distributed uniformly on a 20-in. à 10-in. area. Factored load due to HS20, Vu = 1.75 à 1.33 à 16 = 37.24 kips The nominal shear resistance Vn: ( )= + β  ï£ï£¬   Ⲡ⤠â²0.063 0.126 0.126 LRFD Equation 5.13.3.6.3-1V f b d f b dn c c o v c o v βc = 1.0 dv = 5.0 â 1.5 = 3.5 in. bo = 2(20 + 2) + 2(10 + 2) = 68 in. Therefore: 0.126 0.126 6 68 3.5 73.5 kipsV f b dn c o v ( )( )= â² = = The design shear resistance: ÏVn = 0.9(73.5) = 66.15 kips > 37.24 kips OK 3.3.1.6 Bearing Stresses Since the slab is supported by a discrete system of haunches, bearing stresses between the haunch and the supporting girders should be checked. Bearing stresses resistance should be determined according to Article 5.6.5 of AASHTO LRFD Bridge Design Specifications. Bearing stresses caused by the weight of the slab, wearing surface, and HS20 truck = 76.2 kips Pn = 0.85 f â²c A1m f â²c = 6 ksi
122 Simplified Full-Depth Precast Concrete Deck Panel Systems A1 = 12 Ã 12 = 144 in.2 m = 1.0(to simplify the calculations) Pn = (0.85)(6)(144)(1.0) = 734 kips ÏPn = (0.7)(734) = 514.1 kips >> 76.2 kips OK 3.3.2 Longitudinal Design of DeckâGirder System for Concrete Girders 3.3.2.1 Parametric Study In this investigation, several prestressed concrete I-girder bridges were analyzed to determine the interface shear demand per unit length. Table 3.25 summarizes the basic information of these bridges and calculates the maximum interface shear force acting on the shear connectors when used at 6-ft spacing. Nominal shear capacity of the shear connector assembly developed in this project = 295.3 kips, and the design shear capacity = 0.9 Ã 295.3 = 265.5 kips. Table 3.25 shows that the shear connector assembly can be used at 6-ft spacing for bridge with a span-to-depth ratio up to 27.0. Figure 3.97 gives the interface shear demand per unit length versus the girder span-to-depth ratio. This plot indicates that the girder span-to-depth ratio correlates well with the interface shear demand (R2 = 0.90). 3.3.2.2 Design Example PCI Bridge Design Manual, Chapter 9, Design Example 9.1a: The superstructure consists of six BT-72 beams spaced at 9-ft centers, as shown in Figure 3.94, designed to act compositely with the cast-in-place concrete deck to resist all superimposed dead loads, live loads, and impact. Design live load is HL93. Interface Shear Transfer (LRFD Article 5.7.4) At the Strength Limit State, the horizontal shear at a section on a per unit basis can be taken as: LRFD Equation 5.7.4.5-1V V dhi u v ( )= Bridge Name Span (ft) Span Type Girder Size Girder Depth (ft) Girder Sp. (ft) Span- to- Depth Ratio Interface Shear Demand (kips/in.) Spacing of the Shear Connector Assembly PCI BDM Example 9.1a 120 Simple BT-72 6 9 20.0 2.86 92.8 Florida Bridge, Florida 150 Simple FL I-72 6 10 25.0 3.38 78.6 Oxford South, Nebraska 110 Continuous NU1350 4.42 9 24.9 3.58 74.2 Kearney East, Nebraska 166 Continuous NU1800 5.92 8.5 28.0 3.70 71.7 Oxford South, Nebraska 140 Continuous NU1350 4.42 9 31.7 4.67 56.8 Note: PCI BDM = [Precast/Prestressed Concrete Institute] PCI Bridge Design Manual 2011B. Table 3.25. Interface shear demand in different prestressed concrete I-girder bridges.
Research Findings 123 where Vhi = horizontal factored shear force per unit length of the beam (kips/in.) Vu = factored shear force at specified section due to superimposed loads after the deck is cast (kips). Shear force due to girder weight and deck weight are excluded. dv = distance between the centroid of the tension steel and the mid-thickness of the slab = (de â ts/2) = 75.78 â 7.5/2 = 72.03 in. The AASHTO LRFD Bridge Design Specifications do not identify the location of the critical section. For convenience, it will be assumed here to be the same location as the critical section for vertical shear, at Point 0.051L. Using load combination Strength I: Vu = 1.25(5.4) + 1.5(10.8) + 1.75(73.8 + 30.6) = 205.7 kips Therefore, the applied factored horizontal shear is ( ) = = = Ï = = 205.7 72.03 2.86 kips/in. Required 2.86 0.9 3.17 kips/in. LRFD Equation 5.7.4.3-1 V V V hi ni hi where Vni is nominal shear resistance. Required nominal shear capacity for 6-ft connector spacing Vni = 3.17 (72) = 228 kips Nominal shear capacity of the CDR shear connector assembly was developed and tested in this project = 310.0 kips OK y = 0.15x - 0.18 R² = 0.93 0.0 0.5 1.0 1.5 2.0 2.5 3.0 3.5 4.0 4.5 5.0 16 18 20 22 24 26 28 30 32 34 In te rf ac e Sh ea r D em an d (k ip /in .) Span-to-Depth Ratio (ft/ft) Figure 3.97. Interface shear demand versus girder span-to-depth ratio.
124 Simplified Full-Depth Precast Concrete Deck Panel Systems 3.3.3 Longitudinal Design of DeckâGirder System with Steel Girders 3.3.3.1 Parametric Study The parametric study included a wide range of bridges with the following criteria: Number of spans = 1 and 2 Span length = 100 ft, 125 ft, and 150 ft Girder spacing = 6 ft, 9 ft, and 12 ft Span-to-depth ratio = 21.1 to 27.4 Shear connector groups: Spacing = up to 6 ft Number of studs = nine studs/group Size of studs = 7/8 in., 1 in., and 1¼ in. Minimum spacing between individual studs longitudinally and transversely = 4 times the stud diameter Fatigue capacity: AASHTO LRFD Bridge Design Specifications Strength: 75% of the strength determined by Article 6.10.10.4.3 of the AASHTO LRFD Bridge Design Specifications. Deflection: Use EulerâBernoulli Beam Analysis with 75% EI of the composite section properties. Concrete deck: 8.5-in.-thick slab, concrete strength = 6 ksi, normal weight concrete Steel beam section: A plate girder I-shape steel section was considered for all cases. The span of each case was made of three segments. Table 3.26 shows the details of all cases and the corresponding spacing between the stud groups and the controlling design criteria: fatigue or strength. This table shows that the spacing between the shear connector clustersâin all cases except Case 18âis controlled by the fatigue design. 3.3.3.2 Design Example The research team selected Case 16 (Table 3.26)âa two-span bridgeâto demonstrate the details of the design procedure. Figure 3.98 shows the layout of the three segments of the steel-plate girder. Materials specifications Deck concrete f câ² = 6.0 ksi, modulus of elasticity of the deck Ec = 4,695 ksi Deck reinforcement fy= 60 ksi Structural steel: yield strength Fy = Fyw = Fyt = Fyc = 50 ksi Studs: tensile strength Fu = 72 ksi Modular ratio n = 6.0
Case No. Title N um be r o f S pa ns Sp an L en gt h G ird er S pa ci ng To ta l D ep th Sp an -to -D ep th R at io Pr ov id ed S pa ci ng B et w ee n C lu st er s of 7 /8 -in . s tu ds (i n. ) D es ig n C on tro lle d by F at ig ue o r S tre ng th Pr ov id ed S pa ci ng B et w ee n C lu st er s of 1 -in . s tu ds (i n. ) D es ig n C on tro lle d by F at ig ue o r S tre ng th Pr ov id ed S pa ci ng B et w ee n C lu st er s of 1 1 / 4 -in . s tu ds (i n. ) D es ig n C on tro lle d by F at ig ue o r S tre ng th Segment 1 (in.) Segment 2 (in.) Segment 3 (in.) (ft) (ft) (in.) To p Fl an ge W eb Bo tto m Fl an ge To p Fl an ge W eb Bo tto m Fl an ge To p Fl an ge W eb Bo tto m Fl an ge 1 1_100_6_22.7 1 100 6 52.75 22.7 16x.875 40x0.5 16x0.75 16x.875 40x0.5 16x1.0 16x.875 40x0.5 16x0.75 38 F 50 F 72 F 2 1_100_9_21.9 1 100 9 54.75 21.9 18x1.0 42x0.625 18x0.75 18x1.0 42x0.625 18x1.125 18x1.0 42x0.625 18x0.75 32 F 36 F 58 F 3 1_100_12_21.1 1 100 12 56.75 21.1 20x1.125 44x0.625 20x0.875 20x1.125 44x0.625 20x1.25 20x1.125 44x0.625 20x0.875 28 F 38 F 60 F 4 2_100_6_24.6 2 100 6 48.75 24.6 14x0.875 36x0.5 14x0.75 14x1.25 36x0.5 14x1.25 14x2 36x0.5 14x2.25 34 F 44 F 68 F 5 2_100_9_22.7 2 100 9 52.75 22.7 16x.875 40x0.5 16x0.75 16x1.25 40x0.5 16x1.25 16x2.25 40x0.5 16x2.5 26 F 34 F 54 F 6 2_100_12_21.9 2 100 12 54.75 21.9 18x1.0 42x0.625 18x0.75 18x1.5 42x0.625 18x1.5 18x2.25 42x0.625 18x2.5 20 F 26 F 40 F 7 1_125_6_24.7 1 125 6 60.75 24.7 16x0.875 48x0.5 16x0.75 16x0.875 48x0.5 16x1.25 16x0.875 48x0.5 16x0.75 40 F 54 F 72 F 8 1_125_9_22.5 1 125 9 66.75 22.5 18x1.0 54x0.625 18x0.75 18x1.0 54x0.625 18x1.5 18x1.0 54x0.625 18x0.75 34 F 46 F 72 F 9 1_125_12_21.8 1 125 12 68.75 21.8 20x1.125 56x0.75 20x0.875 20x1.125 56x0.75 20x1.5 20x1.125 56x0.75 20x0.875 28 F 38 F 62 F 10 2_125_6_27.4 2 125 6 54.75 27.4 14x0.875 42x0.5 14x1.0 14x1.25 42x0.5 14x1.5 14x2.5 42x0.5 14x2.75 38 F 50 F 72 F 11 2_125_9_23.2 2 125 9 64.75 23.2 16x0.875 52x0.625 16x.875 16x1.25 52x0.625 16x1.25 16x2.25 52x0.625 16x2.5 28 F 36 F 58 F 12 2_125_12_22.5 2 125 12 66.75 22.5 18x1.0 54x0.625 18x0.875 18x1.5 54x0.625 18x1.625 18x2.5 54x0.625 18x2.75 22 F 30 F 48 F 13 1_150_6_25.4 1 150 6 70.75 25.4 16x1.0 58x0.625 16x1.0 16x1.0 58x0.625 16x1.5 16x1.0 58x0.625 16x1.0 44 F 58 F 72 F 14 1_150_9_24.1 1 150 9 74.75 24.1 18x1.125 62x0.625 18x1.125 18x1.125 62x0.625 18x1.75 18x1.125 62x0.625 18x1.125 36 F 48 F 72 F 15 1_150_12_22.3 1 150 12 80.75 22.3 20x1.125 68x0.75 20x1.0 20x1.125 68x0.75 20x1.875 20x1.125 68x0.75 20x1.0 30 F 38 F 62 F 16 2_150_6_27 2 150 6 66.75 27 16x0.875 54x0.625 16x0.875 16x1.25 54x0.625 16x1.5 16x2.5 54x0.625 16x2.75 38 F 50 F 72 F 17 2_150_9_24.7 2 150 9 72.75 24.7 18x1.0 60x0.625 18x0.875 18x1.75 60x0.625 18x1.875 18x2.625 60x0.625 18x2.875 30 F 40 F 62 F 18 2_150_12_23.5 2 150 12 76.75 23.5 20x1.125 64x0.75 20x0.875 20x1.5 64x0.75 20x1.75 20x2.75 64x0.75 20x3.0 24 S 30 F 48 F Note: F = fatigue; S = strength. Table 3.26. Results of the parametric study for the precast deck system with steel girders.
126 Simplified Full-Depth Precast Concrete Deck Panel Systems Bridge criteria Span length: Two equal spans = 150 ft each Number of girder lines = 9 Girder spacing = 6 ft Deck overhang = 2 ft Bridge roadway width: 52 ft, no pedestrian traffic Skew = 0° Slab thickness ts = 8.5 in. Haunch thickness = 3.25 in. from bottom of the deck to the top of the girder web. The haunch thickness is used in the calculation of deck dead load and section properties. Cross-frame spacing = 25 ft Miscellaneous structural steel = 10% of girder weight Superimposed dead load = 215 lb/ft Future wearing surface = 30 psf Composite action is assumed for full length (positive and negative moment regions). Noncomposite section data Positive moment region (abutment segment): Depth of the web D = 54 in. tw = 0.625 in. Figure 3.98. Layout of the plate girder steel segments.
Research Findings 127 Width of the top flange bft = width of the bottom flange bfb = 16 in. Thickness of the bottom flange tfb = 0.875 in. Thickness of the top flange tft = 0.875 in. Negative moment region (intermediate segment): D = 54 in. tw = 0.625 in. bft = bfb = 16 in. tfb = 1.5 in. tft = 1.25 in. Negative moment region (pier segment): D = 54 in. tw = 0.625 in. bft = bfb = 16 in. tfb = 2.75 in. tft = 2.5 in. The point of dead load contraflexure (zero moment) has been determined to be approximately 100 ft. from abutment. Section size changes will occur nearby these points. Girder geometry check btf (positive moment region) = 16 in. > 13.39 in. Thus, the unbraced length of the top flange at the positive moment region is compact at the time when the bridge is open to traffic. LTB of top flange overhang is not critical. t positive moment region = 0.875 in. 16 12 0.38 29000 50 = 0.874 in.tf ( ) > Thus, the top flange at the positive moment region is compact at the time when the bridge is open to traffic. FLB of top flange overhang is not critical. Geometry of stud clusters Using 6-in. long, 1¼-in. j studs, the ratio of height to diameter is h d 6 1.25 4.8 4 OK LRFD Article 6.10.10.1.1( )= = >
128 Simplified Full-Depth Precast Concrete Deck Panel Systems The depth from the top of the top flange to the bottom of the deck does not exceed 2.375 in. Therefore, the stud shear connectors penetrate more than 2 in. into the slab. The flange width is 16 in. Minimum spacing of the studs of four diameters and minimum edge distance of 1 in. allow for placement of three studs per row. Proposed cluster consists of three rows by three columns = nine studs per cluster. Spacing for Fatigue Limit State Assumed average daily truck traffic = 3,000 trucks/day > 960 trucks/day The Fatigue I load combination is used, and the fatigue shear resistance Zr for infinite life is taken as Z = 5.5 d = 5.5 1.25 = 8.59 kip LRFD Article 6.10.10.2-1r 2 2( ) ( ) Table 3.27 summarizes the required longitudinal spacing between clusters at tenth points of the first span. The smallest longitudinal spacing between the shear connectors given in the table is 76 in., which is greater than the 72 in. Thus, placing all clusters at a uniform spacing of 6 ft (72 in.) will meet the fatigue capacity requirement over the full length of the bridge. Therefore, use 26 clusters per span at 72-in. spacing. Spacing for Strength Limit State Minimum number of shear connectors n P Q (LRFD Equation 6.10.10.4.1-2) r = 1. Required connectors from end support to maximum positive moment (L= 63.21 ft) ( )â² P = total nominal shear force = the smaller of P or P P = 0.85 F b t = 3121.2 kip LRFD Equation 6.10.10.4.2-2 1p 2p 1p c s s where bs is the effective width of the concrete deck (in.), ts is the thickness of the concrete deck (in.). Table 3.27. Required longitudinal spacing between clusters of the first span. Location Shear Range, Vr (kips) Moment of Inertia, I (in.4) Neutral Axis to Bottom Fiber (in.) Moment of Area, Q (in.3) VrQ/I (kips/in.) Zr (kips) Fatigue Spacing (in.) 1.00 59 76315 49.8 1327.1 1.02 8.59 76.0 1.10 51 76315 49.8 1327.1 0.89 8.59 87.2 1.20 45 76315 49.8 1327.1 0.78 8.59 98.8 1.30 45 76315 49.8 1327.1 0.78 8.59 98.8 1.40 45 76315 49.8 1327.1 0.78 8.59 98.8 1.50 47 76315 49.8 1327.1 0.81 8.59 95.6 1.60 48 76622 50.0 1308.5 0.82 8.59 94.4 1.70 50 100919 48.1 1568.9 0.77 8.59 100.5 1.80 51 100919 48.1 1568.9 0.79 8.59 97.6 1.90 53 146913 45.8 1913.5 0.68 8.59 113.1 2.00 57 146913 45.8 1913.5 0.74 8.59 105.0
Research Findings 129 P F Dt F b t F b t 3087.5 kip LRFD Equation 6.10.10.4.2-32p yw w yt ft ft yc fc fc ( )= + + = where Fyw is the yield strength of the web (ksi). = = = Ï = Ï â² Ï P 3087.5 kips factored shear resistance of one shear connector 0.85 Min.[0.5( /4) , ( /4) ] (LRFD Equation 6.10.10.4.3)2 2 Q Q Q d f E Rg d F r r sc n c c u where Rg = a group factor = 0.72 (developed in this project based on the experimental investigation). (0.85) 0.5 4 (1.25) 14 6500 185.1 0.72 4 (1.25) (71) 62.7 0.85 62.7 53.3 2 2 Q Q Min kips kips kipsr sc n ( )( )= Ï = Ï ï£ï£¬   à = Ï ï£ï£¬   =               = = Number of required studs = 3087.5/53.3 = 57.9 studs (over 63.21 ft) Number of provided clusters at 6 ft = 57.9/6 = 10 clusters Number of provided studs = 10 clusters (nine studs per cluster) = 90 studs OK 2. Required connectors from maximum positive moment section to the center support (L = 86.79 ft) ( )P= P + P LRFD Equation 6.10.10.4.2-6p n Pp = smaller of P1p or P2p P1p = 0.85 F â²cbsts = 3121.2 kips P2p = FywDtw + Fytbfttft + Fycbfctfc = 3087.5 kips Pp = 3087.5 kips Pn = smaller of P1n or P2n ( )= + + =P F Dt F b t F b t 5887.5 kip LRFD Equation 6.10.10.4.2-71n yw w yt ft ft yc fc fc ( )= â² =P 0.45 F b t 1652.4 kip LRFD Equation 6.10.10.4.2-82n c s s Pn = 1625.4 kips P = 3087.5 + 1625.4 = 4712.9 kips, Qr = 53.3 kips
130 Simplified Full-Depth Precast Concrete Deck Panel Systems Number of required studs = 4712.9/53.3 = 88.4 studs (over 86.79 ft) Number of provided clusters over 86.79 ft at 6 ft = 86.79/6 = 14 clusters Number of provided studs = 14 clusters (9 studs per cluster) = 126 studs OK Minimum negative moment deck reinforcement This girder was designed as a composite section throughout. To control the deck cracking at the negative moment region, the tensile stresses in the concrete deck caused by applicable load combinations shall be limited to 0.9 fr (where fr is the modulus of rupture of concrete); other- wise, longitudinal reinforcement in accordance with AASHTO LRFD Bridge Design Specifications Article 6.10.1.7 shall be provided. Negative bending moment on composite section MDC2 = 713 kip.ft MDw = 597 kip.ft MLL = 2182 kip.ft Composite section properties Long-term modular ratio, n = 18 Moment of inertia, I = 113,140 in.4 Distance from the centroid to bottom fiber, yb = 37.80 in. Distance from the centroid to top surface of the deck, yd_Top = 56.75 + 3.25 + 8.5 â 37.80 = 30.70 in. Distance from the centroid to bottom surface of the deck, yd_Bottom = 56.75 + 3.25 â 37.80 = 22.20 in. Short-term modular ratio n = 6 I = 146,913 in.4 yb = 45.76 in. yd_Top = 56.75 + 3.25 + 8.5 â 45.76 = 22.74 in. yd_Bottom = 56.75 + 3.25 â 45.76 = 14.24 in. Deck stresses (at Service II Limit State) 713 597 12 18 113140 30.70 1.3 2182 12 6 146913 22.74 1.12 ksi_Deck Top ( ) ( )Ï = + Ã Ã Ã + Ã Ã Ã Ã =
Research Findings 131 ( ) ( )Ï = + Ã Ã Ã + Ã Ã Ã Ã = = â² = Ï > 713 597 12 18 113140 22.20 1.3 2182 12 6 146913 14.24 0.72 ksi f 0.24 f 0.59 ksi, 0.9f _ r c Deck_Top r Deck Bottom where sDeck_Top represents the normal stresses at the top surface of the deck, and sDeck_Bottom represents the normal stresses at the bottom surface of the deck. Thus, the deck is expected to be cracked at service load. Two options may be used: (1) supply adequate crack control and strength passive (rebar) reinforcement, or (2) supply adequate post-tensioning to ensure no flexural cracking at service load. Option 1: Supply adequate crack control and strength passive (rebar) reinforcement. Total tensile force in the deck = 0.5(1.12 + 0.72)(8.5)(6 Ã 12) = 563.0 kips Section 6.10.1.7 states that the reinforcement used to satisfy this requirement shall have a specified minimum yield strength not less than 60.0 ksi; the size of the reinforcement should not exceed No. 6 bars. The required reinforcement should be placed in two layers distributed uni- formly across the deck width, and two-thirds should be placed in the top layer. The individual bars should be spaced at intervals not exceeding 12.0 in. Required area of rebars = 563.0/60 = 9.4 in.2 Area of the top layer = (2/3)(9.4) = 6.3 in.2, provide No. 6 bars at 5 in. Area of the bottom layer = (1/3)(9.4) = 3.1 in.2, provide two No. 6 bars per every longitudinal rib Option 2: Supply adequate post-tensioning to ensure no flexural cracking at service load. Required number of strands: Minimum required compressive stress at mid height of deck = 1.12 â (0.9 Ã 0.59) = 0.59 ksi Minimum required prestressing force at mid height of deck = 0.59 Ã 8.5 Ã (6.0 Ã 12) = 361.0 kips Effective prestressing in the 0.5-in.-diameter strands = 167.6 ksi (see the deck design in Section 3.3.1 of this report) Minimum required strands per beam spacing = 361.0 / (167.6 Ã 0.153) = 14 strands 3.4 Design Guidelines This project resulted in development of design and detailing methods for bridges built with either concrete girders or steel girders supporting full-depth precast deck panel systems with shear connection spacing of up to 6 ft. Details of the precast deck panel and the panel-to-panel and panel-to-girder connections are given in Chapter 2. 3.4.1 Precast Deck 1. It is possible to have full-depth deck panels that are 6-ft long (in the direction of traffic) and as wide as allowed for shipping and handling. In this case, the shear connectors will be provided at the transverse edges of the panels.
132 Simplified Full-Depth Precast Concrete Deck Panel Systems 2. It is possible to have panels that are as long as 12 ft, generally considered the maximum allowed for shipping without a special permit in most of the United States. In this case, an intermediate pocket would be required so that the maximum spacing of 6 ft is not exceeded. 3. Ribbed slab panels have been shown to have adequate resistance while saving weight, which could be advantageous in deck replacement projects that demand increase in live load. Ribbed slab panels are recommended to have longitudinal ribs over the girder lines and transverse ribs along the transverse edges. These ribs would eliminate potential for twisting as the wheel loads travel along the bridge deck. 4. No special design provisions are required for ribbed slabs as given in this project, as the total depth to the steel is maintained as in solid panels. 5. When the slab minimum thickness of 5 in. is used, the capacity of the panels in punching shear is adequate. 6. Only the joints where the interface shear connectors are located are filled with UHPC. The haunch between the girder top face and the deck soffit between the joints may be left unfilled or may be filled as discussed in the following section. 7. For slabs that are supported on discrete joints over the girder lines, a method is presented in the research to allow for more accurate design than currently in the AASHTO LRFD Bridge Design Specifications (Figures 2.2 to 2.7 of this report). 3.4.2 Haunch (Build-Up) Between Girders and Panels 1. Testing was done using a 2.5-in. to 3.5-in. gap (haunch, or build-up) between the top of the girder and the bottom of the deck. In the middle 50% of the span in the actual design, it is recommended that the haunch not exceed 2.5 in. Otherwise, the Vierendeel behavior of the beamâdeck connection with tall discrete joints must be properly recognized in structural design. 2. For deflection analysis it is recommended that EI be reduced to 0.75 EI of the full composite section if the shear connection spacing is 6 ft, and the haunches are not filled with concrete. It is further recommended that the reduction factor become 1.0 at a spacing of 4 ft or less. Linear interpolation is to be used between 4 ft and 6 ft. 3. No degree-of-composite-action adjustments for strength analysis are shown by analysis and testing to be required. 4. All analysis and testing were conducted on details that only fill the shear key pocket with concrete grout. In practice, the haunch may be left unfilled, packed with extruded poly- styrene, or filled with flowable 4.0-ksi concrete grout. While it helps to improve stiffness, filling the space with concrete was not counted on for interface capacity between the girders and the deck. 5. It is recommended that all shear pockets be filled with UHPC, as defined by FHWA. The transverse joints could also be filled with UHPC if no longitudinal post-tensioning is supplied in the deck. If the deck is longitudinally post-tensioned, the transverse joint material may be compatible with the precast deck concrete rather than the more expensive UHPC. 6. An innovative method is used for post-tensioning whereby all grouting is done in one stage to simplify construction. After the grouting material gains enough strength, the post-tensioning operation commences. This is done using a duct-in-duct system and unbonded, greased, post-tensioning strands. Analysis has shown that the loss of post- tensioningâtransferred from the deck to the girder because of the full connection before post-tensioningâis insignificant. 7. If post-tensioning is not used, it is recommended to fill the transverse joint with UHPC of enough width to allow splicing and development of projecting bars to achieve
Research Findings 133 longitudinal deck continuity. The recommended details are given and are consistent with FHWA recommendations. 3.4.3 Concrete Girder-to-Deck Joint 1. Based on numerous trials and iterations, CDRâa new connection hardwareâwas developed for this research. Note that the CDR is placed in the precast girder during production in the precast plant. The two threaded rods are made extra long to allow for field-cutting to the proper length and for haunch variability. 2. Extensive analysis and testing has been done to establish the minimum ultimate nominal capacity of the connection, using the minimum material properties specifiedâmainly 8.0-ksi girder and 6.0-ksi deck concreteâand UHPC joint material. 3. It is recommended that 310-kip minimum ultimate nominal capacity be used for the design, with a recommended capacity reduction factor (resistance factor) of 0.9. Therefore, no analysis is required to size the rods, plate, or tube of the connection hardware assembly. Analysis is only done on the demand side. 3.4.4 Steel Girder-to-Deck Joint 1. As a result of this project, the final configuration recommended is a cluster of up to nine studs at 6-ft maximum spacing. 2. Although the testing was performed on 1-in.-diameter studs, ¾-in.-, 7â8-in.-, and 1¼-in.- diameter studs can be also used as long as no more than nine studs are used without prior experimental assessment of group effect. 3. The fatigue capacity of the studs remains as given in the current AASHTO LRFD Bridge Design Specifications (2017). 4. The nominal strength of the connection is recommended to be limited to 72% of the nominal tensile strength of the studs. Current resistance factors of the AASHTO LRFD Bridge Design Specifications should be used. 3.4.5 Concrete Girder Design 1. For all service loading combinations (excluding deflection), use the full EI value of the composite section. 2. For deflection analysis, it is recommended that EI be reduced to 0.75 EI of the full composite section if the shear connection spacing is 6 ft and the haunches are not filled with concrete. It is further recommended that the reduction factor become 1.0 at a spacing of 4 ft or less. Linear interpolation is to be used between 4 ft and 6 ft. 3. For flexural strength, no changes are proposed. 4. For shear strength, no change is proposed as long as the spacing between connections is less than the total girder depth. In the event that the spacing is greater than the girder depth, it is conceivable that the diagonal shear failure plane may develop from the bottom to the top of the girder without engaging the connection. In this situation, it is recommended that the total depth of the section be taken as the girder depthâexcluding the deck and haunch. 5. For horizontal shear demand, it is recommended to use only the forces that are applied after the member becomes composite in calculating the demand. 3.4.6 Steel Girder Design 1. When discrete joints are used, the top flange shall be considered as discretely braced for all superimposed loads after the deck is sufficiently connected. The unbraced length of the top
134 Simplified Full-Depth Precast Concrete Deck Panel Systems flange is the lesser of the cluster spacing or the cross-frame spacing. No changes are proposed for FLB or LTB provisions. 2. For constructability, no changes are proposed. 3. For stress checks, no changes are proposed. 4. For deflection analysis, it is recommended that EI be reduced to 0.75 EI of the full composite section if the shear connection spacing is 6 ft and the haunches are not filled with concrete. It is further recommended that the reduction factor become 1.0 at a spacing of 4 ft or less. Linear interpolation is to be used between 4 ft and 6 ft. 5. For Fatigue and Fracture Limit State, no changes are proposed. 6. For Strength Limit State, no changes are proposed. 7. It is recommended to limit the nominal strength of the connection to 72% of the nominal tensile strength of the studs. Current resistance factors of the AASHTO LRFD Bridge Design Specifications should be used. 8. If the girder is designed as a composite section throughout the whole length, AASHTO LRFD Bridge Design Specifications Provision 6.10.1.7 shall be applied. Longitudinal reinforcement meeting that provision should be spliced sufficiently to perform the required continuity and development. The splice connection details and materials were proposed previously in this project. Alternatively, longitudinal post-tensioning should be used to limit these tensile stresses and to control deck cracks. 3.5 Proposed Changes to AASHTO LRFD Bridge Design Specifications This section presents the proposed changes to the AASHTO LRFD Bridge Design Specifications, 8th edition (2017). Proposed changes are underlined. The following list of proposed revisions to the AASHTO LRFD Bridge Design Specifica- tions is currently in the process of being developed in a working agenda item format for easier presentation to the relevant Committees of the AASHTO Committee on Bridges and Structures. 3.5.1 Item 1: Create a New Section 2.5.2.6.4 This item is related to reduction of stiffness for deflection calculations when discrete joints are used. 2.5.2.6.4âPrecast Deck Panels Supported by Discrete Joints at a 48- to 72-in.-Wide Spacing For deflection analysis of precast deck panel systems supported by a discrete joint system, the stiffness of the full composite section EI shall be reduced to 0.75 EI if the shear connection spacing is 6 C2.5.2.6.4 Research by Badie et al. (2018) has indicated that when the space between shear connectors is increased from 48 to 72 in. and the haunch between the top face of the beam and soffit of the deck is not filled with a ft. The 0.75 reduction factor shall become 1.0 at a spacing of 4 ft or smaller. Linear interpolation shall be used between 4 and 6 ft. cementitious material, it is possible to have a loss of overall stiffness. This loss may be conservatively assumed to equal 25% for live load deflection calculation. This requirement seldom controls design for beams of typical span/depth ratios. 3.5.2 Item 2: Add New Reference to Section 2.8 Badie, S. S., G. Morcous, and M. K. Tadros. NCHRP Research Report 895: Simplified Full-Depth Precast Concrete Deck Panel Systems. Transportation Research Board, Washington, D.C., 2018.
Research Findings 135 3.5.3 Item 3: Modify Section 5.7.4 This item is related to changing the maximum spacing of shear connectors for concrete girders. 5.7.4âInterface Shear TransferâShear Friction 5.7.4.1âGeneral Interface shear transfer shall be considered across a given plane at: ⢠An existing or potential crack, ⢠An interface between dissimilar materials, ⢠An interface between two concretes cast at different times, or ⢠The interface between different elements of the cross section. C5.7.4.1 Shear displacement along an interface plane may be resisted by cohesion, aggregate interlock, and shear friction developed by the force in the reinforcement crossing the plane of the interface. Roughness of the shear plane causes interface separation in a direction perpendicular to the interface plane. This separation induces tension in the reinforcement balanced by compressive stresses on the interface surfaces. Any reinforcement crossing the interface is subject to the same strain as the designed interface reinforcement. Insufficient anchorage of any reinforcement crossing the interface could result in localized fracture of the surrounding concrete. Where the required interface shear reinforcement in girderâslab design exceeds the area required to satisfy flexural shear requirements, additional reinforcement shall be provided to satisfy the interface shear requirements. The additional interface shear reinforcement need only extend into the girder a sufficient depth to develop the design yield stress of the reinforcement, rather than extending the full depth of the girder as is required for vertical shear reinforcement. Reinforcement for interface shear may consist of single bars, multiple leg stirrups, or welded wire reinforcement. All reinforcement present where interface shear transfer is to be considered shall be fully developed on both sides of the interface by embedment, hooks, mechanical methods such as headed studs, or welding to develop the design yield stress. 5.7.4.3âInterface Shear Resistance C5.7.4.3 Except for specialized connection systems, shear friction theory as given below may be used to determine the reinforcing bars required to connect the two interface concretes. The factored interface shear resistance Vri shall be taken as Vri = ÏVni (5.7.4.3-1) and the design shall satisfy Vri ⥠Vui (5.7.4.3-2) For specialized connection systemsâsuch as that developed by Badie et al. (2018) and shown in Figure C5.7.4.3-1âthe ultimate shear strength of 310 kips of the connection is already determined in the research and can be directly used in design, as long as the minimum material capacities of the connection as specified in the research are used. For concrete and steel strengths below those specified for the connection in Figure 1, FEA and modified shear friction theory may be used, supplemented with full-scale testing.
136 Simplified Full-Depth Precast Concrete Deck Panel Systems Figure C5.7.4.3-1 Special connection system developed by Badie et al. (2018) Total load shall include all noncomposite and composite loads appropriate to the interface being investigated. where Vni = nominal interface shear resistance (kip) Vui = factored interface shear force due to total load, based on the applicable strength and extreme event load combinations in Table 3.4.1-1 (kip) Ï = resistance factor for shear specified in Article 5.5.4.2. For the extreme limit state event, Ï may be taken as 1.0. 5.7.4.5âComputation of the Factored Interface Shear Force for GirderâSlab Bridges Based on consideration of a free body diagram and utilizing the conservative envelope value of Vu1, the factored interface shear stress for a concrete girderâslab bridge may be determined as 1 ui u vi v V v b d = (5.7.4.5-1) where dv = distance between the centroid of the tension steel and the mid-thickness of the slab to compute a factored interface shear stress The factored interface shear force in kips/ft for a concrete girderâslab bridge may be determined as C5.7.4.5 The following illustrates a free body diagram approach to computation of interface shear in a girderâ slab bridge. In reinforced concrete, or prestressed concrete, girder bridges, with a cast-in-place slab, horizontal shear forces develop along the interface between the girders and the slab. The classical strength of materials approach, which is based on elastic behavior of the section, has been used successfully in the past to determine the design interface shear force. As an alternative to the classical elastic strength of materials approach, a reasonable approximation of the factored interface shear force at the strength or extreme event limit state for either elastic or inelastic behavior and cracked or uncracked sections can be derived with the defined notation and the free body diagram shown in Figure C5.7.4.5-1 as follows: 12ui ui cv ui viV v A v b= = (5.7.4.5-2) If the net force Pc across the interface shear plane is tensile, additional reinforcement Avpc shall be provided as c vpc y P A f = Ï (5.7.4.5-3) Mu2 = maximum factored moment at Section 2 (kip-in.) V1 = factored vertical shear at Section 1 concurrent Mu2 (kip) M1 = factored moment at Section 1 concurrent with Mu2 (kip-in.) ââ = unit length segment of girder (in.) C1 = compression force above the shear plane associated with M1 (kip) Cu2 = compression force above the shear plane associated with Mu2 (kip) Mu2 = M1 + V1 â (C5.7.4.5-1) 2 2 u u v M C d = (C5.7.4.5-2) with â = +1 12u v v M V C d d (C5.7.4.5-3) 1 1 v M C d = (C5.7.4.5-4)
Research Findings 137 Figure C5.7.4.5-1âFree Body Diagrams Vh = = = Cu2 â C1 (C5.7.4.5-5) 1 h v V V d (C5.7.4.5-6) Such that for a unit length segment: 1 hi v V V d (C5.7.4.5-7) where Vhi = factored interface shear force per unit length (kips/length) The variation of V1 over the length of any girder segment reflects the shear flow embodied in the classical strength of materials approach. For simplicity of design, V1 can be conservatively taken as Vu1 (since Vu1, the maximum factored vertical shear at Section 1, is not likely to act concurrently with the factored moment at Section 2); and further, the depth, dv, can be taken as the distance between the centroid of the tension steel and the mid- thickness of the slab to compute a factored interface shear stress. For design purposes, the computed factored interface shear stress of Equation 5.7.4.5-1 is converted to a resultant interface shear force computed with Equation 5.7.4.5-2 acting over an area, Acv, within which the computed area of reinforcement, Avf, shall be located. The resulting area of reinforcement, Avf, then defines the area of interface reinforcement required per foot of girder for direct comparison with vertical shear reinforcement requirements. For beams or girders, the longitudinal center-to- center spacing of nonwelded interface shear connectors shall not exceed 72.0 in. For cast-in-place box girders, the longitudinal center-to-center spacing of nonwelded interface shear connectors shall not exceed 24.0 in. Recent research (Markowski et al. 2005, Tadros and Girgis 2006, Badie and Tadros 2008, Sullivan et al. 2011) has demonstrated that increasing interface shear connector spacing from 24.0 to 48.0 in. has resulted in no deficiency in composite action for the same resistance of shear connectors per foot and for girder and deck configurations. These research projects have independently demonstrated no vertical separation between the girder top and the deck under cyclic or ultimate loads. However, the research did not investigate relatively shallow members; hence, the additional limitation related to the member depth is provided. Research by Badie et al. (2018) has demonstrated that spacing between shear connectors can be extended to 72 in. If the connector spacing is greater than the girder depth, then it is recommended that vertical shear reinforcement be determined, based on girder depth rather than composite member depth. As the spacing of connector groups increases, the capacities of the concrete and grout in their vicinity become more critical and need to be carefully verified. This applies to all connected elements at the interface. Equations 5.7.4.3-2 and 5.7.4.3-3 are intended to ensure that the capacity of the concrete component of the interface is adequate. Methods to enhance that capacity, if needed, include use of high-strength materials and of localized confinement reinforcement.
138 Simplified Full-Depth Precast Concrete Deck Panel Systems 3.5.4 Item 4: Add a New Reference to Section 5.15 Badie, S. S., G. Morcous, and M. K. Tadros. NCHRP Research Report 895: Simplified Full-Depth Precast Concrete Deck Panel Systems. Transportation Research Board, Washington, D.C., 2018. 3.5.5 Item 5: Modify Section 6.10.10.1.2 This item is related to changing the maximum spacing of shear connectors for steel girders. 6.10.10.1.2âPitch The pitch of the shear connectors shall be determined to satisfy the fatigue limit state, as specified in Article 6.10.10.2 and 6.10.10.3. The resulting number of shear connectors shall not be less than the number required to satisfy the strength limit state as specified in Article 6.10.10.4. The pitch, p, of shear connectors shall satisfy r sr nZ p V ⤠(6.10.10.1.2-1) in which Vsr = horizontal fatigue shear range per unit length (kip/in.) 2 2 fat fatV + F= (6.10.10.1.2-2) Vfat = longitudinal fatigue shear range per unit length C6.10.10.1.2 At the fatigue limit state, shear connectors are designed for the range of live load shear between the deck and top flange of the girder. In straight girders, the shear range normally is due to only major-axis bending if torsion is ignored. Curvature, skew, and other conditions may cause torsion, which introduces a radial component of the horizontal shear. These provisions provide for consideration of both of the components of the shear to be added vectorially, according to Equation 6.10.10.1.2-2. The parameters I and Q should be determined using the deck within the effective flange width. However, in negative flexure regions of straight girders only, the parameters I and Q may be determined using the longitudinal reinforcement within the effective flange width for negative moment, unless the concrete deck is considered to be effective in tension for negative moment in computing the range of the longitudinal stress, as permitted in Article 6.6.1.2.1. The maximum longitudinal fatigue shear range, Vfat, is produced by placing the fatigue live load immediately to the left and to the right of the point under consideration. For the load in these positions, positive moments are produced over significant portions of the girder length. Thus, the use of the full composite section, including the (kip/in.) fV Q I (6.10.10.1.2-3) Ffat = = = = radial fatigue shear range per unit length (kip/in.) taken as the larger of either: 1 bot flg fat A Ï F wR (6.10.10.1.2-4) or 2 rc fat F F w (6.10.10.1.2-5) concrete deck, is reasonable for determining the stiffness used to determine the shear range along the entire span. Also, the horizontal shear force in the deck is most often considered to be effective along the entire span in the analysis. To satisfy this assumption, the shear force in the deck should be developed along the entire span. For straight girders, an option is permitted to ignore the concrete deck in computing the shear range in regions of negative flexure, unless the concrete is considered to be effective in tension in computing the range of the longitudinal stress, in which case the shear force in the deck must be developed. If the concrete is ignored in these regions, the maximum pitch specified at the end of this Article must not be exceeded. The radial shear range, Ffat, typically is determined for the fatigue live load positioned to produce the largest positive and negative major-axis bending moments in the span. Therefore, vectorial addition of the longitudinal and radial components of the shear range is conservative because the longitudinal and radial shears are not produced by concurrent loads.
Research Findings 139 = distance between brace points (ft) n = number of shear connectors in a cross section p = pitch of shear connectors along the longitudinal axis (in.) Q = first moment of the transformed short-term area of the concrete deck about the neutral axis of the short-term composite section (in.3) R = minimum girder radius within the panel (ft) Vf = vertical shear force range under the applicable fatigue load combination specified in Table 3.4.1-1 with the fatigue live load taken as specified in Article 3.6.1.4 (kip) w = effective length of deck (in.) taken as 48.0 in., except at end supports where w may be taken as 24.0 in. Zr = shear fatigue resistance of an individual shear connector determined as specified in Article 6.10.10.2 (kip) Equation 6.10.10.1.2-5 will typically govern the radial fatigue shear range where torsion is caused by effects other than curvature, such as skew. Equation 6.10.10.1.2-5 is most likely to control when discontinuous cross frame or diaphragm lines are used in conjunction with skew angles exceeding 20 degrees in either a straight or horizontally curved bridge. For all other cases, Frc can be taken equal to zero. Equations 6.10.10.1.2-4 and 6.10.10.1.2-5 yield approximately the same value if the span or segment is curved and there are no other sources of torsion in the region under consideration. Note that Frc represents the resultant range of horizontal force from all cross frames or diaphragms at the point under consideration due to the factored fatigue load plus impact that is resisted by the shear connectors. In lieu of a refined analysis, Frc may be taken as 25.0 kips for an exterior girder, which is typically the critical girder. Frc should not be multiplied by the factor 0.75 discussed in Article C6.6.1.2.1. Equations 6.10.10.1.2-4 and 6.10.10.1.2-5 are presented to ensure that a load path is provided through the shear connectors to satisfy equilibrium at a For straight spans or segments, the radial fatigue shear range from Equation 6.10.10.1.2-4 may be taken equal to zero. For straight or horizontally curved bridges with skews not exceeding 20 degrees, the radial fatigue shear range from Equation 6.10.10.1.2-5 may be taken equal to zero. The center-to-center pitch of shear connectors shall not exceed 72 in. for members having a web depth greater than or equal to 24.0 in. For members with a web depth less than 24.0 in., the center-to-center pitch of shear connectors shall not exceed 24.0 in. The center-to- center pitch of shear connectors also shall not be less than six stud diameters. transverse section through the girders, deck, and cross frame or diaphragm. The basis for the previous 24.0 in. maximum center-to-center spacing for all web depths was based on scaled experiments in the 1940s that recommended a maximum pitch of three-to-four slab thicknesses, as described further in Yura et al. (2008). More recent test results (Badie and Tadros 2008, Provines and Ocel 2014A and 2014B) have shown that placing shear connectors at a pitch of up to 48.0 in. has no negative effect on the global flexural resistance of composite steel members. The research did not test very shallow web depths with long pitches, and limiting the pitch to 24.0 in. for a web depth less than 24.0 in. was to ensure that designs stay within the bounds that have proven satisfactory in experiments. Recent research by Badie et al. (2018) has demonstrated that clusters of nine studs each may be used to effectively increase the spacing between clusters up to 72 in. The minimum compressive strength of the grout recommended for this spacing of 72 in. is 14 ksi. The minimum flexural strength, with utilization of steel fibers, is 1.5 ksi. There are prebagged UHPC materials on the market to satisfy this requirement. Ï where flg = range of longitudinal fatigue stress in the bottom flange without consideration of flange lateral bending (ksi) Abot = area of the bottom flange (in. 2) Frc = net range of cross frame or diaphragm force at the top flange (kip) I = moment of inertia of the short-term composite section (in.4) Equation 6.10.10.1.2-4 may be used to determine the radial fatigue shear range resulting from the effect of any curvature between brace points. The shear range is taken as the radial component of the maximum longitudinal range of force in the bottom flange between brace points, which is used as a measure of the major- axis bending moment. The radial shear range is distributed over an effective length of girder flange, w. At end supports, w is halved. Equation 6.10.10.1.2-4 gives the same units as Vfat.
140 Simplified Full-Depth Precast Concrete Deck Panel Systems 3.5.6 Item 6: Modify Section 6.10.10.4.3 This item is related to changing the nominal shear resistance of steel studs. 6.10.10.4.3âNominal Shear Resistance The nominal shear resistance of one stud shear connector embedded in a concrete deck shall be taken as 0.5n sc c c g sc uQ A f E R A F (6.10.10.4.3-1) where Asc = = cross-sectional area of a stud shear connector (in.2) Ec = modulus of elasticity of the deck concrete determined as specified in Article 5.4.2.4 (ksi) Fu = specified minimum tensile strength of a stud shear connector determined as specified in Article 6.4.4 (ksi) Rg = Group reduction factor = 0.72 for clusters of nine studs, where the spacing between clusters is 72 in. C6.10.10.4.3 Studies have defined stud shear connector strength as a function of both the concrete modulus of elasticity and concrete strength (Ollgaard et al. 1971). Note that an upper bound on stud shear strength is the product of the cross-sectional area of the stud times its ultimate tensile strength. Equation 6.10.10.4.3-2 is a modified form of the formula for the resistance of channel shear connectors developed in Slutter and Driscoll (1965) that extended its use to lightweightâas well as normal- weightâconcrete. Studies by Badie et al. (2018) have demonstrated that the resistance when a group of studs is used in a cluster may be less than distributed studs by as much as 28%. If more than nine studs are required to be used, additional experimental research should be conducted. The minimum compressive strength of the grout recommended for this spacing of 72 in. is 14 ksi. The fibers, is 1.5 ksi. There are prebagged UHPC materials on the market to satisfy this requirement. ⤠minimum flexural strength, with utilization of steel 3.5.7 Item 7: Add New Reference to Section 6.17 Badie, S. S., G. Morcous, and M. K. Tadros. NCHRP Research Report 895: Simplified Full-Depth Precast Concrete Deck Panel Systems. Transportation Research Board, Washington, D.C., 2018. 3.5.8 Item 8: Add New Paragraphs to Section 9.7.5.3 This item is related to filling the shear pockets and the transverse joints in a single operation. 9.7.5.3âLongitudinally Post-Tensioned Precast Decks C9.7.5.3 Construction can be significantly accelerated when all grouting of pockets and of transverse joints in precast deck panels is done in a single operation. This would make the deck and the beam share in the post- tensioning force applied after grouting. Such construction shall be used for simple span bridges. However, for continuous spans, secondary effects of post-tensioning may not allow for the deck to be composite with the beam without significant loss of the deck prestress to the beam. Analysis in Badie et al. (2018) has indicated that the average loss of prestress (from the deck to the beam) is in the range of 2% to 20% for simple span bridges. However, this significant construction acceleration may not be feasible for continuous spans, as the post-tensioning secondary moments may be large enough to offset or even reverse the effect of the primary moments. It is possible, however, to have creative design solutions that would allow for post- tensioning after full grouting for continuous spans. However, the solutions are not direct solutions and cannot be generalized at this time for all practical cases.
Research Findings 141 3.5.9 Item 9: Add New Reference to Section 9.10 Badie, S. S., G. Morcous, and M. K. Tadros. NCHRP Research Report 895: Simplified Full-Depth Precast Concrete Deck Panel Systems. Transportation Research Board, Washington, D.C., 2018. 3.6 Economical Impact of Proposed Guidelines and Specifications 1. Using ribbed slab deck panels reduces the weight of the deck by about 10% to 20%, compared to constant-thickness slabs. This helps when a deck replacement project requires that live load capacity be increased. This solution would be less time-consuming and less expensive than girder strengthening. 2. Using the proposed optimized transverse joint details and the discrete interface shear joint system reduces the amount of grouting materials and labor costs, as well as the associated labor. 3. If the option of eliminating grouting of the haunch is exercised, the high volume of haunch grouting materials and the associated labor are eliminated. Further, the complication of blind grouting and the difficulty of pre-wetting the top face of the concrete girder are avoided. 4. Increasing the shear connector spacing up to 6 ft eliminates the need for creating shear pockets in 6-ft-long precast panels and requires only one pocket per girder line for 12-ft-long panels. Blind intermediate pockets in current systems and the difficulties in fitting up the hardware projecting from the girders with the pockets in the panels have been a constant challenge for precasters and contractors and have caused increased cost to match the risk of relatively low tolerances. 5. Although the UHPC proposed for the shear pockets is more expensive than conventional concrete and some other grouting materials, it has far superior strength and toughness. In addition, it enhances durability of the system. The proposed details attempt to minimize the UHPC volume and the associated costs. 6. When longitudinal post-tensioning is desired to keep the deck from experiencing transverse cracks, several simplifying measures are proposed in this project. A novel duct-in-duct, unbonded, post-tensioning system is proposed. Thus, the difficult and time-consuming field grouting of the post-tensioned ducts is eliminated. Single-stage grouting of all field-grouting joints saves considerable construction time. When post-tensioning is applied after all joint grouting is completed, the beam shares a part of the prestress. The prestress loss to the beam has been found to be small for simple span bridges. Single-stage grouting, with later post-tensioning of the composite deck beam, is recommended. For continuous spans, single-stage post-tensioning is possible. However, it must be carefully studied on a project- by-project basis, and the post-tensioning profile must be adjusted to account for secondary post-tensioning.
