


Below is the uncorrected machine-read text of this chapter, intended to provide our own search engines and external engines with highly rich, chapter-representative searchable text of each book. Because it is UNCORRECTED material, please consider the following text as a useful but insufficient proxy for the authoritative book pages.
188 This chapter provides guidance on the use and installation of traffic control devices at a diverging diamond interchange (DDI) to inform, guide, and control various traffic modes such as motorists, pedestrians, and bicycles. Details are provided on various elements of signing, pavement marking, traffic control signals, and lighting. Where appropriate, several key issues that may arise during the design of traffic control plans are discussed, as well as the trade-offs and any potential solutions that could be considered to mitigate challenges that arise. The Manual on Uniform Traffic Control Devices (MUTCD) remains the primary source for guidance and standards related to traffic control devices (1). This chapter is intended to augment and interpret existing MUTCD language for application to DDIs. The MUTCD (or its state-level equivalent) should be the primary source for traffic control device guidance, with this chapter providing supplemental information related to the DDI. 7.1 Traffic Control Device Design Principles and Approach The key objective for the application of traffic control devicesâsigning, pavement markings, and signalizationâis to provide guidance to drivers, pedestrians, and bicyclists on how to act and how to travel through an intersection or interchange. The use of consistent and clear traffic control devices enhances driver understanding and expectancy of the interchange they are about to traverse. With the unique geometric configuration of the DDI, traffic control devices need to be applied and implemented carefully to assure that drivers understand what behavior is expected from them. In applying traffic control devices to a DDI, there are four primary objectives and messages that are conveyed to motorists and other travel modes: 1. Priority describes which movement has the right-of-way (ROW) at a crossing or conflict point. Priority is controlled through signalization or regulatory signage (e.g., a yield sign), as well as supplemented with pavement markings where appropriate (e.g., a stop line). If necessary, advanced warning signs may be geared at informing drivers of an upcoming conflict point and priority control. 2. Directional guidance informs drivers about upcoming turning movements and reduces the likelihood of movements against the intended direction of traffic (i.e., at the crossover). Directional guidance is provided through signing and pavement markings. 3. Lane choice communicates to drivers which lane to choose and pre-positions them to complete a specific movement such as the left turn onto the freeway. The lane choice at a DDI generally follows driver expectations to where the driver chooses the right lane to turn right and the left lane to turn left (as opposed to, for example, a cloverleaf interchange where a driver turns right to go left). Lane choice is communicated through signing and especially pavement marking. C H A P T E R 7 Traffic Control Devices and Illumination Applications
Traffic Control Devices and Illumination Applications 189 4. Information about other aspects of the interchange and surrounding area is provided mostly through signage. Informational signs are not necessary at a DDI and can contribute to the visual clutter that distracts drivers from other necessary information. This section covers traffic control device applications that are distinctive to DDIs but does not intend to be comprehensive for all possible signs and pavement markings. Proper signing, pavement marking, and signalization can be an effective aid in moving drivers through the DDI correctly. Errors can cause driver confusion, so careful attention should be paid when designing the traffic control devices for DDIs. Agencies should consult the MUTCD for further details related to placement and installation of traffic control devices (1). 7.2 Regulatory and Warning Signs Regulatory signs are traffic signs intended to instruct road users on what they must or should do (or not do) under a given set of circumstances. The signs covered in this section include: ⢠Movement prohibition and lane control signs (R3 series); ⢠Signs for marking directionality around islands (R4 series); and ⢠âDo Not Enter,â âWrong Way,â and âOne Wayâ signs (R5 and R6 series). 7.2.1 Movement Prohibition and Lane Control Signs Exhibit 7-1 shows the lane control signing options used at signal-controlled movements. Crossover movements consistently used âThru Onlyâ (R3-5A) signs. Further discussion of options for traffic control signal display is given in Section 7.5.3. Exhibit 7-1. Lane control signing for signalized movements.
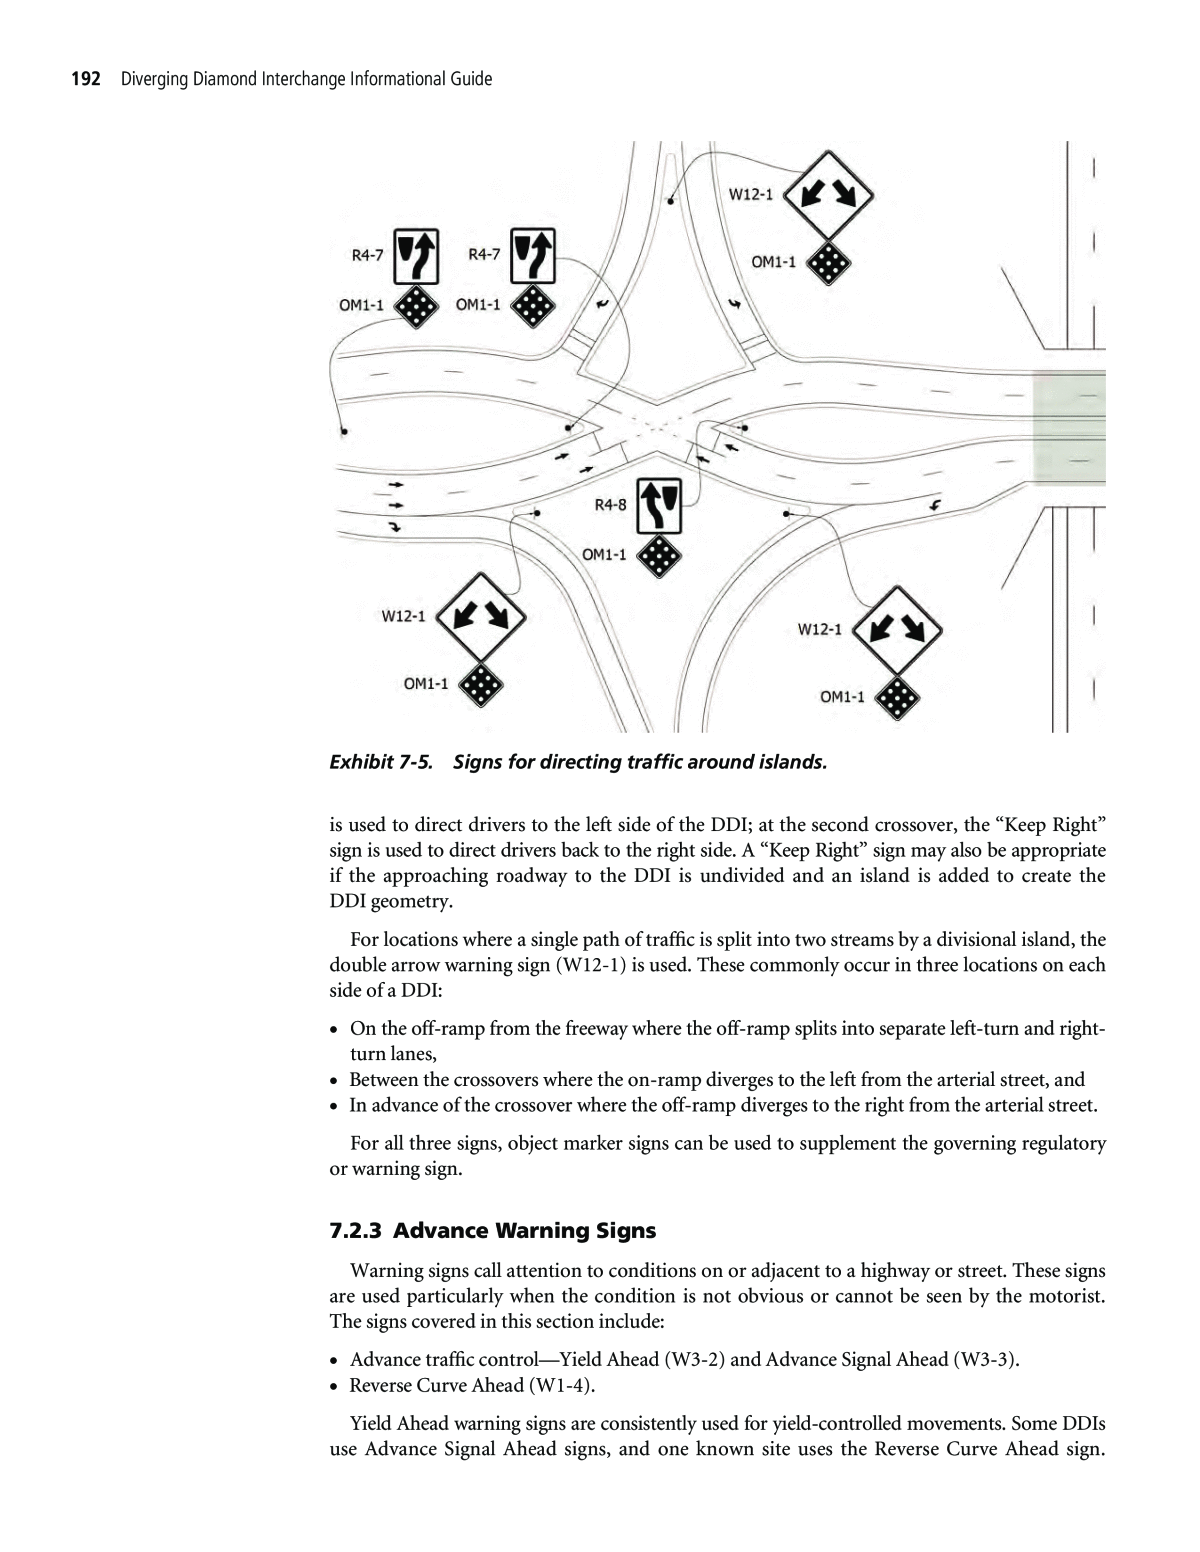
190 Diverging Diamond Interchange Informational Guide The combination âNo Left Turnâ and âNo Right Turnâ sign assembly at the crossover is consistently used at DDIs, as shown in Exhibit 7-2. The use of âNo Left Turnâ and âNo Right Turnâ signs at ramps has increased since the first DDIs opened in Missouri. Exhibit 7-2 shows yield-controlled off-ramps, but âNo Left Turnâ and âNo Right Turnâ signs are also used where off-ramp movements are signalized. Exhibit 7-3 shows a variation in which the signs at the crossover signal are mounted overhead. âOne Wayâ signs are sometimes used at ramp merge and diverge locations (as shown in MUTCD Figure 2B-18) if ramp entry angles are such that a vehicle might be likely to make a wrong-way movement. Good geometric design should minimize the need for these supple- mental signs. Some DDIs have also used âDo Not Enterâ signs to supplement the âNo Right Turnâ and âNo Left Turnâ signs and âStay Left âand âStay Rightâ signs installed at the crossovers. âWrong Wayâ signs can also be installed to supplement âDo Not Enterâ signs related to the crossovers and exit ramps as shown in Exhibit 7-4. In some instances, the âDo Not Enterâ sign was installed with a âOne Wayâ sign at the exit ramp left turn. Per the MUTCD, âWrong Wayâ signs are supplemental to âDo Not Enterâ signs. 7.2.2 Signs for Directing Traffic Around Islands The use of divisional islands through a DDI creates the importance of using correct signage to mark the correct path for oncoming drivers. The key signs for this purposeââKeep Rightâ and âKeep Leftâ regulatory signs and double arrow warning signsâare shown in Exhibit 7-5. At DDI crossovers, âKeep Rightâ (R4-7) and âKeep Leftâ (R4-8) signs are used to direct drivers to the correct receiving side of the divisional island. At the first crossover, the âKeep Leftâ sign Exhibit 7-2. General use of âNo Left Turn,â âNo Right Turn,â and âOne Wayâ signs.
Traffic Control Devices and Illumination Applications 191 Exhibit 7-3. Overhead application of âNo Left Turnâ and âNo Right Turnâ signs. Exhibit 7-4. âDo Not Enterâ and âWrong Wayâ signs.
192 Diverging Diamond Interchange Informational Guide is used to direct drivers to the left side of the DDI; at the second crossover, the âKeep Rightâ sign is used to direct drivers back to the right side. A âKeep Rightâ sign may also be appropriate if the approaching roadway to the DDI is undivided and an island is added to create the DDI geometry. For locations where a single path of traffic is split into two streams by a divisional island, the double arrow warning sign (W12-1) is used. These commonly occur in three locations on each side of a DDI: ⢠On the off-ramp from the freeway where the off-ramp splits into separate left-turn and right- turn lanes, ⢠Between the crossovers where the on-ramp diverges to the left from the arterial street, and ⢠In advance of the crossover where the off-ramp diverges to the right from the arterial street. For all three signs, object marker signs can be used to supplement the governing regulatory or warning sign. 7.2.3 Advance Warning Signs Warning signs call attention to conditions on or adjacent to a highway or street. These signs are used particularly when the condition is not obvious or cannot be seen by the motorist. The signs covered in this section include: ⢠Advance traffic controlâYield Ahead (W3-2) and Advance Signal Ahead (W3-3). ⢠Reverse Curve Ahead (W1-4). Yield Ahead warning signs are consistently used for yield-controlled movements. Some DDIs use Advance Signal Ahead signs, and one known site uses the Reverse Curve Ahead sign. Exhibit 7-5. Signs for directing traffic around islands.
Traffic Control Devices and Illumination Applications 193 These signs are shown in Exhibit 7-6. Exhibit 7-6 assumes ramp terminals are yield-controlled, but if they are signalized Advance Signal Ahead signs could be placed on the off-ramp. 7.3 Guide Signs Guide signs show route, street or city designations, directions, distances, services, and more. Guide signs, when used, should be located where they can be read from a proper distance to allow drivers to make safe driving decisions prior to entering the DDI. The specifics of guide sign types are not covered in this section. Instead, guide signs used along the vehicle routes from the crossroad to the limited access facility are provided, as their installation techniques and locations are unique at various sites. Overhead, lane use control sign installation tech- niques are also covered. The MUTCD provides examples of guide signs that can be used at a diamond interchange with multilane approaches. These are adapted for use at a DDI as illustrated in Exhibit 7-7. The figure shows a sequence of five guide signs, labeled A through E, as follows: ⢠Location A, Junction AssemblyâThis sign is located well upstream of the DDI and is the same used at a conventional diamond interchange. ⢠Location B, Advance Entrance Direction signs for both freeway directionsâThese signs are located next in sequence and are also the same as used at a conventional diamond interchange. ⢠Location C, Entrance Direction sign for the first rampâThis sign is located just prior to the first crossover, where drivers must decide to take a right onto the exit ramp or continue through the crossover. Ideally, the signage provides information to drivers upstream of any queues to allow for good lane discipline through the DDI. Signage is usually provided overhead using a gantry or mast arm system; in some locations, signage is ground-mounted signage. ⢠Location D, Advance Turn AssemblyâThis sign is located just past the first crossover. The signs are most often ground-mounted where the crossroad passes over the freeway and Exhibit 7-6. Advance Warning signs.
194 Diverging Diamond Interchange Informational Guide Exhibit 7-7. Typical guide sign sequence.
Traffic Control Devices and Illumination Applications 195 overhead where the crossroad passes under the freeway. The signs remind drivers about the lane assignments for merging onto the freeway, and in some cases, signage is provided for through movements as well. ⢠Location E, the Entrance Direction sign for the second ramp provides guide signs at the ramp diverge pointâThese signs remind drivers where the left-turn movement onto the freeway takes place. 7.4 Pavement Markings In general, striping for a DDI should be standardized to maintain consistency and efficiency. Typical pavement markings for DDIs delineate the vehicle entry and exit approaches of ramps and crossovers and provide direction for bicycle and pedestrian movements when in the pave- ment ROW. This section discusses the application of pavement markings in the interchange influence area that are unique and may vary between sites constructed at this time. 7.4.1 Centerlines and Edge Lines Travel on the left side of the road at a DDI creates an unusual situation for the application of longitudinal pavement markings. The MUTCD, which not does explicitly address DDIs, states that white line markings shall delineate the separation of traffic flows in the same direction or the right-hand edge of the street, and yellow line markings shall delineate the separation of traffic traveling in the opposite direction or the left-hand edge of the streets of divided highways and one-way streets or ramps. The pavement marking designs employed along the crossed-over sections of streets are quite different across states and even within states, in some cases. A pavement marking design example is provided in Exhibit 7-8 based on practices to date. This example does not reflect a standard. The traffic driving on the left side of the road is unique to the DDI (shown in blue). At most DDIs, yellow lines have been used on the left side of travel lanes in these areas, and white lines have been used on the right side of travel lanes, as if each direction of travel is a one-way street. However, if treated as a single, two-way facility, this configuration places white, rather than yellow, lines between the two (wrong-way) directions of travel. The channelizing turn islands have three gore locations, each where a merge or diverge occurs. Most agencies choose to change pavement marking color at the gore point, as shown in Exhibit 7-8; however, some agencies have chosen to transition white pavement marking on both sides of the gore for several feet. 7.4.2 Lane Lines As per the MUTCD, lane lines should be used at multilane approaches. For DDIs, solid lane lines are recommended to discourage lane changing in the immediate vicinity of the crossover and ramp terminal approaches, as shown in Exhibit 7-9. There are several benefits to providing solid lane lines, including: ⢠Reducing the likelihood of side-swipe crashes due to last minute lane changes at an approach; and ⢠Discouraging lane changing immediately before crosswalks, which reduces the likelihood of multiple threat crashes between vehicles and pedestrians. Solid lane lines may also be used on the cross street at the crossover departures. These would extend through crossover curves but not to any merge or departure maneuvers at the entry and exit ramps. The addition of solid lane lines at the departure with solid lines
196 Diverging Diamond Interchange Informational Guide at the approach can discourage drivers from cutting across multiple lanes to obtain a faster path through the reverse curves of the intersection crossover. Lane line extensions can be helpful for directing turning and crossover vehicles. Exhibit 7-9 presents lane line extensions used in the crossover to show the alignment to receiving lanes, simi- lar to those used at many conventional intersection configurations. The aerial view shows line extensions along the outer portion of the outermost lanes in the crossover, which is not always used in design, but is recommended to provide additional channelization. Another potential location for line extensions is for dual left-turn lanes from the exit ramp, also shown in Exhibit 7-9. Another marking treatment used prior to diverges is the dotted lane line. At DDIs, this is sometimes used to delineate an exclusive left-turn lane onto the limited access facility, as shown in Exhibit 7-10. White channelizing lines are often used at exit and entry ramp movements with multiple lanes. Many agencies use channelizing islands, called âvane islands,â to create painted islands between multiple entry lanes of a single approach. These painted islands are thought to provide additional deflection for passenger cars while accommodating the swept paths of trucks. The vane islands typically use chevron markings in the neutral area of the island. An example is provided in Exhibit 7-11. Standard DesignZone Inverted DesignZone Crossover Gore Ramp Terminal Gore Yellow Line White Line Image Source Adapted Exhibit 7-8. Example centerline and edge line pavement markings at a DDI (2). Exhibit 7-9. Lane line markings at crossover and ramp terminal approaches (2).
Traffic Control Devices and Illumination Applications 197 7.4.3 Lane Use Arrows Lane use arrows, along with intersection lane control signs, provide the best opportunity to guide motorists correctly through the interchange. Standard lane use arrows should be used on each lane approaching each component intersection of the interchange, as these also provide a visual cue against wrong-way movements. For the signalized crossover intersections, the most basic use of through pavement arrows is a standard lane use arrow as shown in Part A of Exhibit 7-12. An extension of this pavement marking use provides another standard lane use arrow in the receiving lane to provide addi- tional guidance, as is shown in Part B. Another less frequently used option is a wrong-way arrow at the entry approach with a standard lane use arrow in the downstream receiving lane, as shown in Part C. There is no research available at the time of this writing to determine whether there is a measurable difference in performance among these methods. 7.4.4 Stop and Yield Lines For DDIs, stop lines are used at signalized intersection approaches of crossovers and ramps and at stop-controlled exit and entry ramp movements. For unsignalized exit and entry ramp movements without dedicated receiving lanes, yield lines are used if the unsignalized movement is yield-controlled (the more typical application), and stop lines are used if the unsignalized movement is stop-controlled. The stop and yield lines define where vehicles should stop in response to the signal or regulatory sign. For multilane approaches, stop lines should be staggered, especially at ramp terminals with right-turn-on-red (RTOR) or left-turn-on-red (LTOR) operations to allow drivers to see past the vehicle in the inside lane of a multilane approach. An example of the application of staggered stop bars at a DDI is given in Exhibit 7-13. Exhibit 7-10. Use of dotted lines to delineate an exclusive left-turn lane onto a limited access facility (2). Exhibit 7-11. Channelizing lines and vane islands at the exit ramp (2).
198 Diverging Diamond Interchange Informational Guide 7.4.5 Pedestrian Crosswalk Markings Pedestrian crosswalk markings should be installed at all pedestrian crossing locations. Crosswalk markings provide guidance to pedestrians who are navigating a DDI while also providing a visual cue to drivers of where pedestrians may be present in the street. 7.4.6 Bicycle Lanes Guidance on the placement of bicycle lanes is provided in Chapter 3. In general, DDIs do not have unique requirements for bicycle pavement markings. Where lane line extensions are Image Source Adapted Exhibit 7-12. Three variations of lane use arrows at the crossover intersection (2). Exhibit 7-13. Staggered stop bar locations at the intersection crossover and exit ramp terminal (2).
Traffic Control Devices and Illumination Applications 199 used to provide additional guidance through intersections for motorized vehicles, similar bicycle lane line extensions should be used to provide similar additional guidance for bicyclists. 7.5 Signal Equipment While traffic signal design tends to come relatively late in the process of designing an inter- change, there are a few critical issues that should be considered before the geometric design is complete. In particular, the location of signal cabinets and poles should be determined in parallel with the geometric design of the interchange. 7.5.1 Number of Controllers Due to the relatively low number of phases at DDIs, it is possible to operate both crossovers using a single controller. As of publishing, many agencies have chosen to use a single controller, but several agencies are now using two, with each controller operating one crossover. Exhibit 7-14 details trade-offs to consider when choosing whether to use one or two controllers. The primary appeal of using two controllers is that the signal design is simple and intuitive for designers, operators, and technicians; the DDI crossovers can function more like traditional signalized intersections. An important goal for any signal designer should be to make the design as understandable as possible to operators and technicians. The more standard the design, the more quickly technicians can respond to and resolve field issues. If an agency has a lot of situations where a single controller operates two intersections, this design will become commonplace to operators and technicians in that area. Otherwise, if this configuration is new, training may be needed to make sure everyone understands the operations. The distance between crossover intersections directly influences many of the factors that should be considered when deciding between one and two controllers. Crossovers spaced closer One Signal Controller Two Signal Controllers + Reduced hardware and installation costs + More transparency in signal design and cabinet set-up for designers and technicians + Potentially avoids the need for communication infrastructure between crossovers (if no adjacent intersections) + Ability to control offsets directly rather than through overlap phases or other programming + Improved flow during âfreeâ signal operations (e.g., late night) + Easier for technicians to see operations from the cabinet â More complicated signal design and cabinet set-up for designers and technicians + More room in each cabinet to allow for complicated scenarios (e.g., light-rail) â More difficult maintenance and troubleshooting for technicians â Additional hardware and installation costs â Additional wiring required from signal equipment to controller â Need for controllers to communicate and potential for time drift that may impact progression â More difficult for technicians to see operations at both crossovers from the cabinet â May result in undesirable gap-out situations during low-volume periods Note: Benefits are shown with a (+) and challenges with a (â). Exhibit 7-14. Considerations for one versus two signal controllers at a DDI. The decision to use one versus two signal controllers may be related not only to the trade-offs mentioned here, but also to specific functions of the traffic signal hardware and software used by the agency as well as agency preferences.
200 Diverging Diamond Interchange Informational Guide together will significantly increase the importance of perfectly synced progression, lessen the impact of long detection cables, and increase the visibility of both crossovers from one location. Crossovers that are spaced farther apart will likely result in platoon dispersion that will make tight synchronization less critical. A longer spacing will also exacerbate the extensive cabling that would need to run between the crossovers and the issue of seeing both crossovers from one location. Each of these points is discussed in more detail in the following sections. 7.5.1.1 Progression Considerations With two controllers, the offset between the crossovers can be modified directly without the use of ring-offset functionality or dummy phases. When using a single controller, gener- ally each ring is used to operate one crossover. Although progression can be achieved with one controller using the phasing schemes discussed in this guidebook, two controllers may be preferable if they do not have ring-offset functionality. Some form of reliable communication between two controllers will be necessary to make sure that they are synced at all times because the interaction between crossover movements is critical; use of GPS units to prevent clock drift between two controllers may be required. With one controller, communications infrastructure may still be needed to progress traffic along the entire corridor, but there is no concern that a communication failure would disrupt progression between the crossovers. In lower-volume situations with two controllers, there is a potential for a phase to gap out early at one of the crossovers, sending a platoon from one crossover toward the other too soon. Use of pre-timed operations may be required to prevent early return to green; for more information, reference the section on pre-timed control in Chapter 5. With one controller, full actuation may be used such that if a phase gaps out early, as long as the corresponding phase at the other crossover also gaps out, a waiting platoon may be served early without fear of stopping downstream. This capability makes full use of the interchange capacity. Additionally, late at night when coordination with adjacent intersections or maintaining a particular cycle length may not be a priority, the interchange can run free because a single controller will keep movements between the crossovers synced. 7.5.1.2 Wiring Considerations Aside from operational concerns, there are additional construction and maintenance factors to consider when making the decision to use one or two controllers. If one controller is used, all of the cabling for detection input and signal display output must run from the cabinet across the interchange to the other crossover. The installation method for this cabling must be considered up front, especially in the case of an overpass where any conduit would need to be routed along or inside the bridge deck. For loop detection cable, the longer a cable is, the more voltage is lost between the loop and the controller. Increasing the number of âturnsâ (times that the cable is wrapped around the loop form) or the gauge of the wire will increase the inductance of the detector to help mitigate this problem. However, with very long crossover spacing, this should be accounted for early in the design. 7.5.1.3 Visibility Considerations One way to assist operators and technicians with maintenance and troubleshooting is to make sure that all intersection movements are visible from the traffic signal cabinet. This allows a person to stand at the cabinet and observe the impact of programming or wiring changes instantly as well as to put the signal into and out of flash operation at times that are safe based
Traffic Control Devices and Illumination Applications 201 on where vehicles are currently located. If one controller is used to operate both crossovers, it may be difficult or impossible to see all movements. One way to mitigate this concern is to install supplemental display boards or video output in the cabinet for the movements that are not visible. 7.5.2 Signal Cabinet Details The signal cabinet houses the signal controller, among other pieces of equipment. As part of the initial signal design, a designer must decide how many controllers are required at a DDI and where to locate the cabinet(s). 7.5.2.1 Cabinet Equipment Signal cabinets come in standard sizes, so there are inherent limitations on the amount of equipment that can be accommodated inside of them. A common constraint at intersections is the number of phases and overlaps, which in the cabinet are tied to load switches. A load switch is an electromechanical device that operates the signal head indications, and a typical signal cabinet may house between 12 and 18 of them. For the three different DDI phasing schemes presented in Chapter 5, it is possible to accom- modate all movements using 12 load switches. As such, this guidebook presents a way to control both crossovers using one controller. However, there are circumstances that may require more load switches than can fit in a single cabinet. For example, use of exclusive phases for transit or bicycles could push the number of required load switches over the available space in the cabinet. Signal designers and technicians should consider cabinet limitations prior to deciding between one and two controllers. 7.5.2.2 Locating the Cabinet(s) Once the number of controllers and resulting cabinets is determined, the next step is to identify good locations for cabinet placement. The traffic signal cabinet will need to be located where it is easily accessible by technicians for maintenance and does not block the view of drivers trying to turn on red. It is also helpful if the cabinet is located such that a technician can stand at the cabinet and view the entire interchange. One potential location is in the median that separates the left turn and right turn at the on-ramp. This area is generally large enough to provide a safe place for a technician to work (although positive protection may be needed to limit exposure), does not impede the vision of motorists, and provides good sight lines for a technician. This location has the added advan- tage of always being within the ROW so no easements or additional ROW acquisition would be required of adjacent property owners. For a DDI with only one controller, either crossover location is permissible. Exhibit 7-15 is a picture of a cabinet in this area, and Exhibit 7-16 is a graphic showing both possible locations at a DDI in this area. Note that if a median area is too small to accommodate a cabinet, a cabinet can also be placed on the right side of the on-ramp right-turn lane. This area may be outside of the ROW or easement (shown as an alternative location in Exhibit 7-16) and put a technician further away from being able to see all movements, but it will not impede the vision of motorists. Locating a power source for the cabinet is also useful at this stage of design to ensure that accommodations can be made for providing power concurrently with any other utility work needed for the interchange. If two cabinets and controllers are used (one for each crossover), it is also important to identify the method for providing communication between them.
202 Diverging Diamond Interchange Informational Guide 7.5.3 Signal Poles and Displays The location of signal poles is another important step in the traffic signal design process. All signal head and pole installations must be in compliance with the MUTCD (1), and the reader should refer to the latest edition for specific requirements. Because there are a limited number of places where a traffic signal pole can be placed to align the signal heads, mast arms are generally the best option for DDI signals. Some signal heads may also need to be placed on pedestals on either side of the roadway to achieve maximum visibility. Mast arm poles require a large reinforced concrete foundation, and if any are needed on the bridge structure, they will need to be incorporated into the design loading. It is also possible that a pole will be needed outside of existing ROW or in a median where proper clear zone requirements will need to be considered in the design. To determine where poles may be needed, a designer should first determine the location of signal heads. 7.5.3.1 Types of Vehicle Signal Heads Three types of signal heads may be used at a DDI: ⢠Type 1: Red ball, yellow ball, and green ball. ⢠Type 2: Red ball, yellow arrow, and green arrow. ⢠Type 3: Red arrow, yellow arrow, and green arrow. For through traffic at the crossover, either a Type 1 or Type 2 signal head may be used for each lane with the Type 2 signal heads showing an angular arrow to denote a through Source: North Carolina State University Exhibit 7-15. Signal cabinet located in a landscaped median with good visibility. Exhibit 7-16. Recommended locations for signal cabinet(s) at a DDI.
Traffic Control Devices and Illumination Applications 203 movement. Type 2 signal heads may help convey and confirm to drivers that they are not supposed to turn at the intersection (as seen in Exhibit 7-17). For turning movements, Type 3 signal heads should be used to clearly identify that the indi- cations are intended for left- or right-turning traffic. However, in some states, a Type 3 signal does not allow vehicles to turn on red; these situations may require the use of a Type 2 signal for those movements. In states where the RTOR rule is controlled through supplemental signage, either configuration may be acceptable. Also, while most states allow RTOR, several states do not allow for LTOR. Adequate signage should supplement the signal heads to promote confor- mity with state laws. 7.5.3.2 Vehicle Signal Head Placement Stopping sight distance must be provided at all signalized and yield-controlled approaches to the DDI. The visibility of the signal heads and the distance to clearly view traffic signal heads must be considered for all movements. This is especially true at the crossovers where the small curve radii leading into the curve can impede visibility of the signal heads. To reduce the likelihood of false indications, louvered or programmable signal heads may be needed. The crossover signal heads are typically placed on the opposing side of the intersection to allow for the necessary set-back from the stop bar (as shown in Exhibit 7-18). Signals placed on the opposite side of the crossover provide motorists an additional visual cue to guide them into the appropriate travel lanes. The trade-off of this downstream placement is that it may be difficult to see the signal heads from a distance due to the crossover curvature. When adequate visibility of the signal heads is not provided, supplemental, near-side signal heads can be used to provide advance warning to drivers. One or more pedestal mounted signal heads in the median(s) can help with visibility on the crossover approaches. A less common alternative strategy is to use a single mast arm with signal heads in both direc- tions (as shown in Exhibit 7-19). This strategy does not provide the same guidance through the intersection; however, green arrows in the bulb assembly can be used to assist with proper direction. A single mast arm installation generally provides drivers better visibility of the signal heads when approaching the crossover. Care must be taken with this option to ensure that the signal heads are placed far enough away from the stop bar to allow visibility of the heads. At least 40 feet of separation between the stop bar and the signal heads is desirable. Mast arms should not impede the visibility of signal heads. This blocked view most frequently occurs with the mast arm assembly of one approach impeding visibility of the other approach. The mast arms for ramp turning movements can have a similar effect. An example of these Exhibit 7-17. Type 2 crossover signals with a Type 1 supplemental signal on left (2).
204 Diverging Diamond Interchange Informational Guide visibility effects for an outbound DDI movement approaching the crossover is shown in Exhibit 7-20 where the presence of multiple overhead mast arms and signal heads creates visual clutter and makes it difficult to identify the appropriate signal. 7.5.3.3 Supplemental Vehicle Signals Supplemental signal heads are recommended when the visibility of overhead-mounted signal heads is limited because of the horizontal curvature of the crossover or vertical alignment of the bridge structure. Examples of supplemental signals at DDIs are shown in Exhibit 7-21, Exhibit 7-22, and Exhibit 7-23. Exhibit 7-19. Option 2 for DDI signal pole and head placement. Exhibit 7-18. Option 1 for DDI signal pole and head placement.
Exhibit 7-20. Mast arm assembly limiting approach visibility (2). Image Source Adapted Exhibit 7-21. Supplemental signal on right for an inbound movement at a DDI (2). Image Source Adapted Exhibit 7-22. Supplemental signal on left for an outbound movement at a DDI (2). Image Source Adapted Exhibit 7-23. Supplemental signal for a DDI off-ramp from freeway (2).
206 Diverging Diamond Interchange Informational Guide For the inbound movement, the supplemental signal head is typically installed on the right- hand side of the street as illustrated in Exhibit 7-21. For the outbound movement, the supple- mental signal head is typically installed on the left-hand side of the street as illustrated in Exhibit 7-22. Supplemental signals may also be required for the freeway exit ramp movements as shown in Exhibit 7-23. For exit ramps, supplemental signals are placed on the right side of the road for the left-turning movement and on the left side of the road for right-turning move- ments. Notice that the right-turn signal in Exhibit 7-23 is supplemented with a sign to convey the nature of the signal to drivers: âRight Turn Signal.â For a DDI where a turning movement from the off-ramp has a large radius, the distance between the crossover itself and the ramp traffic can be significant (over 100 feet at some existing DDIs). More detailed information related to the clearance intervals associated with this distance is provided in Chapter 5. In addition to signal timing options for clearance, an additional measure may be needed at DDIs with a long distance between the crossover and ramp. When a vehicle passes through the crossover, a driver may perceive that he or she has left the signalized intersection and may not anticipate an additional conflict point ahead with the ramp traffic. One way to mitigate this issue is to provide an additional set of signal heads at the ramp terminus for traffic internal to the DDI; this would stop any residual traffic in the DDI that had not yet cleared the conflict point (as illustrated in Exhibit 7-24). This supplemental set of signal heads is sometimes used in single point diamond inter- changes for the same reason. Where these heads are used, it is critical to ensure that the supplemental heads are not placed in such a way that they would confuse drivers outside of the DDI. Where possible, modifying the geometric design to tighten the off-ramp radius and reduce this distance would be preferable, but for existing DDIs or locations where the long distance is unavoidable, supplemental heads may be necessary. 7.5.3.4 Pedestrian Signals Anywhere pedestrian signals are provided at a DDI, Accessible Pedestrian Signal (APS) devices and detectable warning surfaces need to be installed to comply with the Americans with Disabilities Act (ADA). While no specific ADA regulations exist for DDIs, the proposed Public Rights-of-Way Accessibility Guidelines (PROWAG) can be applied to all intersections and interchanges (3). Specifications for push-button locations and APS devices can be found in the MUTCD (1). Exhibit 7-24. Use of supplemental signal for DDI inbound through movement.
Traffic Control Devices and Illumination Applications 207 An APS consists of a push button with a push-button locator tone to assist pedestrians who are visually impaired to find the device, as well as a tactile arrow and an audible message. The audible message communicates to the visually impaired traveler when the walk interval phase is active. The audible message can be in the form of a rapid ticking or beeping/chirp sound or can be a speech message. The latter is required for two APS devices that are separated by less than 10 feet, while a rapid tick message is required for APS that are more than 10 feet apart. The APS devices for different crossings should be installed on two separate poles. At the DDI, providing 10 feet of separation between the two APS devices may pose a challenge in the median island. Exhibit 7-25 shows an example of an undesirable pedestrian push-button installation with the push buttons for the two directions on the same pole. Note that the example shown does not provide APS devices or any audible information about the crossing. As installed, the lack of separation may make it difficult for pedestrians to distin- guish which push button is intended for which crossing. Given that the âpointâ of the median island does not provide adequate room to allow the pedestrian push buttons to be on separate poles, it is recommended that the poles are located on the opposite side of the waiting area where the island is generally wider. This is shown in the left illustration (a) of Exhibit 7-26. Alternatively, pedestrian push buttons could be separated diagonally, with the push buttons being consistently to the right of the pedestrian (in direction of travel), as shown in the right illustration (b) of Exhibit 7-26. Alternatively, the crosswalk may be moved back from the crossover by some small distance to result in a wider splitter island and provide the necessary space for push buttons (or APS devices) on separate poles. However, this would require the vehicle stop bar to be moved back accordingly, which can have other implications for visibility. In general, wider islands are strongly recommended to provide a true refuge area for pedestrians (of at least 6 feet in length). This assures a minimum of 2 feet between the detectable warning surfaces for the two directions as well as adequate storage for wheelchair users. A wider island may be desired to provide additional storage, passing ability for multiple wheelchair users, and a 10-foot separation of pedestrian push buttons. If two APS devices are less than 10 feet apart, speech messages are required with customized wording specific to the DDI. One potential for such wording after activating the push button Undesirable Installation for Pedestrian Guidance Exhibit 7-25. Undesirable use of single pole with two pedestrian push buttons, no APS, and insufficient separation of the two detectable warning surfaces (2).
208 Diverging Diamond Interchange Informational Guide [i.e., the push-button information message (see MUTCD 4E.13) (1)] may be: âWait to cross eastbound lanes Airport Road at Highway 26. Traffic coming from your left.â During the walk interval, the message then would be: âEastbound lanes Airport Road: walk sign is on to cross eastbound lanes Airport Road.â An expert in accessibility installations may need to be consulted for specialized applications and signal installations at a DDI to assure that the crossings are accessible to and usable by all users as required by ADA. The placement of pedestrian signals is more straightforward for the crossing toward the median island and the crossing of a right- or left-turn lane. In both cases, only a single pole and single APS device (on each side of the crossing) is needed. Reach ranges for wheelchair users need to be carefully measured and considered in installation. An example of a pedestrian signal crossing toward the median island is shown in Exhibit 7-27; an example of a pedestrian crossing for a left turn onto the freeway is shown in Exhibit 7-28. For both examples, the cut- through widths as shown could be increased further to enhance the pedestrian experience and to allow opposing pedestrian movements (including wheelchairs) to pass, especially given the additional ROW already provided in the channelization islands. (a) Pedestrian Signals on Same Side (b) Diagonal Pedestrian Signals Exhibit 7-26. DDI splitter island with pedestrian signals: (a) pedestrian signals on same side and (b) diagonal pedestrian signals. Source: Field Evaluation of Double Crossover Diamond Interchanges (4) Exhibit 7-27. Pedestrian signal and push button on outside of crossover (pedestrian facility in median).
Traffic Control Devices and Illumination Applications 209 Where pedestrians need to travel through a channelized island to complete their crossing, clear guidance (such as a raised curb) is needed to help pedestrians navigate through the island to the next crossing point. This is illustrated in Exhibit 7-29, which also shows a potential layout of pedestrian push buttons and signal heads. 7.5.3.5 Bicycle Signals If bicycles remain in the street on bicycle lanes, they are controlled by vehicular signals and bicycle signals are unnecessary. If bicycles use a shared-use path such as a median walkway, bicycle signals could supplement pedestrian signals and reinforce the intended route of travel for bicyclists. 7.5.4 Detection Many of the existing traffic signals at DDIs are operating as pre-timed traffic signals and are not making use of detection. However, most do still have detection installed and could Source: Field Evaluation of Double Crossover Diamond Interchanges (4) Exhibit 7-28. Pedestrian signal and push button for left turn onto freeway (pedestrian facility on outside). Exhibit 7-29. Pedestrian signal head placement at a DDI.
210 Diverging Diamond Interchange Informational Guide operate as fully-actuated signals if desired. One benefit of installing detection at a DDI, even if the intention is to operate it as pre-timed, is that it allows for free operations in off-peak or late-night conditions and allows for flexibility in future operations. Any of the forms of in-pavement or above-pavement detection used at other signalized inter- sections could also be used at a DDI. If in-pavement loops are being installed, the distance to the controller cabinet should be considered; as discussed in Section 7.5.1, longer distances resulting from use of a single controller cabinet may require more cable âturns.â For lanes on a bridge deck, a form of above ground detection may be desirable to avoid cutting into the bridge deck. Stop bar detection alone could be deemed sufficient to adequately operate a DDI if speeds are low. However, for more complicated signal timing schemes, it may be desirable to have upstream detection to locate gaps in traffic early and transition to the next phase. 7.5.5 Communications When two controllers are used or when the DDI is part of a larger network of traffic signals, communication will need to be provided between the controller(s) at a DDI. If the DDI is in an isolated area and two controllers are selected, wireless communication could be used to avoid the need to install cabling on the bridge. In this instance, it would be advisable to also have GPS units or another backup option installed to ensure that the clocks stay synced. Alternatively, interconnected cable could be used to provide a hard-wired connection between the signals. In this case, the method for installing the cable should be identified early in the design process to make sure that a location for the cable has been reserved. 7.5.6 Preliminary Cost Estimate The key signal equipment that should be included in a preliminary cost estimate includes: ⢠Signal cabinets, ⢠Controllers, ⢠Poles and foundations, ⢠Pedestals, and ⢠Communication equipment. Having determined these primary cost items, the next level of equipment to include in the cost estimate includes: ⢠Vehicle signal heads, ⢠Pedestrian signal heads, ⢠Bicycle signal heads, and ⢠Detection. Finally, much of the cabling may need to be installed via directional drilling at a DDI. Determining the paths through the intersection to connect the cabinet to all of the poles, pedestals, and detection will help to approximate a number of linear feet of directional drilling. 7.6 Signal Timing Parameters After the signal equipment has been installed, a range of timing parameters will need to be programmed into the signal controller, including minimum green, passage time, pedestrian intervals, recalls, detector configurations, cycle length, and offsets. For most items, the timing practices are not unique to DDIs, and the reader is referred to other references for additional
Traffic Control Devices and Illumination Applications 211 details such as NCHRP Report 812: Signal Timing Manual, Second Edition (5). Cycle lengths and offsets for DDIs are sensitive to the respective signal phasing scheme chosen, and the reader is referred to Chapter 5 for more discussion. In general, most local signal design parameters can be derived at a DDI just as they would be for a typical signalized intersection. Clearance intervals, however, need careful consideration at a DDI. One reason to pay special attention to clearance intervals is that travel speeds at DDIs are a function of the design speeds at the crossovers. Research has shown that design speeds are more influential than speed limits in determining travel speeds (as illustrated in Exhibit 6-65). Local speed measurements of existing DDIs may be necessary to better inform an appropriate value for the red clearance interval. Even after opening to traffic, both yellow and red clearance times should be carefully monitored and adjusted as needed to either provide an additional safety buffer or shortened for enhanced efficiency if the DDI appears to be operating safely. For yellow clearance intervals, using a higher speed will produce a longer interval, so using an agency standard calculation for the yellow clearance interval will generally yield a conservative value. The red clearance interval, however, needs more thought. Because a higher speed used in a red clearance calculation will yield a lower value, the design speed is likely not appropriate for providing a conservative value. The key issue for calculating the red clearance interval is the clearance distance. As discussed in Chapter 5, there are two key distances for a through vehicle to traverse at a DDI crossover. One is the relatively short distance to cross the opposing lanes. The other is the sometimes significantly longer distance past the conflict point with ramp traffic. Chapter 5 discusses the use of overlap delay and short, fixed-time phases to allow opposing traffic to begin earlier and reduce the overall lost time at the DDI. If one of these options is used, the red clearance interval can be calculated using only the distance through the crossover. If overlap delay or short, fixed-time phases are not used, the red clearance interval should be calculated using the entire distance between the crossover and the ramp conflict point. 7.7 Illumination This section provides basic guidance for street lighting designers and state and local agencies regarding the design and application of street lighting. It is not intended to be a detailed guide, because lighting designs often vary depending on agency internal policies, though they should meet minimum guidelines found in various resource documents. As such, this section is provided as a resource for policy makers and the design and construction community to evaluate the need, potential benefits, and even applicable references when considering street lighting at DDIs. The AASHTO Roadway Lighting Design Guide (6) and the American National Standards Institute/Illuminating Engineering Society (ANSI/IES) American National Standard Practice for Design and Maintenance of Roadway and Parking Facility Lighting (7) offer more detailed recommendations on lighting levels and configurations at interchanges. In addition, agency-specific street lighting policies should be followed when necessary. As the DDI is a unique interchange design, agency policies regarding street lighting at these facilities may need to include specifications specific to this interchange design. 7.7.1 Complete Versus Partial Interchange Lighting Systems AASHTO provides warrants for complete and partial interchange lighting systems (6). Although these warrants do not represent a requirement to provide lighting, they do provide a mechanism for designers to make sound design decisions on how to provide adequate lighting. Warrants for complete and partial interchange lighting systems are based on conditions including traffic volume, interchange spacing, adjacent light use, and night-to-day crash ratios. It is
212 Diverging Diamond Interchange Informational Guide generally desirable to provide at least partial interchange lighting systems at rural DDI locations, but consideration should be given to complete interchange lighting designs. Complete inter- change lighting will be desirable on bridge designs in urban and suburban areas. Pole spacing options at DDI crossroads will be highly variable based on several factors such as: ⢠Type of system deployed (e.g., complete or partial), ⢠Types of poles being considered (e.g., high-mast poles, mast arms, post-top, etc.), ⢠Interchange area being considered (e.g., inbound approaches, ramps, between the cross- overs, etc.), ⢠Surrounding environment, ⢠Width of the bridge(s), and ⢠Clear zone considerations. At sites that are a part of a complete interchange lighting system, lighting should be used on the entry and exit ramps for continuity. If continuous freeway lighting is not provided, such as the case with partial interchange lighting systems, it is recommended that lighting be provided on the ramps to transition into the interchange given the unique design. Most often, mast arm and davit-style lighting will be used along the ramps. When pedestrian walkways are provided along the outside of the crossroad, high-mast lighting will usually be more effective than mast arm, truss, or davit-style lighting. This provides more options for installing high-mast arms as sufficient clear zone outside the crossroad and the median are optimal. This option requires fewer poles than other methods, though their maintenance costs may be higher in some cases. An example of a complete interchange lighting system with high-mast lighting (six luminaires each) at the crossovers is provided in Exhibit 7-30. In this example, crosswalks are not present in the median, and high-mast lighting is used on the outside. If sufficient clear zone were available, it is possible to install high-mast poles in the median as well. Sites with pedestrian facilities in the median will typically have mast arm or davit-style lighting installed along the cross street; however, it is possible to install a high mast along the outside as well, provided the poles meet applicable clear zone requirements. This pole type requires more poles than high-mast types, though they are typically easier to maintain. An example of a partial interchange lighting system is provided in Exhibit 7-31, where lighting is provided on the ramps to transition off and onto the dark, limited-access facility. The lighting at the Highmast Mast Arm/Davit Post-top Image Source Adapted Note: Transparent circular and triangular shapes only describe basic lighting characteristics and not necessarily the zone being lighted. Exhibit 7-30. Continuous interchange lighting in an urban setting (2).
Traffic Control Devices and Illumination Applications 213 ramps shows key merge and diverge points at the entry and exit ramps. Post-top lighting is used along the bridge for aesthetics. An example of a partial interchange lighting system with no lighting on the ramps is provided in Exhibit 7-32. 7.7.2 Pedestrian Lighting The lighting design for the pedestrian facilities at a DDI should follow the same considerations as at other interchanges. For arterial underpasses, these considerations include adequate illumination of the pedestrian facilities under the bridge structure, as well as lighting on pedestrian walkways and crossing points. For center walkway locations, recessed LED lighting, as shown in Exhibit 7-33, provides an opportunity to illuminate the walkway without the need for additional street lights. Street lights may be difficult to place in a constrained ROW, and poles should not be placed within the walkway where they would form an obstacle for pedestrians. The recessed lighting feature can provide adequate illumination without introducing such obstacles, but illumination levels Exhibit 7-32. Partial interchange lighting in a suburban setting (2). No lighting is provided on the ramps for transition. Highmast Mast Arm/Davit Post-top Image Source Adapted (2) Note: Transparent triangular shapes only describe basic lighting characteristics and not necessarily the zone being lighted. Exhibit 7-31. Partial interchange lighting in a suburban setting (2). Lighting on the ramps is provided as a transition. Highmast Mast Arm/Davit Post-top Image Source Adapted (2) Note: Transparent circular and triangular shapes only describe basic lighting characteristics and not necessarily the zone being lighted.
214 Diverging Diamond Interchange Informational Guide Exhibit 7-33. Recessed lighting in DDI center walkway (4). should be checked against the appropriate federal, state, or local standards. Illumination levels of pedestrian pathways should account for low-vision users, especially in cases where ambient light may be blocked through structures or retaining walls. 7.8 Document Local Practices This guide is intended to provide a starting point and frame of reference for many of the common issues encountered at DDIs. Each agency has specific preferences for signal design and timing parameters; documenting the local practices and preferences for DDI-specific parameters based on this guide is strongly recommended. Taking a standard approach to all DDIs oper- ated and maintained by an agency can help reduce confusion during the design, construction, maintenance, and troubleshooting of the DDI signals going forward. Existing examples of this are available from Missouri and Utah Departments of Transportation (8, 9). 7.9 References 1. Manual on Uniform Traffic Control Devices for Streets and Highways, FHWA, U.S. Department of Transportation, 2009. 2. Google, Inc. Google Earth. Accessed July 2014. 3. Americans with Disabilities Act. âInformation and Technical Assistance on the Americans with Disabilities Act.â Available: http://www.ada.gov/2010ADAstandards_index.htm. 4. Cunningham, C., B. Schroeder, J. Hummer, C. Vaughan, C. Yeom, K. Salamati, D. Findley, J. Chang, N. Rouphail, S. Bharadwaj, C. Jagadish, K. Hovey, and M. Corwin. Field Evaluation of Double Crossover Diamond Interchanges. Contractorâs Draft Submittal. FHWA, Project No. DTFH61-10-C-00029, 2014. 5. Urbanik, T., A. Tanaka, B. Lozner, E. Lindstrom, K. Lee, S. Quayle, S. Beaird, et al. NCHRP Report 812: Signal Timing Manual, 2nd ed., Transportation Research Board, Washington, D.C., 2015. 6. Roadway Lighting Design Guide, 7th ed. AASHTO, Washington, D.C., October 2018. 7. American National Standard Practice for Design and Maintenance of Roadway and Parking Facility Lighting. ANSI/IES RP-8-18. American National Standards Institute, Illuminating Engineering Society, New York, 2018. 8. Missouriâs Experience with the Diverging Diamond Interchange, MoDOT Report No. OR10- 021, Missouri Department of Transportation, Jefferson City, MO, 2010. 9. DDI Guideline: A UDOT Guide to Diverging Diamond Interchanges. Utah Department of Transportation, Salt Lake City, UT, June 2014.
