
Below is the uncorrected machine-read text of this chapter, intended to provide our own search engines and external engines with highly rich, chapter-representative searchable text of each book. Because it is UNCORRECTED material, please consider the following text as a useful but insufficient proxy for the authoritative book pages.
B-1 APPENDIX B MS Word Template Instructions This appendix includes instructions for using the MS Word template. Appendix C includes a copy of the template itself. To be functional, an electronic version of this template will have to be downloaded from TRBâs Maintenance Prac- tices Web Board over the Internet as described in Chapter 2, Part 2. In addition, both files will need to be saved separately into the same directory on your computer hard drive. INTRODUCTION The template allows you to simplify the process of com- posing a maintenance practice by standardizing the structure and text style. The template was developed as a Word docu- ment and requires an understanding of that word processing program to use. The template follows the format presented in Chapter 4 of the hard-copy Guidebook. By using the template, you will be able to focus on the content of your practice instead of being concerned with formatting it. If you need help while developing a practice, the template contains links to relevant sections of the Guidebook. The first set of links will take you to instructions for completing indi- vidual practice sections (creating a practice title, summariz- ing local conditions, etc.). The second set of links will take you to specific sections of the Guidebook to obtain more gen- eral guidance (information on writing well, inserting pictures, obtaining reference material, regulatory compliance, etc.). INSTRUCTIONS FOR USING THE TEMPLATE Downloading the Template The template file can be downloaded from the Mainte- nance Practices Web Board as described in Chapter 2, Part 2, âUsing the Web Board.â Installing the Template File on Your Computer For the links contained in the template to function, the tem- plate and Guidebook must be saved as two separate files into the same directory on your computer hard drive. Note that the template is an MS Word file, while the Guidebook is an Adobe PDF file. Using the Template to Write a Maintenance Practice When youâre ready to write a maintenance practice, open the template file. If you try exiting the file at any time, the program will ask you to give that file a new name, thereby preserving the original (blank) template for future use when developing other practices. You can always download another blank template from the Web Board if needed. The template contains numerous gray-shaded areas. These shaded areas are form fields where you can enter new text. Click once on the shaded box and start typing; a standard font style and size has already been applied to these form fields. Existing instructions contained in the shaded areas will dis- appear as you type in new text. Note: You may have to delete any instructional text that remains in the shaded areas. Page Numbering and Footers Page numbering occurs automatically; it has been included in the templateâs footer. It is recommended that you also add the practice title to the footer. To do so, or to change or delete the page numbering, 1. Click âViewâ from the toolbar, then âHeader and Footer.â 2. A window box appears. Select the footer by clicking on the icon that looks like a page with a rectangular box above and below the page. This switches between header and footer. (Note: different versions of Word may have different features.) 3. With the cursor in the footer box, type in the practice title. 4. You can also change or delete the page numbering while the header/footer box is still open. 5. Click on âCloseâ when finished and youâll be taken back to your document. You can always go back into the footer to make additional changes by following the steps described above. Section Headings Since use of the practice format is voluntary, you may want to delete some section headings and add new ones. To do so, you can add text, delete text, or bold text as you would any Word document. Using the Step-by-Step Procedures Section The step-by-step procedures section of the template for- mat may have more or fewer blank steps (i.e., rows) than you actually need to complete your particular practice. Adding and deleting rows is done from the âTableâ menu.
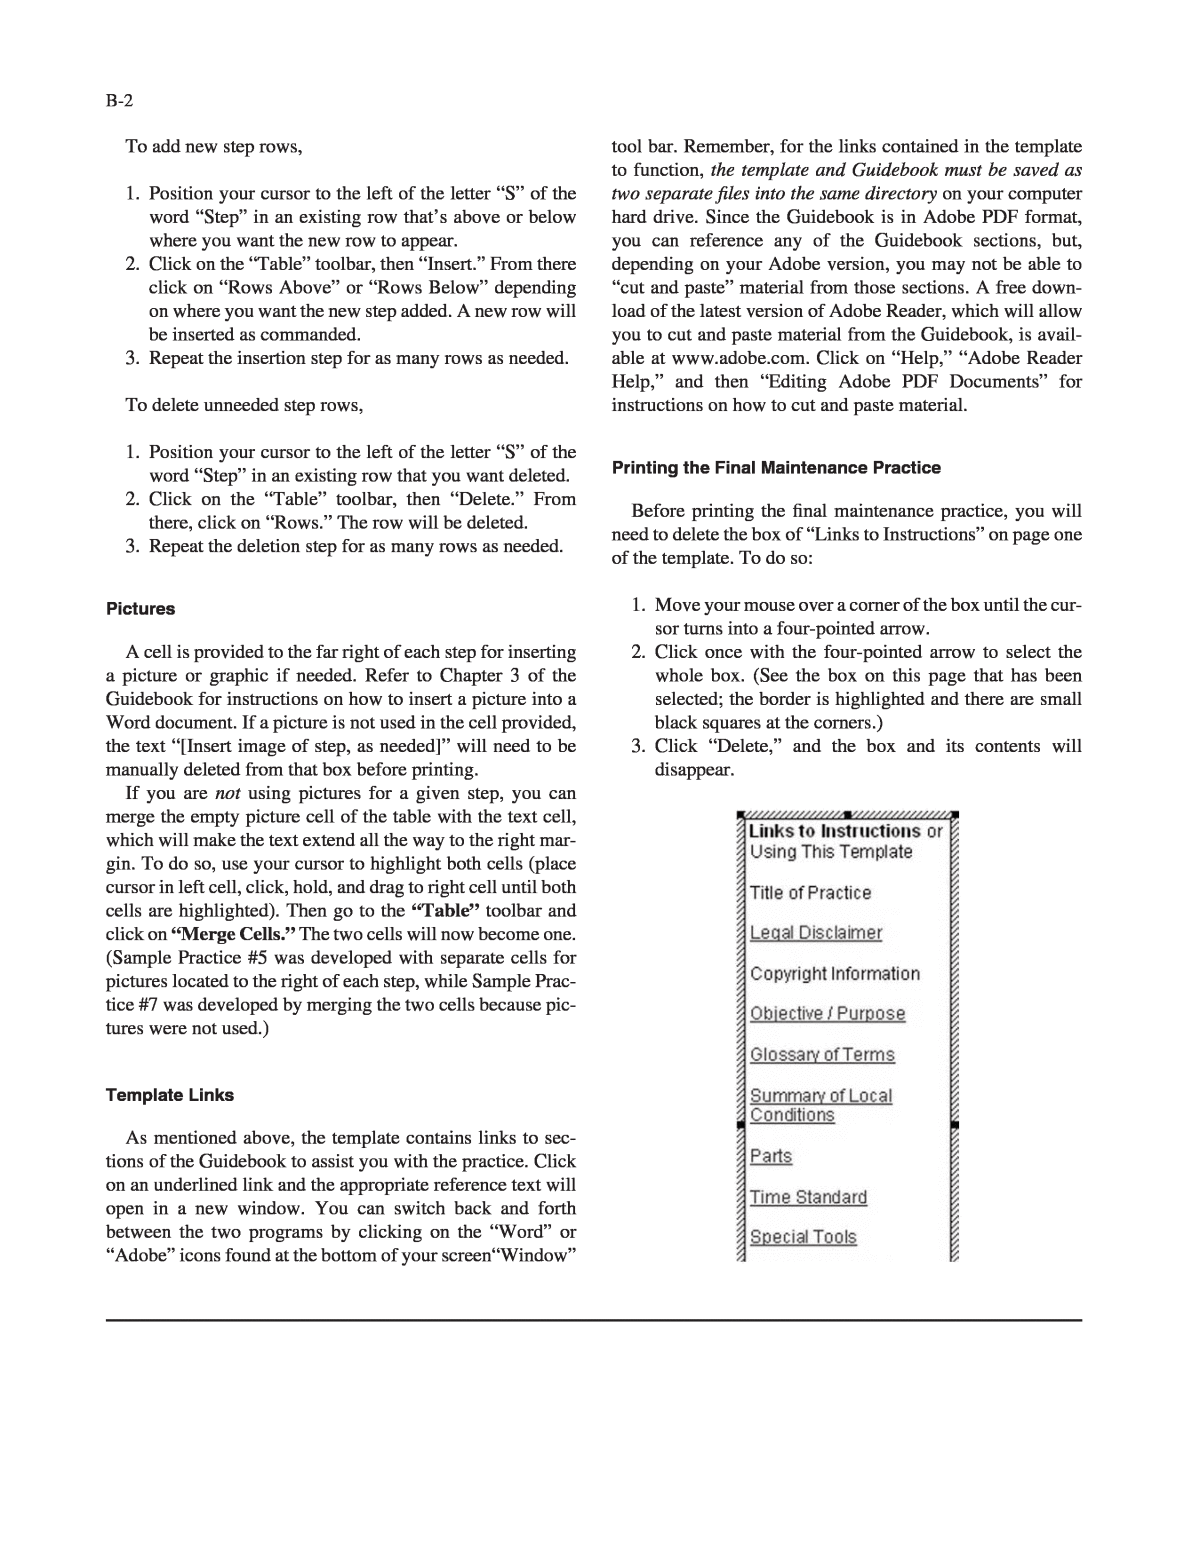
To add new step rows, 1. Position your cursor to the left of the letter âSâ of the word âStepâ in an existing row thatâs above or below where you want the new row to appear. 2. Click on the âTableâ toolbar, then âInsert.â From there click on âRows Aboveâ or âRows Belowâ depending on where you want the new step added. A new row will be inserted as commanded. 3. Repeat the insertion step for as many rows as needed. To delete unneeded step rows, 1. Position your cursor to the left of the letter âSâ of the word âStepâ in an existing row that you want deleted. 2. Click on the âTableâ toolbar, then âDelete.â From there, click on âRows.â The row will be deleted. 3. Repeat the deletion step for as many rows as needed. Pictures A cell is provided to the far right of each step for inserting a picture or graphic if needed. Refer to Chapter 3 of the Guidebook for instructions on how to insert a picture into a Word document. If a picture is not used in the cell provided, the text â[Insert image of step, as needed]â will need to be manually deleted from that box before printing. If you are not using pictures for a given step, you can merge the empty picture cell of the table with the text cell, which will make the text extend all the way to the right mar- gin. To do so, use your cursor to highlight both cells (place cursor in left cell, click, hold, and drag to right cell until both cells are highlighted). Then go to the âTableâ toolbar and click on âMerge Cells.â The two cells will now become one. (Sample Practice #5 was developed with separate cells for pictures located to the right of each step, while Sample Prac- tice #7 was developed by merging the two cells because pic- tures were not used.) Template Links As mentioned above, the template contains links to sec- tions of the Guidebook to assist you with the practice. Click on an underlined link and the appropriate reference text will open in a new window. You can switch back and forth between the two programs by clicking on the âWordâ or âAdobeâ icons found at the bottom of your screenâWindowâ B-2 tool bar. Remember, for the links contained in the template to function, the template and Guidebook must be saved as two separate files into the same directory on your computer hard drive. Since the Guidebook is in Adobe PDF format, you can reference any of the Guidebook sections, but, depending on your Adobe version, you may not be able to âcut and pasteâ material from those sections. A free down- load of the latest version of Adobe Reader, which will allow you to cut and paste material from the Guidebook, is avail- able at www.adobe.com. Click on âHelp,â âAdobe Reader Help,â and then âEditing Adobe PDF Documentsâ for instructions on how to cut and paste material. Printing the Final Maintenance Practice Before printing the final maintenance practice, you will need to delete the box of âLinks to Instructionsâ on page one of the template. To do so: 1. Move your mouse over a corner of the box until the cur- sor turns into a four-pointed arrow. 2. Click once with the four-pointed arrow to select the whole box. (See the box on this page that has been selected; the border is highlighted and there are small black squares at the corners.) 3. Click âDelete,â and the box and its contents will disappear.
