


Below is the uncorrected machine-read text of this chapter, intended to provide our own search engines and external engines with highly rich, chapter-representative searchable text of each book. Because it is UNCORRECTED material, please consider the following text as a useful but insufficient proxy for the authoritative book pages.
19 CHAPTER THREE EROSION CONTROL TECHNIQUES Erosion control is the proactive prevention of the loss of surface soil. Erosion control has been shown to have a higher level of effectiveness than sediment controlâtrying to catch the soil once it has eroded away (Atkins et al. 2001). The main goals of erosion control are to minimize potential ero- sion from disturbed sites and to then limit the transport of sediment from these sites. For effective erosion control, consider a systematic approach that includes design, construction, and mainte- nance issues; various temporary and permanent erosion con- trol methods; and new technologies (Johnson et al. 2003). Also take into account government regulations and permit- ting requirements. It is important to consider erosion control in the design stage of a project, and a detailed erosion con- trol plan should be developed before construction begins to identify the erosion problem areas and to devise effective and economical measures to prevent or, at the least, control erosion (SDDOT 2004). General practices that can aid in erosion control include confining operations to periods of dry weather, minimizing traffic through areas, selecting equipment that will create less soil disturbance, and minimizing the area of disturbance at any one time (Atkins et al. 2001). It is important that temporary erosion control measures be used during construction, especially when the construc- tion occurs in steep, rolling topography; where most of the drainage enters directly into adjacent water bodies or wet- lands; or where the subsoils are erosive. In selecting such measures, consider the following factors: purpose, grade or slope, amount of on-site water flow, length of time the treat- ment will be effective, ease of construction, maintenance requirements, and cost. Common devices for temporary erosion control include earth diversions and swales, erosion control blankets and stabilization mats, mulching and turf establishment, ditch checks, sandbag barriers, silt fences, soil berms, temporary slope stabilization and pipe downd- rains, and triangle silt dikes. Note that temporary sediment control measures (e.g., biorolls, drainage swales, inlet pro- tection, perimeter control, sediment basins, sediment traps, silt curtains, silt fences, standpipes, treatment basins) are also needed during construction to prevent off-site damage from sediment flowing into lakes, rivers, streams, and adja- cent lands. This section summarizes literature and interview results on erosion control techniques. Erosion is the process of separat- ing and transporting sediment by water, wind, gravity, or other geologic processes (Atkins et al. 2001). It is a natural process that can be accelerated by vegetation removal, top- soil disturbance or compaction, or creation of steep slopes. (Hyman and Vary 1999). It has been reported that the loga- rithm of sediment yield (in kg/km2) features a positive lin- ear relationship with the logarithm of runoff depth (in mm), based on a field study of embankment slopes along the Qing- haiâTibet highway in China (Xu et al. 2005). The same study also confirmed that there is a positive linear relationship between the runoff depth and the product of rain intensity (in millimeters/hour) and rain precipitation (in millimeters). TYPES OF EROSION Three types of erosion are common: surface, rill, and gul- ley (Orr 1998) (Figure 14). Surface, or sheet, erosion occurs when rainfall dislodges soil on the surface of material, and the water and soil flow down a slope in sheets. Rill erosion occurs when the velocity of the water flow is great enough to dislodge soil in addition to that dislodged by rainfall. Typical rill erosion has small, narrow channels that form in banks and on slopes not protected from erosion. Gully ero- sion occurs when rill erosion combines and concentrates the flow of runoff into gullies. Although soils erode differently, for most road materials it can be assumed that exposed soils will erode and cause sedimentation. Generally speaking, the flatter the slope, the fewer erosion problems occur. FIGURE 14 Types of soil erosion by water (from www.extension.missouri.edu).
20 After projects are completed and vegetation is established, permanent measures are to be implemented for erosion con- trol purposes. Common devices for permanent erosion con- trol include ditches and liners, riprap, runoff spreaders, soil bioengineering, and turf establishment. Detention ponds can be used to trap eroded material and control water flow. It has been reported that engineering measures (e.g., concrete pre- fabricated panes, LAttice, or runoff interception and drainage) can quickly reduce runoff and soil loss from road sideslopes, whereas revegetation has great potential once the vegetation cover is well established. The findings were based on a field evaluation of various erosion control measures along the Qin- ghaiâTibet highway in China, an area that features âhigh alti- tude, low summer rainfall and permanently poor vegetation coverâ (Xu et al. 2006). A combined measure (LAttice plus Common Seedling) was found to be most effective in both short-term and long-term erosion control (Xu et al. 2005). Many erosion control methods are frequently used alone or in conjunction with soil stabilization. This section pres- ents some examples of cost-effective and sustainable erosion control treatments most frequently used in conjunction with soil stabilization techniques. Useful Points ⢠Consider erosion control/stabilization work as quickly and early in the project as you can (J. Haag, personal communication, April 19, 2011). ⢠When working on slopes steeper than 3:1 (H:V), con- sider using soil stabilization blankets that can be pinned down or used in conjunction with mulch. It appears to save time and money in the long run (B. Johnson, per- sonal communication, April 18, 2011). ⢠Consider putting in place interim erosion control measures during seasonal shutdowns (Keller and Sherar 2003). Additional Resources for Erosion Control American Association of State Highway and Transpor- tation Officials (AASHTO), Washington, D.C. [Online]. Available: http://transportation.org/. Atkins, R.J., M.R. Leslie, D.F. Polster, M.P. Wise, and R.H. Wong, Best Management Practices Handbook: Hill- slope Restoration in British Columbia, Resource Tenures and Engineering Branch, BC Watershed Restoration Pro- gram, BC Ministry of Forests, Victoria, Canada, 2001. [Online]. Available: http://www.ieca.org/resources/federal- statewebsites.asp. CDM, Inc., Erosion and Sediment Control Best Manage- ment Practices: Report, Revised May 2004 [Online]. Avail- able: http://www.mdt.state.mt.us/research/projects/env/ erosion.shtml. California Department of Transportation (Caltrans), Stormwater and Water Pollution Control, Caltrans Divi- sion of Construction, Sacramento, 2011 [Online]. Available: http://www.dot.ca.gov/hq/construc/stormwater/stormwa- ter1.htm. Environmental Protection Agency (EPA), National Pol- lutant Discharge Elimination System: National Menu of Stormwater Best Management Practices, EPA, Washing- ton, D.C., 2008 [Online]. Available: http://cfpub1.epa.gov/ npdes/stormwater/menuofbmps/index.cfm. FHWA, Best Management Practices for Erosion and Sediment Control, FHWA-SLP-94-005, FHWA, Sterling, Va., 1995. Gillies, F., Erosion and Sediment Control Practices for Forest Roads and Stream Crossings â A Practical Opera- tions Guide, Advantage Vol. 9, No. 9, FP Innovations, FERIC Division, Forest Engineering Research Institute of Canada, Western Region, BC, Canada, 2007. International Erosion Control Association (IECA), Den- ver, Colo. [Online]. Available: www.ieca.org. Johnson, A., A. Moffatt, and E. Slattery, Erosion Con- trol Handbook for Local Roads, Minnesota Local Road Research Board (LRRB) Manual Number 2003-08, Minne- sota Department of Transportation, St. Paul, 2003. Local Soil and Water Conservation Districts, Natural Resources Conservation Service (NRCS), Washington, D.C. [Online]. Available: www.nrcs.usda.gov. Orr, D., Roadway and Roadside Drainage, CLRP Pub- lication No. 98-5, Cornell Local Roads Program and New York LTAP Center, Ithaca, N.Y., 104 pp., 1998 (Updated 2003) [Online]. Available: http://www.clrp.cornell.edu/ workshops/pdf/drainage_08_reprint-web.pdf. Rivas, T., Erosion Control Treatment Selection Guide, Gen. Tech Rep. 0677 1203âSDTDC, San Dimas Technol- ogy and Development Center, USDA Forest Service, San Dimas, Calif., 2006 [Online]. Available: http://www.fs.fed. us/eng/pubs/pdf/hi_res/06771203hi.pdf. South Dakota Department of Transportation (SDDOT), âRoadside Developmentâ Road Design Manual, SDDOT, Pierre, 2004 [Online]. Available: http://www.sddot.com/pe/ roaddesign/docs/rdmanual/rdmch14.pdf. GRASS SEEDING Seeding with grasses is one of the most common methods used to protect soils, and in many states and countries it
21 etative coverage of large areas (Howell 1999). Grass seeding is often used in conjunction with mulching and netting to aid in grass establishment. Initially, the grass armors against erosion, and later, as roots develop, it also acts to reinforce shallow soil (Howell 1999). Grass seed should be sown on soils that drain well. Hydro-seeding Hydro-seeding utilizes high-pressure pumps to apply a slurry of water, wood fiber mulch, seed, and fertilizer onto a slope (NRCS 2011) (Figure 15). Hydro-mulching is the application of a slurry of water, wood fiber mulch, and often a tackifier. The terms hydro-seeding and hydro-mulching are often used interchangeably. The benefits are the same as hand seeding; initially, the grass armors the soil against erosion, and then once the roots are established, it reinforces shallow soil. The benefit of hydro-seeding is that it can be used on just about any site (Howell 1999) and has a high suc- cess rate (Hearn and Weeks 1997). Often the limiting factor is the length of the hose used for spraying the hydro-seed, or how far the pumps can spray the materials [approximately 300 ft (100 m) or less] (Howell 1999). Grass seed should be sown on soils that drain well. FIGURE 15 Hydro seeding of a slope (Courtesy: M. Long). Grass Slips Grass slips, or small clumps of grass pulled from a larger mass, can be planted horizontally, vertically, diagonally, in a random pattern, or for full coverage (Hearn and Weeks 1997). The varying planting patterns can help create con- tours to the slope and channel or slow the surface flow of water, depending on site needs (Hearn and Weeks 1997). Deeply Rooted Grasses Another category of grasses that have been used to stabi- lize structures, including earth embankments and road cuts, water and drainage ways, and at building sites, are is a standard specification. Grass is very effective at cov- ering soil and protecting soil from wind and water erosion (Shah 2008). When seeding with grasses, it is ideal to use a mixture of creeping and clumping types. Creeping grasses form a continuous root system, or mat. Clumping grasses leave gaps between the plants that can be vulnerable to ero- sion, but they can grow large with deep roots (Hearn and Weeks 1997). Seed mixtures normally include grasses that germinate rapidlyâsuch as rye or annual grassâto pro- vide immediate short-term protection, and slower-growing perennial grasses that provide long-term protection. The optimum seed mix depends on the soil, site, and climatic conditions (Schor and Gray 2007). It is also very important to consider use of native seed varieties at each site. With the help of a botanist, horticulturalist, ecologist, or a local conservation agency, the appropriate seed varieties can be chosen for each site. To ensure the highest success rate, always scarify, or loosen, the surface soil (Howell 1999). Once the seed has been sown, apply mulch, netting, or sheeting to protect the seeds and to keep the moisture in. If grass seeds are sown on steep angled slopes (greater than 30 degrees), consider netting the mulch (Howell 1999). Maintenance may include protection from grazing animals, weeding, and possible thinning of shrubs if included in the seed mix. The timing of planting is critical. For example, seeds should be sown in the late fall, winter, or spring (USDA 1992). In temperate zones, watering may be necessary initially to ensure that the seeds are established if they are sown at other times. At each site, seeds should be matched to the site conditions. Grasses can be established by manual or hand seeding, hydro-seeding, or with turf or sod (Hearn and Weeks 1997). Use of turf and/or sod is not discussed in this section because of the high cost compared with hand or hydro-seeding. It is sometimes possible to get local sod farms to grow native grass sod (Dollhopf et al. 2008). If this is the best treatment option for the site, contact local sod farms directly to check on the availability of native grass sod or the option to grow a test plot. âA low-cost technique that is highly effective and under- utilized is native-grass-sod-lined ditches. Several compa- nies are developing native grass sod in rolls up to 4 ft wide. It can easily be installed in ditches or in areas of concen- trated flow around culverts, bridge abutments, etc. Sod is âexpensiveâ compared to seed, but it is inexpensive com- pared to fabric-lined channels and much more effectiveâ (S. Jennings, personal communication, April 12, 2011). Hand Seeding Hand seeding is accomplished by throwing seed by hand directly onto a site. The use of grass seed allows for easy veg-
22 deeply rooted grasses such as vetiver (Grimshaw and Faiz 1995). Vetiver grass (Vetiveria zizanioides) is a densely tufted perennial grass that grows in large clumps with very branched and spongy root mass (World Bank 1990). Vetiver grass has been proven to aid in soil and moisture conserva- tion and has a wide geographic and ecological area of adop- tion. Vetiver has been shown to decrease water runoff by up to 57% and reduce soil loss by more than 80% compared with stone barriers, other vegetation, and bare ground (Rao et al. 1992). Over time, as the hedge grows larger and the vegetation becomes denser, these numbers further improve (Rao et al. 1993). Vetiver grass has not been observed to be an invasive spe- cies; generally it produces no seeds, but if seeds are produced they tend to be sterile (Grimshaw and Faiz 1995). Vetiver hedges can take 2 months to 4 years to establish. Vetiver can grow in a wide range of soil types and pH levels, but it will not survive prolonged exposure to subzero temperatures typically seen in the continental Northern Hemisphere. Veti- ver grass can be planted horizontally across slopes to create a bench, slow the migration of water, and trap sediment; in gullies to slow water flow; or around engineered structures to stabilize soil (Grimshaw and Faiz 1995). It has been used for slope stabilization in Bangladesh, Brazil, China, and Thailand for decades, and is an inexpensive slope stabiliza- tion tool that improves performance with time. Useful Points ⢠When there isnât a mixture of shallow and deep-rooted veg- etation you can end up with the sod looking like a bunch of carpet at the bottom of the slope. Grass and legume seed roots only stabilize the surface; you need woody spe- cies (or plants with deeper) roots to stabilize at depth (D. Polster, personal communication, April 29, 2011). ⢠You can never put too much grass seed down (D. Orr, personal communication, May 3, 2011). Additional Resources for Grass Seeding Andreu, V., et al., âEcotechnological Solutions for Unstable Slopes: Ground Bio- and Eco-Engineering Tech- niques and Strategies,â In Slope Stability and Erosion Con- trol: Ecotechnological Solutions, J.E. Norris, et al., Eds., Springer, Dordrecht, the Netherlands, 2008. Caltrans, Statewide Stormwater Quality Practice Guide- lines, CTSW-RT-02-009, Caltrans, Sacramento, 2003. FHWA, Best Management Practices for Erosion and Sediment Control, FHWA-SLP-94-005, FHWA, Sterling, Va., 1995. Grimshaw, R.G. and A. Faiz, âVetiver Grass: Application for Stabilization of Structures,â In Proceedings of the Sixth International Conference on Low-Volume Roads, Minne- apolis, Minn., June 25â29, 1995. Goldman, S., K. Jackson, and T.A. Bursztynsky, Erosion and Sediment Control Handbook, McGraw Hill, New York, N.Y., 1986. Hearn, G.J. and R.W. Weeks, Principles of Low Cost Road Engineering in Mountainous Regions, with special ref- erence to Nepal, Himalaya, C.J. Lawrence, Ed., Transporta- tion Research Library Overseas Road Note 16, Berkshire, United Kingdom, 1997. Howell, J., Roadside Bio-engineering: Site Handbook, His Majestyâs Government of Nepal, Ganabahal, Kath- mandu, 1999 [Online]. Available: http://onlinepubs.trb.org/ Onlinepubs/sp/Airport/RoadsideBioengineering.pdf. Natural Resources Conservation Service (NRCS), Wash- ington, D.C., 2011 [Online]. Available: http://www.wy.nrcs. usda.gov/technical/ewpfactsheets/hydroseed.html. Shah, B.H., Field Manual on Slope Stabilization, United Nations Development Program, Pakistan, Sep. 2008 [Online]. Available: http://www.preventionweb.net/english/ professional/publications/v.php?id=13232. World Bank, Vetiver GrassâThe Hedge Against Erosion, 3rd ed., Washington, D.C., 1990. MULCH AND COMPOST Mulch is used as a temporary measure to help with the estab- lishment and growth of vegetation, but mulch alone will not protect a slope from eroding or establish vegetative cover (Howell, 1999). Mulch can be organic (e.g., compost, grass clippings, straw, bark, leaf litter) or inorganic (e.g., stone) (Sotir and Gray 2011). Mulch can be applied in various ways, including spreading it over the entire slope, over sown seeds, or around individual plants (Howell 1999). Mulch helps to keep soil cool and moist and enhances growth and early establishment of shrub and tree seedlings (Howell 1999). A good option for armoring sown grass seed is to mulch the entire site with chopped plant material or brushwood cleared from the site (Howell 1999). Mulching is suitable for any site with slopes up to 45 degrees and with well-draining materials (Howell 1999). For slopes greater than 45 degrees, erosion-control netting or blankets may be necessary to keep the mulch in place. Because mulching is a temporary measure, no maintenance is required (Howell 1999). Compost is decomposed or aged organic matter. It can be used as mulch or added to the soil as an amendment, and
23 can be used to create a berm or dike to control erosion (EPA 2008). Compost berms can be placed perpendicular to sheet flow and are generally trapezoidal in cross section. Compost filter berms are generally placed along the perimeter of a site or at intervals on a slope, reducing the speed of sheet flow and retaining sediment and pollutants. They can be used in place of silt fences, and do not need to be removed from the site once work is completed. Compost can also be used to fill wattles or fiber rolls, check dams, or be vegetated. The quality of the compost is important to consider [see the National Menu of Stormwater Best Management Practices (EPA 2008) for additional information]. Research has shown that compost can improve vegetation establishment and density. Test sections in arid southwest Montana monitored by Ament et al. (2011) demonstrated that 0.5â1 in. of compost was sufficient to establish 16% to 25% vegetation density at a cost of $16,000â$33,000 (using a blower truck to place the material similar to hydro-mulch) for this site. The same study demonstrated that coconut fiber and thin plastic netting were more effective at retaining compost than soil tackifiers. Field studies in Washington (in both the wetter western and drier eastern parts of the state) also showed that compost improved vegetation establish- ment and density while reducing weeds and erosion (Lewis et al. 2001). The researchers found better results when the compost was incorporated (raked) into the soil, including enhanced grass growth, increased soil workability, and a more diverse grass community. âCompost blanket application of 1â3 cm is very environ- mentally friendly in terms of reusing waste, aids in erosion control and vegetation establishment. The costs associated with these treatments range from low to high depending on the site-specific characteristics such as procurement cost, transportation cost, method of application, etc. Com- post can be considered high cost compared to leaving bare soil in an eroded condition, but I take the position that bare and erosive transportation corridors are unacceptableâ (S. Jennings, personal communication, April 12, 2011). Additional Resources for Mulch and Compost Caltrans, Statewide Stormwater Quality Practice Guide- lines, CTSW-RT-02-009, Sacramento, 2003. EPA, National Pollutant Discharge Elimination System: National Menu of Stormwater Best Management Practices, EPA, Washington, D.C., 2008 [Online]. Available: http:// cfpub1.epa.gov/npdes/stormwater/menuofbmps/index.cfm. FHWA, Best Management Practices for Erosion and Sediment Control, FHWA-SLP-94-005, FHWA, Sterling, Va., 1995. Howell, J., Roadside Bio-engineering: Site Handbook, His Majestyâs Government of Nepal, Ganabahal, Kath- mandu, 1999 [Online]. Available: http://onlinepubs.trb.org/ Onlinepubs/sp/Airport/RoadsideBioengineering.pdf. EROSION-CONTROL GEOTEXTILES Erosion-control geotextiles, including blankets and mats, are generic terms given to woven or bonded fabrics that are placed directly on soil for temporary erosion control (TIRRS 2001; EPA 2008). Erosion-control blankets and mats protect the surface from raindrop impact (TIRRS 2001), wind and stormwater erosion, and they allow vegetation to grow (EPA 2008). Geotextiles can be biodegradable, such as jute, wood fiber, paper or cotton, or synthetic and made of plastic. Geotextiles can be used to stabilize the flow of water in channels or swales, to protect seedlings or vegetation, to protect exposed soil, or to separate soil from other slope stabilization treatments such as riprap (EPA 2008). Lay the geotextile so it has continuous contact with the soil surface, or erosion can occur. Geotextiles should also be pinned in place. This can be done with stakes made of wood, metal, corn plastic, or live cuttings (NRCS 2007). Plastic geotextiles can trap and harm small animals (Fig- ure 16), even if the material is photodegradable. This issue is to be considered in advance; if possible, more easily biode- gradable fiber materials should be used to minimize poten- tial disturbance to wildlife (TIRRS 2001). Additional Resources for Erosion-Control Geotextiles Caltrans, Statewide Stormwater Quality Practice Guide- lines, CTSW-RT-02-009, Sacramento, 2003. EPA, National Pollutant Discharge Elimination System: National Menu of Stormwater Best Management Practices, EPA, Washington, D.C., 2008 [Online]. Available: http:// cfpub1.epa.gov/npdes/stormwater/menuofbmps/index.cfm. FHWA, Best Management Practices for Erosion and Sediment Control, FHWA-SLP-94-005, FHWA, Sterling, Va., 1995. NRCS, âTemporary Erosion Control Around the Home Following a Fire: Jute Netting,â NRCS Fact Sheet, California FS-54, 2007 [Online]. Available: ftp://ftp-fc.sc.egov.usda. gov/CA/programs/EWP/2007/FS54.pdf. Orr, D., Roadway and Roadside Drainage, CLRP Pub- lication No. 98-5, Cornell Local Roads Program and New York LTAP Center, Ithaca, N.Y., 1998 (updated 2003), 104 pp. [Online]. Available: http://www.clrp.cornell.edu/work- shops/pdf/drainage_08_reprint-web.pdf.
24 Tahoe Interagency Roadway Runoff Subcommittee (TIRRS), Planning Guidance for Implementing Permanent Storm Water Best Management Practices in the Lake Tahoe Basin, Chapter 6, âSlope Stabilization Techniques,â 2001. FIGURE 16 Eastern racer (Coluber constrictor) caught in erosion netting in highway right-of-way, Montana (Courtesy: T. Allen). Jute and Other Biodegradable Netting Jute is a rough fiber that is woven to create an organic and biodegradable net. Jute netting protects the soil surface, armoring against erosion and catching small debris, allows seeds to hold and germinate, and improves the microcli- mate on the slope surface by holding moisture and increas- ing infiltration. As it decays, it acts as a mulch for the growing vegetation (Howell 1999) (Figure 17). Any use of jute netting is a temporary measure designed to enhance vegetation establishment. It is sometimes possible to have netting made locally from jute grown in the region (Hearn and Weeks 1997). In Brazil, low-cost biotextiles made from native palms for use as biode- gradable erosion control mats proved successful at reducing soil loss while maintaining soil moisture and anchoring seeds. Other common materials used are coir fiber, excelsior mats, and straw. Coir is made from the husks of coconuts. Coir can be woven into mesh or net, or made into blankets (Coir Insti- tute 2011). Excelsior mats are composed of dried, shredded wood and covered with a fine paper net (Goldman et al. 1986). FIGURE 17 Biodegradable netting with planted vegetation, Floras Creek, Oregon (Courtesy: M. Long). Standard netting is used on steep, hard slopes where con- ditions are too harsh for vegetation to establish itself with- out assistance (Howell 1999). Normal use is on slope angles of 45 to 60 degrees (Howell 1999). Netting is best used on well-drained materials that are too hard to allow vegetation to become established unaided, or on slopes exposed to hot sun and where extreme drought would otherwise be a prob- lem (Howell 1999). It should not be used on soft or poorly drained soils, and never used on soils with a high rate of shallow slumping (Howell, 1999). Jute netting should be anchored in place with pins or staples (NRCS 2007). Jute netting can be easily integrated with soil bioengineering by planting grass slips through the holes in the netting in a ran- dom pattern fairly close together. If deeper reinforcement is required, the surface can be seeded with shrubs or small trees before the netting is laid down (Howell 1999). Jute netting does not protect a surface if used alone. No maintenance is necessary for jute netting; it will rot away over time (Howell 1999). It has been found to last for two or three seasons of rains before it degrades (Howell 1999), but it may last longer in less extreme climates. Additional Resources for Jute and Other Biodegradable Netting Goldman, S., K. Jackson, and T. A. Bursztynsky, Erosion and Sediment Control Handbook, McGraw Hill, New York, N.Y., 1986. Howell, J., Roadside Bio-engineering: Site Handbook, His Majestyâs Government of Nepal, Ganabahal, Kath-
25 mandu, 1999 [Online]. Available: http://onlinepubs.trb.org/ Onlinepubs/sp/Airport/RoadsideBioengineering.pdf. Orr, D., Roadway and Roadside Drainage, CLRP Pub- lication No. 98-5, Cornell Local Roads Program and New York LTAP Center, Ithaca, N.Y., 1998 (updated 2003), 104 pp. [Online]. Available: http://www.clrp.cornell.edu/work- shops/pdf/drainage_08_reprint-web.pdf. Other Netting There are many other erosion-control netting options. Many are made of nonbiodegradable materials and therefore per- sist in the environment. Use of these products is not as sus- tainable a practice as using biodegradable products, and additional time for cleaning up the product once it has served its purpose may be necessary. Note that nonbiodegradable netting is also used to reinforce sod and encase wattles, and for many other purposes. Rock Blankets or Riprap Rock blankets are created by placing a layer of loose rock or aggregate over an erodible soil surface (TIRRS 2001) (Figure 18). Rock blankets can be used with a variety of other techniques, such as seeding or planting of cuttings, or between other erosion-control measures to break up a slope. Ideally, rock would be available locally or on site and would match the surrounding landscape. Rock blankets are best used in areas where revegetation is difficult, and are often used on steep slopes above retaining walls. This technique should not be used on slopes greater than 2:1 (EPA 2008). FIGURE 18 Rock blanket on a cut slope for erosion control, Lake Tahoe (Courtesy: G. Keller). To install a rock blanket, excavate out the loose material or clear the slope if necessary, if seeding, then broadcast the seed (TIRRS 2001). Then place rock or aggregate. Geotex- tiles can be placed over the soil before the rock is placed to reduce soil erosion. Rock joint planting can also be used to further stabilize the slope. It is important that rock blankets not be used where they would pose a public safety hazard. They require little to no maintenance. Follow-up maintenance may include periodic inspection to see if rocks have dislodged (TIRRS 2001). Additional Resources for Rock Blankets or Riprap EPA, National Pollutant Discharge Elimination System: National Menu of Stormwater Best Management Practices, EPA, Washington, D.C., 2008 [Online]. Available: http:// cfpub1.epa.gov/npdes/stormwater/menuofbmps/index.cfm. Goldman, S., K. Jackson, and T. A. Bursztynsky, Erosion and Sediment Control Handbook, McGraw Hill, New York, N.Y., 1986. Orr, D., Roadway and Roadside Drainage, CLRP Pub- lication No. 98-5, Cornell Local Roads Program and New York LTAP Center, Ithaca, N.Y., 1998 (updated 2003), 104 pp. [Online]. Available: http://www.clrp.cornell.edu/work- shops/pdf/drainage_08_reprint-web.pdf. Tahoe Interagency Roadway Runoff Subcommittee (TIRRS), Planning Guidance for Implementing Permanent Storm Water Best Management Practices in the Lake Tahoe Basin, Chapter 6, âSlope Stabilization Techniques,â 2001. CHECK DAMS Check dams are a physical construction that prevents down- cutting of water in gullies (Howell 1999). Check dams reduce the gradient of a gully by providing periodic steps that trap the water, and safely discharge the water at a lower velocity to the next step. By trapping sediment on their upstream side, check dams create a stepped channel bed profile, thus reducing velocities and channel down-cutting, and ultimately halting the progression of erosion (Hearn and Weeks 1997). Check dams can be used in any type of gully or rill that is in danger of enlarging or on any slope where there is a danger of water scour (Howell 1999). There are many ways to construct check dams, including loose stone, gabion baskets, concrete, stone masonry, live brushwood, palisades, and vegetated poles (Shah 2008) (Figures 19â21). The selection of materials to be used may be based on what is available on site, and whether vegetation is desired as a permanent measure. It is important to consider the location, spacing, and size of the check dams. The check dam location should be selected to achieve the maximum effect with the minimum amount of construction (Howell 1999). Check dams are nor- mally placed where they can protect weak parts of a gully from scour, utilizing natural topography such as natural nick points, debris piles or foundations, or bedrock anchor points. In situations where the gully is too steep or irregular,
26 The following are key design points for gully stabilization in check dams are (G. Keller, personal communication, Nov. 22, 2011): 1. Remove the source of water to the gully if at all possible. 2. Have a weir over the top of the check dam to keep the flow in the middle of the channel (as shown in Figure 19). 3. Key the check dam into the sides of the gully and compact the soil well around the structure. 4. Protect the outfall from the structure to prevent undermining of the structure. Use riprap, gabions, or other energy dissipation, or drop into the pool of the next downstream structure. Live Check Dams or Vegetated Pole Check Dams To create live or vegetated pole check dams, large woody cuttings are planted across a gully, usually following the contour, forming a strong barrier and trapping material mov- ing down-slope (Howell 1999). Over time, a small step will form in the gully floor. This technique can be used in gullies with slopes up to 2:1 (27 degrees) (Howell 1999). It should not be used in areas with high rates of slumping. Spacing of live check dams var- ies with slope steepness and profile, normally 9 to 16 ft (3 to 5 m) apart is sufficient. Within the live check dam, spacing of the cuttings can be very close (less than an inch apart), but on gentle slopes spacing can be wider. Planting a double, offset line of cuttings will make a much stronger live check dam. Generally, little to no maintenance is needed, with the exception of replacing failed sections or thinning established vegetation (Howell 1999). Useful Points ⢠The size of the check dams may need to be increased down-slope to accommodate additional water drainage from the watershed (S. Jennings, personal communica- tion, April, 12, 2011). Additional Resources for Check Dams Caltrans, Statewide Stormwater Quality Practice Guide- lines, CTSW-RT-02-009, Caltrans, Sacramento, 2003. FHWA, Best Management Practices for Erosion and Sedi- ment Control, FHWA-SLP-94-005, FHWA, Sterling, Va., 1995. Goldman, S., K. Jackson, and T. A. Bursztynsky, Erosion and Sediment Control Handbook, McGraw Hill, New York, N.Y., 1986. the check dams should be placed where a stable cross section is available with strong points for keying-in the structure (Hearn and Weeks 1997). FIGURE 19 Wooden check dams with rock reinforcement (Courtesy: D. Orr). FIGURE 20 Stone check dams (Courtesy: D. Orr). FIGURE 21 Rock pile check dams (Courtesy: G. Keller).
27 Grimshaw, R.G. and A. Faiz, âVetiver Grass: Application for Stabilization of Structures,â In Proceedings of the Sixth International Conference on Low-Volume Roads, Minne- apolis, Minn., June 25â29, 1995. Hearn, G.J. and R.W. Weeks, Principles of Low Cost Road Engineering in Mountainous Regions, with special ref- erence to Nepal, Himalaya, C.J. Lawrence, Ed., Transporta- tion Research Library Overseas Road Note 16, Berkshire, United Kingdom, 1997. Howell, J., Roadside Bio-engineering: Site Handbook, His Majestyâs Government of Nepal, Ganabahal, Kath- mandu, 1999 [Online]. Available: http://onlinepubs.trb.org/ Onlinepubs/sp/Airport/RoadsideBioengineering.pdf. Shah, B.H., Field Manual of Slope Stabilization, United Nations Development Program, Pakistan, Sep. 2008 [Online]. Available: http://www.preventionweb.net/english/ professional/publications/v.php?id=13232. WATTLES OR FIBER ROLLS Wattles, or fiber rolls, are tube-shaped erosion control devices that are filled with straw, rice husks, flax, coconut fiber, or composting material that is wrapped in netting (Caltrans 2003; SWS 2008). The netting can be made of biodegrad- able materials such as jute, coir, or burlap, or nonbiodegrad- able polypropylene (SWS 2008). Live fascinesâbundles of live plant material planted partially in the groundâcan also serve the same purpose. Wattles can be made to varying diameters and lengths (Etra 2011). Wattles are used to break up slopes and reduce water velocity on the slope, protect- ing against sheet flow and concentrated water flow (Caltrans 2003; SWS 2008). They also help to reduce sediment loss by trapping water long enough for the sediment to settle out (SQH 2000). All slope stabilization work is to be completed before application of wattles and fascines, which are surface treatments for surface water and erosion control (Figure 22). Wattles should be used immediately after grading and before seeding or mulching (SWS 2008). To install, dig a trench approximately half the diameter of the roll, place the roll in the trench, and use wooden stakes (SQH 2000) or live cuttings to anchor the roll. Anchors should be placed 2â3 ft apart (SQH 2000). Maintenance may include removing sediment built up on the upslope side, re-anchoring, or repairing or replacing split, torn, or unraveling rolls (Caltrans 2003; SWS 2008). Additional Resources for Wattles or Fiber Rolls California Stormwater BMP Handbook, Califor- nia Stormwater Quality Association, Menlo Park, 2003 [Online]. Available: www.cabmphandbooks.com/Docu- ments/Construction/SE-5.pdf. Caltrans, Statewide Stormwater Quality Practice Guide- lines, CTSW-RT-02-009, Sacramento, 2003. Etra, J., 2011, âFiber Roles or Sediment Logs: The Rest of the Story,â Environmental Connection, Vol. 5, No. 2, 2011, pp. 20â21. Storm Water Services (SWS), Runoff Management, Fiber rolls/wattles (RM-10), Springfield, Mo., 2008 [Online]. Available: www.sprfieldmo.gov/stormwater/pdfs/BMP%20 PDFs/RM%20BMPs/FIBER%20ROLLS-WATTLES.pdf. Stormwater Quality Handbooks (SQH), Construction Site Best Management Practices (BMPs) Manual, Califor- nia Department of Transportation (Caltrans), Sacramento, Nov. 2000. STRAW BALE BARRIERS A straw bale barrier is a linear sediment barrier consisting of straw bales designed to intercept and slow the flow of water and filter sediment-laden sheet flow runoff. Straw bale barri- ers allow sediment to settle from runoff before water leaves FIGURE 22 A successful application of wattles on a stable cut slope (left); A failed application of wattles that were placed over an unstable, over-steep fill slope (right) (Courtesy: G. Keller).
28 narrow custom-shaped blade into the ground, while silt fence fabric is simultaneously pulled into the opening that is created. Four passes of a tractor tire are used to achieve appropriate compaction. Static slicing was pio- neered by Iowa DOT in the 1990s and has been adopted by other midwestern states. Trench-based installation of silt fences requires that a trench be dug and cleaned out, fabric placed in the trench, and then the fabric buried and the trench compacted. Additional Resources for Silt Fences Caltrans, Statewide Stormwater Quality Practice Guide- lines, CTSW-RT-02-009, Sacramento, 2003. FHWA, Best Management Practices for Erosion and Sediment Control, FHWA-SLP-94-005, FHWA, Sterling, Va., 1995. Goldman, S., K. Jackson, and T.A. Bursztynsky, Erosion and Sediment Control Handbook, McGraw Hill, New York, N.Y., 1986. Keller, G. and J. Sherar, Low-Volume Roads Engineer- ingâBest Management Practices Field Guide, Office of International Programs and U.S. Agency for International Development, USDA Forest Service, Washington, D.C., 2003 [Online]. Available: http://www.fs.fed.us/global/topic/ welcome.htm#12. Sprague, J. and T. Carpenter, âSilt Fence Installation Efficacy: Definitive Research Call for Toughening Speci- fications and Introducing New Technology,â International Erosion Control Association, Denver, Colo., 2011 [Online]. Available: www.ieca.org/resources/documents/Article/ ArticleSFInstallationEfficacy.asp CHEMICAL SOIL STABILIZERS Chemical stabilization is an effective tool for temporary stabilization of surface soil. Vinyl, asphalt, rubber, anionic and nonionic polyacrylamide (PAM), and biopolymers are examples of chemical stabilizers that can be sprayed onto an exposed soil surface to hold the soil in place and minimize erosion from runoff and wind (EPA 2008). Chemical soil stabilizers can be used in areas where vegetation cannot be established, or on rough grading, cut and fill areas, tempo- rary stockpiles, temporary or permanent seeding, or for site winterization, dormant seeding in the fall, staging areas, or other disturbed soils (IUM 2011). When asked to provide an example of an underutilized tool, technique or method of erosion control, one respon- dent (Skip Ragsdale, personal communication, April 18, 2011) said, a disturbed area. Straw bales are readily available in most locations. One disadvantage is that they are bulky and heavy when wet (Caltrans 2003). Straw bale barriers are short-term erosion control mea- sures that are best used at the base of a slope or down-slope of disturbed soil. Straw bale barriers can be placed around stockpiles, such as a stockpile of topsoil that will be used again later in the project, and can be used to protect drain inlets and ditch lines (Caltrans 2003). Straw bale barrier maintenance may include replacing damaged straw bales, repairing washouts, or removing accu- mulated sediment behind the straw bale. The straw bales should be removed and accumulated sediment redistributed once work is complete (Caltrans 2003). Additional Resources for Straw Bale Barriers Caltrans, Statewide Stormwater Quality Practice Guide- lines, CTSW-RT-02-009, Sacramento, 2003. FHWA, Best Management Practices for Erosion and Sediment Control, FHWA-SLP-94-005, FHWA, Sterling, Va., 1995. Goldman, S., K. Jackson, and T.A. Bursztynsky, Erosion and Sediment Control Handbook, McGraw Hill, New York, N.Y., 1986. Keller, G. and J. Sherar, Low-Volume Roads Engineer- ingâBest Management Practices Field Guide, Office of International Programs and U.S. Agency for International Development, USDA Forest Service, Washington, D.C., 2003 [Online]. Available: http://www.fs.fed.us/global/topic/ welcome.htm#12. SILT FENCES Silt fences are a linear barrier of permeable fabric designed to intercept and slow the flow of sediment-laden runoff, allow- ing sediment to settle from the runoff before water leaves the site (Caltrans 2003). Silt fences are difficult to construct and maintain, and their use is for short-term maintenance only (Caltrans 2003). Although silt fences are widely used, they are often not installed correctly, not maintained, or not removed once the work is complete. Additionally, silt fences are made of nonbiodegradable materials. Erosion control professionals have recently called for more stringent specifications to be placed on silt fence installation techniques (Sprague and Carpenter 2011). Currently two techniques, static slicing and trench-based installations, can be used to achieve maximum silt fence performance. Static slicing requires the insertion of a
29 Anionic polyacrylamide. There was a new Interstate project in which the sculpted road was going to sit unpaved from November through May. Usually they put three inches of gravel down for erosion control (estimated cost $400,000) but instead they sprayed anionic PAM (cost $3500) and they had no erosion issues at the site. [PAM is] very underutilized for short-term bare soil treatment. PAM creates an electrochemical reaction that draws fine particles close together, making larger particles that are more resistant to erosion and large enough to settle from suspen- sion (Cohn 2001). Historically, PAM has been used in agri- culture to reduce soil loss in irrigation channels. When used for slope stabilization, PAM is only to be used where sheet flow is present. PAM is not be used on slopes greater than 4:1 unless additional erosion-control measures such as mulch, geotextiles, or mats are used (IUM 2011). PAM should not be applied to frozen soil or where ice is present. It works best in soils with significant amounts of fine silts, clays, and colloidal particles, although overapplication can reduce soil infiltration rates. PAM breaks down over time, and areas of application need to be inspected regularly for signs of ero- sion. When applied to a soil surface for erosion control, PAM has been shown to reduce runoff volumes by 10% to 15%, further enhancing seed germination from additional water and aeration of soil. Biopolymers that chemically stabilize soil include chi- tosan, cellulose and starch xanthates, and cellulose micro- fibrils (Orts et al. 2000). Chitosan, a naturally occurring polysaccharide, is derived from chitin in shellfish. Chito- sanâs ability to work is dependent on the pH of the water. Tests have shown optimal flocculation of suspended river silt and kaolinite at pH 7â7.5 (Divakaran and Sivasankara Pillai 2002). Historically, cellulose and xanthates have been used as soil stabilizers. Cotton microfibrils are a new product that shows potential for soil stabilization. The U.S. Environmental Protection Agency (EPA) cur- rently allows the use of PAM in water treatment. Some countries, including Japan, Germany, and the Netherlands, have banned or highly restricted its use in drinking water treatment. The EPA permits chitosan use in drinking water, waste water, and industrial water. Additional Resources for Chemical Soil Stabilizers Cohn, W., âPolyacyrlamide (PAM) for Erosion Control Applications,â presented at the Southeastern Pennsylvania Stormwater Management Symposium, 2001. Divakaran, R. and V.N. Sivasankara Pillai, âFloccula- tion of River Silt Using Chitosan,â Water Research, Vol. 36, 2002, pp. 2414â2418. Illinois Urban Manual (IUM), Practice Standard, Poly- acrylamide (PAM) for Temporary Soil Stabilization (no.) Code 893, 2011 [Online]. Available: http://aiswcd.org/IUM/ standards/urbst893.html. Nichols, E., Synthetic and Natural Cationic Polymers for Clarification of Environmental Water and the Significance of Cationicity, White paper, Scientific Director of Water Treatment Technologies. Orts, W.J., R.E. Sojka, and G.M. Glenn, âBiopolymer Additives to Reduce Erosion-induced Soil Losses During Irrigation,â Industrial Crops and Products, Vol. 11, No. 1, 2000, pp. 19â29. Sojka, R.E., D.L. Bjorneberg, J.A. Entry, R.D. Lentz, and W.J. Orts, âPolyacrylamide in Agriculture and Environmen- tal Land Management,â Advances in Agronomy, Vol. 92, 2007, pp. 75â162.
30 CHAPTER FOUR SOIL BIOENGINEERING AND BIOTECHNICAL TECHNIQUES This section summarizes literature and interview results on soil bioengineering and biotechnical stabilization tech- niques. Soil bioengineering is a technique that uses plants and plant material alone, whereas biotechnical techniques use plants in conjunction with more traditional engineer- ing measures and structures to stabilize slopes (Gray and Sotir 1996; Schiechtl and Stern 1996) and alleviate shal- low, rapid landslides and eroding stream banks (Lewis et al. 2001). Both soil bioengineering and biotechnical tech- niques contribute to sustainable development practices, as they enhance the aesthetics of the highway environment and reduce the ecological impacts of highway construc- tion, maintenance, and operations. In soil bioengineering systems, plants (grasses and shrubs, especially deep- rooted species) are an important structural component in reducing the risk of slope erosion (Jiang et al. 2004). Soil bioengineering measures are designed to aid or enhance the reestablishment of vegetation (USDA 1992). Properly designed and installed vegetative portions of systems should become self-repairing, with only minor mainte- nance to maintain healthy and vigorous vegetation. Soil bioengineering frequently mimics nature by using locally available materials and a minimum of heavy equipment, and is an inexpensive way to treat slope stabilization (Lewis et al. 2001). â[Soil] bioengineering is a technique that has been used for decades in countries such as Nepal, or in other cases (e.g., in Pakistan) has been recently adopted as a viable soil stabilization methodâ (A. Faiz, personal communica- tion, May 6, 2011). Soil bioengineering has six main functions: 1. To catch eroded materials with physical barriers (e.g., walls, vegetation); 2. To armor the slope from erosion caused by runoff or rain splash using vegetative cover, partial armoring using lines of vegetation; 3. To reinforce soil physically with plant roots; 4. To anchor surface material to deeper layers using large vegetation with deep roots or rock bolts; 5. To support soil by buttressing with retaining walls or large vegetation; and 6. To drain excess water from the slope through the use of drains and vegetation (Howell 1999; Schor and Gray 2007). When using soil bioengineering and biotechnical stabi- lization practices on slopes, consider a partnership among many disciplines, including soil scientists, hydrologists, bot- anists, engineering geologists, maintenance personnel, civil engineers, and landscape architects (Lewis et al. 2001). The following basic concepts will aid in selection of soil bioengi- neering and biotechnical treatments: ⢠Fit the system to the site. Consider topography, geol- ogy, soils, vegetation, and hydrology. Avoid extensive grading and earthwork in critical areas. ⢠Test soils to determine if amendments are necessary. ⢠Use on-site vegetation whenever possible. ⢠Limit the amount of disturbed areas at each site. Any materials removed from the site are to be kept on site and reused if possible. ⢠Clear sites during times of low precipitation. ⢠Stockpile or protect the topsoil and reuse during planting. ⢠Utilize temporary erosion and sediment control measures. ⢠Divert, drain, and/or store excess water (USDA 1992). PLANNING FOR SOIL BIOENGINEERING When planning to use soil bioengineering or biotechnical treatments for soil stabilization, the following design mea- sures need to be considered: earthwork required to prepare the site, scheduling and timing of the work to ensure optimal timing for site construction and planting, appropriate use of vegetation to avoid damaging structures, and appropriate content and property of fill material to ensure that mechani- cal and hydraulic properties are met while supporting plant life. Soil bioengineering systems generally require minimal access for equipment and cause relatively minor site distur- bance during installation (USDA 1992). The timing of implementation of a soil bioengineered and biotechnical treatments is an important part of plan- ning. Consider planting during the dormant season, usually
31 late fall, winter in temperate zones, or early spring (USDA 1992). Installation of live cuttings should begin concurrently with earthmoving operations if they are carried out during the dormant season. All construction operations are to be phased together when possible. The selection of plant species is also important. First, the architectural features of plant root systems play a significant role in the effectiveness of plants in shallow slope stabiliza- tion and/or erosion control (Reubens et al. 2007). Second, wherever possible, native plant species (e.g., native multi- species grass sod) are preferred because they tend to tolerate drought; need little irrigation, fertilizer, pesticides, or herbi- cides; and demand less mowing (Dollhopf et al. 2008). Over time, highway agencies could see significant savings in labor, fuel, maintenance equipment costs, and reduced chemical use. Chen et al. (2009) reported that the use of native shrubs and grass species along with micro-environment improve- ments ensured the long-term viability of hydro-seeded vegetation along slopes in the arid Loess Plateau of China. Finally, mixture seeding is a desirable method of establish- ing a viable plant community for roadside slope protection. Chen et al. (2011) systematically evaluated 19 woody plants and 8 herbaceous plants in terms of their early growth abil- ity, stress resistance, and growth potential once introduced to mild slopes along a freeway segment in Hubei, China. For this specific region, the field results indicated that the Indigo- fera pseudotinctoria and Pinus massoniana ranked the best and the worst, respectively. The authors suggested that the mixture seeding utilize woody plants featuring high stress resistance and outstanding growth potential as target species in conjunction with herbaceous plants featuring high early growth ability as protective species. Soil bioengineering and biotechnical projects ideally use on-site stockpiled topsoil as the planting medium (USDA 1992). Soil bioengineering and biotechnical systems need to be installed in a planting medium that includes fines and organic material and is capable of supporting plant growth. It has been reported that âamendment of soils through the addition of topsoil is an important technique in roadfill revegetation in (semiarid) Mediterranean environmentsâ (Tormo et al. 2007). Similarly, for slopes along the Qinghaiâ Tibet highway in the permafrost region of China, the veg- etation established by local-topsoil-amended spray seeding was much better than that of ordinary spray seeding (Chen et al. 2009). The same study also found that the addition of more water retainer and soil stabilizer (instead of mulch) improved the performance of ordinary spray seeding. The selected soil backfill does not need to be organic topsoil, but enough organic material needs to be present to support plant growth. On-site soil should be tested for nutrient content, metals, and pH before the vegetation is installed. Soil around the vegetation should be compacted to densities approximat- ing the surrounding natural soil densities, and soil around plants should be free of voids (USDA 1992). âInitial failures of a small portion of a system normally can be repaired easily and inexpensively. Neglect of small failures, however, can result in the failure of large portions of a systemâ (USDA 1992). Vegetation alone plays an important role in stabilizing slopes by intercepting and absorbing water, retaining soil below ground with roots and above ground with stems, retarding runoff velocity by providing a break in the path of the water and increasing surface roughness, and increas- ing water infiltration rates, soil porosity, and permeability (Schor and Gray 2007). Each type of vegetation serves a critical function. Grasses, or herbaceous cover, protects sloped surfaces from rain and wind erosion. Shrubs, trees, and other vegetation with deeper roots are more effective at preventing shallow soil failures, as they provide mechani- cal reinforcement and restraint with the roots and stems and modify the slope hydrology by root uptake and foliage interception (Schor and Gray 2007). Where the main func- tion of structural elements is to allow vegetation to become established and take over the role of slope stabilization, the eventual deterioration of the structures is not a cause for con- cern (USDA 1992). Field studies have shown instances where combined slope protection systems have proven to be more cost- effective than the use of vegetative treatments or struc- tural solutions alone (USDA 1992). Lewis et al. (2001) found that where technically feasible, soil bioengineer- ing alternatives can be adopted to produce equal or better economic and environmental results than the traditional geotechnical solutions alone. The average benefit-to-cost ratio in this study was 2.41, demonstrating that soil bioen- gineering can be a favorable economic alternative in road- side management. The cost of soil bioengineering at three sites in Washington State ranged from $1.50 to $3.50 per square foot (Lewis et al. 2001). Many interviewees stated that on slope stabilization projects in which they have participated, the overall cost of the soil bioengineering or biotechnical component represented about 1% of the total project budget. Soil bioengineering and biotechnical treatments should not be considered the solution to every slope failure and surface erosion problem (USDA 1992). At some sites, hand seeding with grass seed will be the most cost-effective solution for the site, while at other sites a better solution may be an engineered retaining wall, with or without a vegetative component. Additional Resources for Soil Bioengineering and Biotechnical Techniques Andreu, V., et al., âEcotechnological Solutions for Unstable Slopes: Ground Bio- and Eco-Engineering Tech- niques and Strategies,â In Slope Stability and Erosion Con-
32 trol: Ecotechnological Solutions, J.E. Norris, et al., Eds., Springer, Dordrecht, the Netherlands, 2008. Atkins, R.J., M.R. Leslie, D.F. Polster, M.P. Wise, and R.H. Wong, Best Management Practices Handbook: Hill- slope Restoration in British Columbia, Resource Tenures and Engineering Branch, Victoria, BC Watershed Restoration Program, BC Ministry of Forests, 2001 [Online]. Available: http://www.ieca.org/resources/federalstatewebsites.asp. Fox, P.J., T.H. Wu, and B. Trenner, Bio-Engineering for Land Stabilization, Final report prepared for the Ohio Department of Transportation, Columbus, 2010. Gray, D.H. and R.B. Sotir, Biotechnical and Soil Bioengi- neering Slope Stabilization: A Practical Guide for Erosion Control, John Wiley & Sons, New York, N.Y., 1996. Howell, J., Roadside Bio-engineering: Site Handbook, His Majestyâs Government of Nepal. Ganabahal, Kath- mandu, 1999 [Online]. Available: http://onlinepubs.trb.org/ Onlinepubs/sp/Airport/RoadsideBioengineering.pdf. Howell, J.H., S.C. Sandhu, N. Vyas, R. Sheikh, and S.S. Rana, Introducing Bio-engineering to the Road Network of Himachal Pradesh, The World Bank [Online]. Available: http://himachal.gov.in/hpridc/RandD.pdf. Lewis, L., Soil Bioengineering: An Alternative for Road- side Management A Practical Guide, USDA-FS, T&DP, 0077 1801-SDTDC, U.S. Department of Agriculture, Wash- ington, D.C., 2000. Lewis, L., S.L. Salisbury, and S. Hagen, Soil Bioengi- neering for Upland Slope Stabilization, Report WA-RD 491.1, Washington State Department of Transportation, Olympia, 2001. Ramakrishna, A.S., and D. Sapzova, Using Bioengineer- ing to Stabilize Landslide-Prone Hill Slides. Innovations in Development, Mizoram Roads Project, The World Bank, India, 2011. Schiechtl, H.M. and R. Stern, Ground Bioengineering Techniques for Slope Protection and Erosion Control, David H. Baker, U.K. Ed., translated by L. Jaklitsch, WileyâBlack- well, Oxford, U.K., 1966. Schiechtl, H., Bioengineering for Land Reclamation and Conservation, The University of Alberta Press, Edmonton, AB, Canada, 1980. Schor, B. and D.H. Gray, Landforming: An Environmen- tal Approach to Hillside Development, Mine Reclamation and Watershed Restoration, John Wiley & Sons, Hoboken, N.J., 2007. USDA, Natural Resources Conservation Service, National Engineering Handbook, Part 650, Engineering Field Handbook, Chapter 18, âSoil Bioengineering for Upland Slope Protection and Erosion Reduction,â USDA, Washington, D.C., 1992. LIVE STAKES Live staking involves the insertion and tamping of live, root- able, vegetative cuttings into the ground (Figure 23) (USDA 1992). When correctly prepared and planted, or placed, the live stakes will root and grow. A system of stakes creates a living root mat that stabilizes the soil by reinforcing and binding soil particles together and by extracting excess soil moisture. In the United States, willow is a good woody plant that roots rapidly and begins to dry out a slope soon after installation (USDA 1992). Live stakes are an appropriate technique for repair of small earth slips and slumps that are frequently wet. FIGURE 23 Live stake used to pin down matting (Courtesy: R. Sotir). Live staking is a technique for relatively uncomplicated site conditions when construction time is limited and an inexpensive method is necessary (USDA 1992). Live stak- ing can also be used to pin down, or anchor, erosion control materials on the surface. Live stakes are also well suited for stabilizing intervening areas between other soil bioengi- neering techniques, such as live fascines. Live cuttings should be 0.5â1.5 in. in diameter (1.3â4 cm) and 2â3 ft long (0.6â1 m) (USDA 1992). Side branches are to be cleanly removed with bark intact. Basal ends are to be cut at a 45-degree angle for easy insertion into soil and the top is to be cut square. It is important that cuttings be installed as
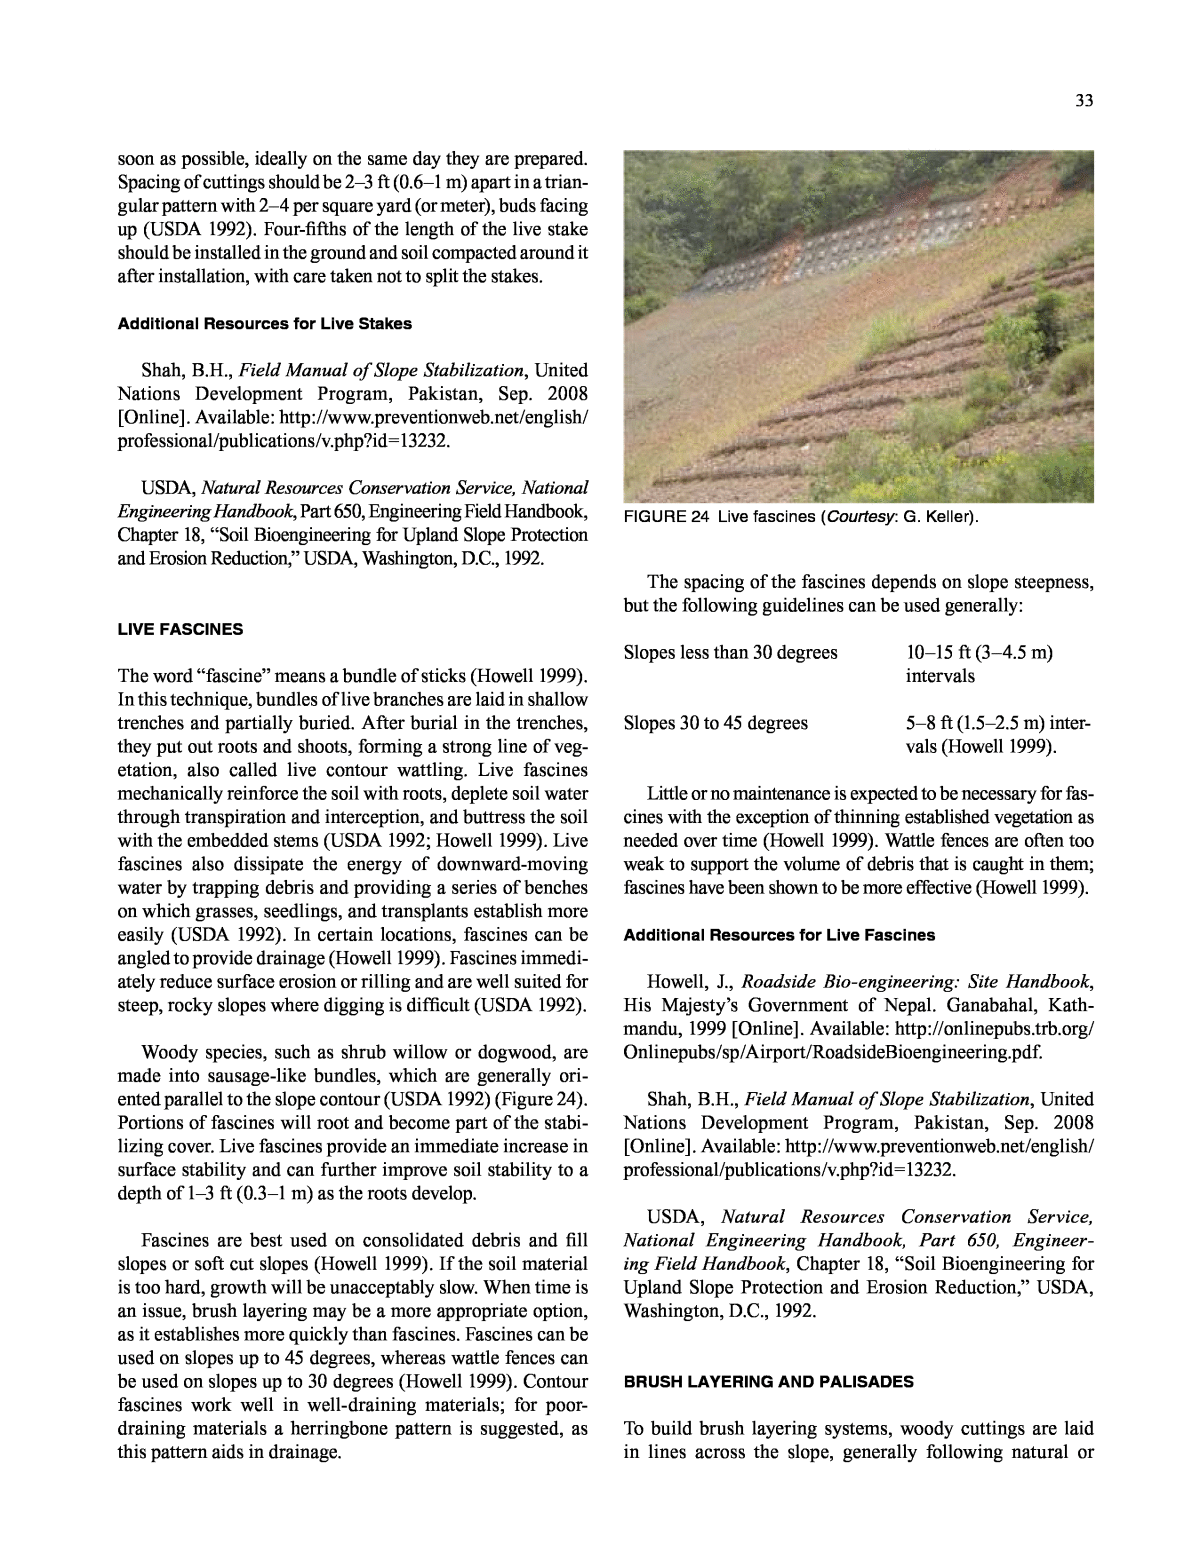
33 soon as possible, ideally on the same day they are prepared. Spacing of cuttings should be 2â3 ft (0.6â1 m) apart in a trian- gular pattern with 2â4 per square yard (or meter), buds facing up (USDA 1992). Four-fifths of the length of the live stake should be installed in the ground and soil compacted around it after installation, with care taken not to split the stakes. Additional Resources for Live Stakes Shah, B.H., Field Manual of Slope Stabilization, United Nations Development Program, Pakistan, Sep. 2008 [Online]. Available: http://www.preventionweb.net/english/ professional/publications/v.php?id=13232. USDA, Natural Resources Conservation Service, National Engineering Handbook, Part 650, Engineering Field Handbook, Chapter 18, âSoil Bioengineering for Upland Slope Protection and Erosion Reduction,â USDA, Washington, D.C., 1992. LIVE FASCINES The word âfascineâ means a bundle of sticks (Howell 1999). In this technique, bundles of live branches are laid in shallow trenches and partially buried. After burial in the trenches, they put out roots and shoots, forming a strong line of veg- etation, also called live contour wattling. Live fascines mechanically reinforce the soil with roots, deplete soil water through transpiration and interception, and buttress the soil with the embedded stems (USDA 1992; Howell 1999). Live fascines also dissipate the energy of downward-moving water by trapping debris and providing a series of benches on which grasses, seedlings, and transplants establish more easily (USDA 1992). In certain locations, fascines can be angled to provide drainage (Howell 1999). Fascines immedi- ately reduce surface erosion or rilling and are well suited for steep, rocky slopes where digging is difficult (USDA 1992). Woody species, such as shrub willow or dogwood, are made into sausage-like bundles, which are generally ori- ented parallel to the slope contour (USDA 1992) (Figure 24). Portions of fascines will root and become part of the stabi- lizing cover. Live fascines provide an immediate increase in surface stability and can further improve soil stability to a depth of 1â3 ft (0.3â1 m) as the roots develop. Fascines are best used on consolidated debris and fill slopes or soft cut slopes (Howell 1999). If the soil material is too hard, growth will be unacceptably slow. When time is an issue, brush layering may be a more appropriate option, as it establishes more quickly than fascines. Fascines can be used on slopes up to 45 degrees, whereas wattle fences can be used on slopes up to 30 degrees (Howell 1999). Contour fascines work well in well-draining materials; for poor- draining materials a herringbone pattern is suggested, as this pattern aids in drainage. FIGURE 24 Live fascines (Courtesy: G. Keller). The spacing of the fascines depends on slope steepness, but the following guidelines can be used generally: Slopes less than 30 degrees 10â15 ft (3â4.5 m) intervals Slopes 30 to 45 degrees 5â8 ft (1.5â2.5 m) inter- vals (Howell 1999). Little or no maintenance is expected to be necessary for fas- cines with the exception of thinning established vegetation as needed over time (Howell 1999). Wattle fences are often too weak to support the volume of debris that is caught in them; fascines have been shown to be more effective (Howell 1999). Additional Resources for Live Fascines Howell, J., Roadside Bio-engineering: Site Handbook, His Majestyâs Government of Nepal. Ganabahal, Kath- mandu, 1999 [Online]. Available: http://onlinepubs.trb.org/ Onlinepubs/sp/Airport/RoadsideBioengineering.pdf. Shah, B.H., Field Manual of Slope Stabilization, United Nations Development Program, Pakistan, Sep. 2008 [Online]. Available: http://www.preventionweb.net/english/ professional/publications/v.php?id=13232. USDA, Natural Resources Conservation Service, National Engineering Handbook, Part 650, Engineer- ing Field Handbook, Chapter 18, âSoil Bioengineering for Upland Slope Protection and Erosion Reduction,â USDA, Washington, D.C., 1992. BRUSH LAYERING AND PALISADES To build brush layering systems, woody cuttings are laid in lines across the slope, generally following natural or
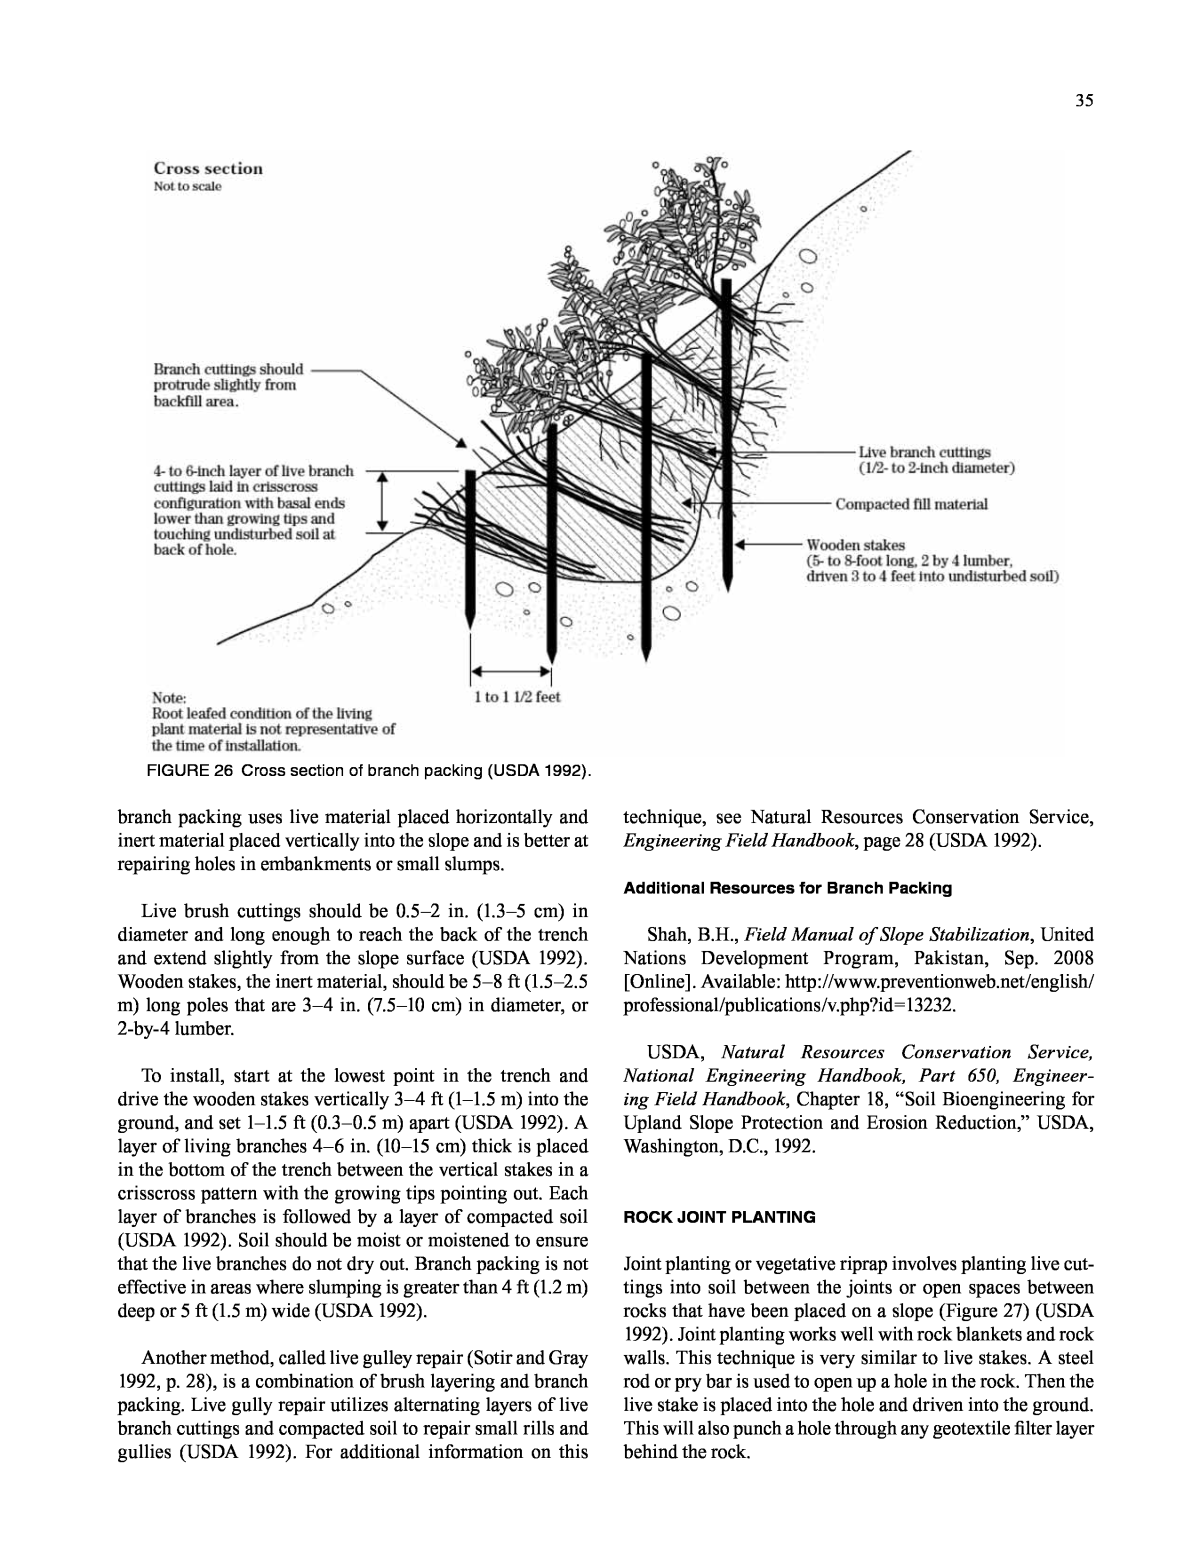
34 created contours (Howell 1999) (Figure 25). Brush layers form a barrier and prevent the development of rills, and trap sediment and debris moving down-slope. Brush layer- ing is somewhat similar to live fascine systems in that both involve the cutting and placement of live branch cuttings on slopes, but the two techniques differ in the orientation of the branches and the depth to which they are placed in the slope (USDA 1992). In brush layering, the cuttings are ori- ented more or less perpendicular to the slope contour, simi- lar to live stakes. The brush branches reinforce the slope, and the portions of the brush that protrude from the slope face assist in retarding runoff and reducing surface erosion (USDA 1992). The main function of brush layering is to catch debris and to armor and reinforce the slope (Howell 1999). After installation, over time a terrace or bench will develop. In certain locations, brush layers can be angled to create a drainage channel. FIGURE 25 Brush layering with live stakes (Courtesy: R. Sotir). Brush layering consists of placing live branch cuttings in small 2â3 ft (0.6â1 m) benches that have been excavated from the slope (USDA 1992). Bench excavation should start at the toe of the slope. The surface of the bench should be sloped so that the outside edge is higher than the inside. Live branch cuttings should be placed on the bench in a criss- cross or overlapping configuration with the brush growing tips aligned toward the outside of the bench. Backfill is then placed on top of the branches and compacted to eliminate air spaces, with brush tips extending beyond the compacted fill. Each lower bench is backfilled with soil from excavating the bench above. Consider brush layering on slopes up to 2:1 in steepness and no greater than 15 ft (4.5 m) in vertical height (USDA 1992). Mulching between benches is suggested. This technique can be used on a wide range of sites up to 45 degrees (Howell 1999). It is particularly effective on debris piles, fill slopes, and high embankments. Avoid using this technique on soils that drain poorly or that frequently slump. Spacing between brush layering depends on the steep- ness of the slope (Howell 1999). The following guidelines can be used generally: Slope less than 30 degrees 5â7 ft (1.5â2 m) intervals Slope 30 to 45 degrees 3 ft (1 m) intervals Slopes 30 to 60 degrees 3 ft (1 m) intervals (pali- sades only) (Howell 1999). There is generally no need for maintenance except to replace failures if they occur, or to thin vegetation once it is established (Howell 1999). Brush layering can be complex, and careful tailoring to specific site and soil conditions may be needed (USDA 1992). Additional Resources for Brush Layering and Palisades Howell, J., Roadside Bio-engineering: Site Handbook, His Majestyâs Government of Nepal. Ganabahal, Kath- mandu, 1999 [Online]. Available: http://onlinepubs.trb.org/ Onlinepubs/sp/Airport/RoadsideBioengineering.pdf. Shah, B.H., Field Manual of Slope Stabilization, United Nations Development Program, Pakistan, Sep. 2008 [Online]. Available: http://www.preventionweb.net/english/ professional/publications/v.php?id=13232. USDA, Natural Resources Conservation Service, National Engineering Handbook, Part 650, Engineer- ing Field Handbook, Chapter 18, âSoil Bioengineering for Upland Slope Protection and Erosion Reduction,â USDA, Washington, D.C., 1992. BRANCH PACKING Branch packing consists of alternating layers of live branch cuttings and compacted backfill to repair small localized slumps and holes in slopes (USDA 1992) (Figure 26). This method is very similar to brush layering. The main dif- ferences been brush layering and branch packing is that
35 branch packing uses live material placed horizontally and inert material placed vertically into the slope and is better at repairing holes in embankments or small slumps. Live brush cuttings should be 0.5â2 in. (1.3â5 cm) in diameter and long enough to reach the back of the trench and extend slightly from the slope surface (USDA 1992). Wooden stakes, the inert material, should be 5â8 ft (1.5â2.5 m) long poles that are 3â4 in. (7.5â10 cm) in diameter, or 2-by-4 lumber. To install, start at the lowest point in the trench and drive the wooden stakes vertically 3â4 ft (1â1.5 m) into the ground, and set 1â1.5 ft (0.3â0.5 m) apart (USDA 1992). A layer of living branches 4â6 in. (10â15 cm) thick is placed in the bottom of the trench between the vertical stakes in a crisscross pattern with the growing tips pointing out. Each layer of branches is followed by a layer of compacted soil (USDA 1992). Soil should be moist or moistened to ensure that the live branches do not dry out. Branch packing is not effective in areas where slumping is greater than 4 ft (1.2 m) deep or 5 ft (1.5 m) wide (USDA 1992). Another method, called live gulley repair (Sotir and Gray 1992, p. 28), is a combination of brush layering and branch packing. Live gully repair utilizes alternating layers of live branch cuttings and compacted soil to repair small rills and gullies (USDA 1992). For additional information on this technique, see Natural Resources Conservation Service, Engineering Field Handbook, page 28 (USDA 1992). Additional Resources for Branch Packing Shah, B.H., Field Manual of Slope Stabilization, United Nations Development Program, Pakistan, Sep. 2008 [Online]. Available: http://www.preventionweb.net/english/ professional/publications/v.php?id=13232. USDA, Natural Resources Conservation Service, National Engineering Handbook, Part 650, Engineer- ing Field Handbook, Chapter 18, âSoil Bioengineering for Upland Slope Protection and Erosion Reduction,â USDA, Washington, D.C., 1992. ROCK JOINT PLANTING Joint planting or vegetative riprap involves planting live cut- tings into soil between the joints or open spaces between rocks that have been placed on a slope (Figure 27) (USDA 1992). Joint planting works well with rock blankets and rock walls. This technique is very similar to live stakes. A steel rod or pry bar is used to open up a hole in the rock. Then the live stake is placed into the hole and driven into the ground. This will also punch a hole through any geotextile filter layer behind the rock. FIGURE 26 Cross section of branch packing (USDA 1992).
36 FIGURE 27 Rock joint planting (Courtesy: R. Sotir). Roots from the plants will improve drainage by removing soil moisture, and over time create a living root mat in the soil base and around rocks (USDA 1992). The root system of the mat will help to bind or reinforce the soil and to prevent loss of fines between and below the rocks (USDA 1992). The live cuttings should be 0.5â1.5 in. (1.2â4 cm) in diameter, long enough to extend into the soil behind the rock surface, and have the branches removed (USDA 1992). To install, plant live branch cuttings into the openings of the rock during or after construction by tamping them with a soft mallet or by hand. Orient the live cuttings perpendicular to the slope with growing tips protruding slightly from the finished face of the rock. Additional Resources for Rock Joint Planting Kling, P., M. Pyles, D. Hibbs, and B. Kauffman, The Role of Vegetated Riprap in Highway Applications, Final Report SPR 324, Federal Highway Administration. Washington, D.C., 2001. USDA, Natural Resources Conservation Service, National Engineering Handbook, Part 650, Engineering Field Handbook, Chapter 18, âSoil Bioengineering for Upland Slope Protection and Erosion Reduction,â USDA, Washington, D.C., 1992. LIVE AND TIMBER CRIB WALLS A live crib wall consists of a hollow, boxlike interlocking arrangement of untreated log or timber members (Figure 28) (USDA 1992). The structure is filled with suitable back- fill material and layers of live branch cuttings, which root inside the crib structure and extend into the slope (NRCS 1992). Once the live cuttings root and become established, the resulting vegetation gradually takes over the structural function of the wood members (USDA 1992). Crib walls provide immediate erosion protection, while the established vegetation provides long-term stability. The technique is appropriate at the base of a slope where a low wall may be needed to stabilize the toe of the slope, to prevent small failures, and to reduce its steepness (USDA 1992). Crib walls are useful where space is limited and a more vertical structure is needed (USDA 1992). Timber crib walls cost less to construct than concrete crib walls, espe- cially when timber can be harvested or gathered from the site (Shah 2008). Crib walls are not designed or intended to resist large, lateral earth stresses (USDA 1992). FIGURE 28 Live crib wall, from a distance (left) and close up (right) (Courtesy: G. Keller).
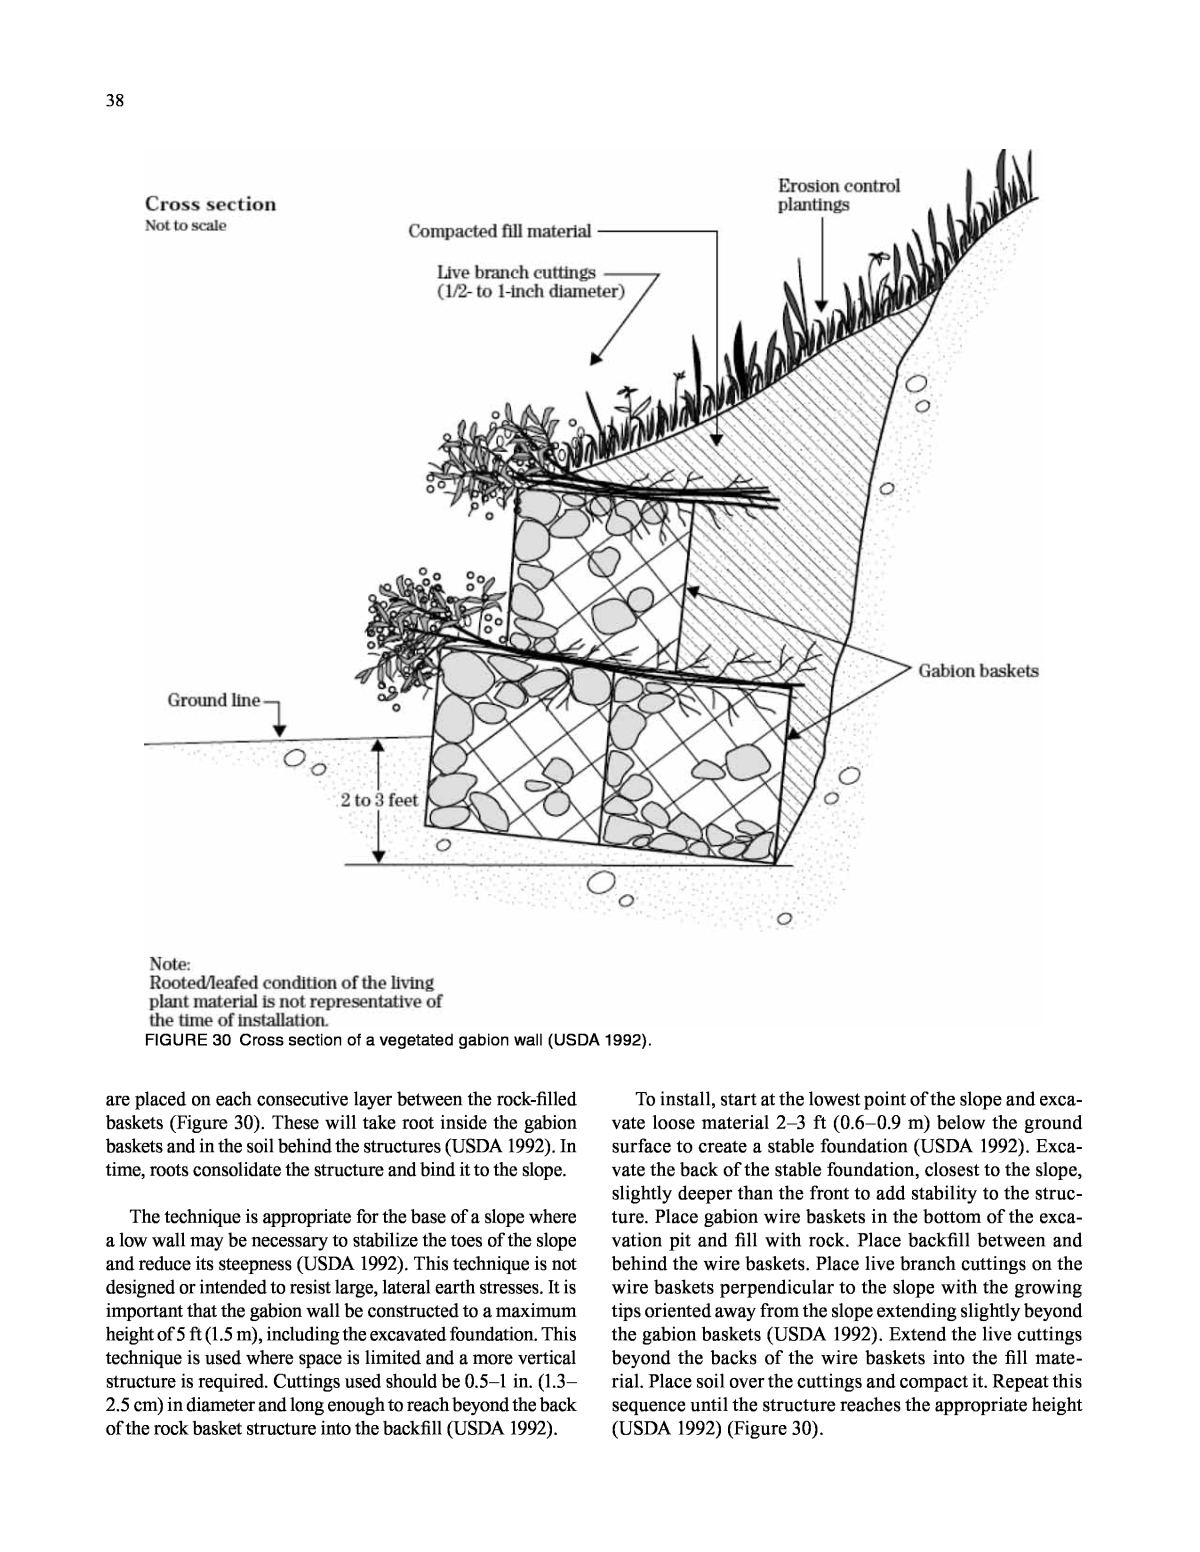
37 To install a crib wall, start at the lowest point and exca- vate loose material down 2â3 ft (0.6â1 m) until the founda- tion is stable (USDA 1992). Excavate the back of the stable foundation, at the slope, slightly deeper than the front; this will add stability to the structure. Crib walls are to be built with round or square timbers, 4-10 in. (10â25 cm) in diam- eter (USDA 1992; Shah 2008). Place the first course of logs or timber at the front and back about 4â5 ft (1.2â1.5 m) apart and parallel to the slope contour (USDA 1992). Place the next course of logs or timbers at right angles, or perpen- dicular, to the slope on top of the previous course, allowing 3â6 in. (7.5â15 cm) of overhang. Repeat these steps for each additional course of crib wall, securing each course with nails or rebar. As the crib wall structure is built up, beginning at ground level, place live branch cuttings on the backfill perpendicu- lar to the slope, cover the cuttings with backfill, and com- pact it (USDA 1992). Live branch cuttings should be 0.5â2 in. (1.2â5 cm) in diameter and long enough to reach the back of the wooden crib structure, with less than 10 in. (25 cm) protruding from the wall (USDA 1992; Shah 2008). Live branch cuttings should be placed on each course to the top of the crib wall with growing tips coming out of the face of the crib wall (USDA 1992). When the fill material is tamped into openings between the poles, large hollow spaces should be avoided to ensure that the branches will root properly (Shah 2008). Vegetation should be planted at a density of 10 live stakes per 3 ft (0.9 m) or as necessary. This may vary with the type of vegetation used for cuttings and the slope steepness. The constructed crib wall should be tilted back, or bat- tered, if the system is built on a smooth, evenly sloped sur- face (USDA 1992). Crib walls can also be constructed in a stair-step fashion so that each successive level of timber is set back 6â10 in. (15â25 cm) toward the slope face at a 1:10 angle toward the slope, but never placed vertically (USDA 1992; Shah 2008). Crib walls are to be constructed to a max- imum height of 6â10 ft (2â3 m). Live crib walls can be complex, and careful tailoring to specific site and soil conditions may need to be considered (USDA 1992). Vegetated Concrete Crib Walls Another option is a vegetated concrete crib wall (Figure 29). Prefabricated concrete slabs or hollow bricks are used to cre- ate the wall (Shah 2008; Zhang and Chen 2008). There are different types of concrete crib walls, but generally 4-ft-long (1.2-m-long) concrete slabs are prepared that are 6 in. (15 cm) thick and 1 ft (30 cm) thick at both ends (Shah 2008). The footer slabs have sockets on both sides and the header slabs have convex ends on both sides (Shah 2008). FIGURE 29 Post-earthquake (2005) slope stabilization using a masonry crib wall and layered planting of native trees and bushes, Balakot-Kaghan Road (N-15), Pakistan (Courtesy: A. Faiz). To build a vegetated concrete crib wall: ⢠Clear and excavate material from the site to create a solid base. ⢠Place concrete slabs to create a solid foundation. ⢠Place the concrete slabs at a 1:5 slope gradient, sloping back toward the slope face. ⢠Build up the wall by placing the footers parallel to the slope with 2-ft (0.6-m) gaps between each concrete slab. ⢠Place headers over footers. ⢠Fill soil in the gaps between the concrete slabs. ⢠Plant cuttings in the gaps between the concrete slabs. ⢠Drainage should be considered at the base of the wall (Shah 2008). Additional Resources for Live and Timber Crib Walls Shah, B.H., Field Manual of Slope Stabilization, United Nations Development Program, Pakistan, Sep. 2008 [Online]. Available: http://www.preventionweb.net/english/ professional/publications/v.php?id=13232. USDA, Natural Resources Conservation Service, National Engineering Handbook, Part 650, Engineering Field Handbook, Chapter 18, âSoil Bioengineering for Upland Slope Protection and Erosion Reduction,â USDA, Washington, D.C., 1992. VEGETATED ROCK GABIONS Vegetated gabions begin as rectangular containers fabricated from a triple-twisted, hexagonal mesh of heavily galvanized steel wire (USDA 1992). Empty gabions are placed in posi- tion, wired to adjoining gabions, filled with stones, and then folded shut and wired at the ends and sides. Live branches
38 are placed on each consecutive layer between the rock-filled baskets (Figure 30). These will take root inside the gabion baskets and in the soil behind the structures (USDA 1992). In time, roots consolidate the structure and bind it to the slope. The technique is appropriate for the base of a slope where a low wall may be necessary to stabilize the toes of the slope and reduce its steepness (USDA 1992). This technique is not designed or intended to resist large, lateral earth stresses. It is important that the gabion wall be constructed to a maximum height of 5 ft (1.5 m), including the excavated foundation. This technique is used where space is limited and a more vertical structure is required. Cuttings used should be 0.5â1 in. (1.3â 2.5 cm) in diameter and long enough to reach beyond the back of the rock basket structure into the backfill (USDA 1992). To install, start at the lowest point of the slope and exca- vate loose material 2â3 ft (0.6â0.9 m) below the ground surface to create a stable foundation (USDA 1992). Exca- vate the back of the stable foundation, closest to the slope, slightly deeper than the front to add stability to the struc- ture. Place gabion wire baskets in the bottom of the exca- vation pit and fill with rock. Place backfill between and behind the wire baskets. Place live branch cuttings on the wire baskets perpendicular to the slope with the growing tips oriented away from the slope extending slightly beyond the gabion baskets (USDA 1992). Extend the live cuttings beyond the backs of the wire baskets into the fill mate- rial. Place soil over the cuttings and compact it. Repeat this sequence until the structure reaches the appropriate height (USDA 1992) (Figure 30). FIGURE 30 Cross section of a vegetated gabion wall (USDA 1992).
39 Gabion walls are strengthened by trees growing on them (Howell 1999). There are two types of gabions: stone-filled and earth-filled. Vegetated stone gabions tend to come about naturally where trees have seeded existing gabion walls, although they could be seeded artificially. There is little concern for distortion of the wire gabion boxes (How- ell 1999). The benefit is that the trees will provide flexible binding to the structure once the wire has corroded. For stone-filled gabions, trees are unlikely to contribute much to the strength of the structure until the wire has become seriously corroded. Vegetated earth-filled gabions are a lower-cost alterna- tive to stone-filled gabions (Howell 1999). They are cre- ated by placing a fill of in-situ earth behind a single layer of dry stone within the gabion basket (Howell 1999). Tree seedlings are then planted on the gabion (Howell 1999). Plants should be spaced 1.5 ft (0.5 m) in a random pattern (Howell 1999). Maintenance may include thinning of veg- etation to maintain the site. This technique is not widely studied or implemented. Vegetated Soft Gabion Wall Another technique, called vegetated soft gabion walls, has been used successfully in Pakistan (Figure 31) (Shah 2008). Soft gabions are made of jute or synthetic fiber bags, origi- nally used for fertilizer or sugar, which are filled with soil or aggregate and placed to create a soft retaining wall. This technique can be used where stones are not available for gabion construction. FIGURE 31 Vegetated soft gabion wall (Shah 2008). The steps to create a vegetated soft gabion wall are as follows (Shah 2008): ⢠Clear the area where the wall will be built and excavate the base to a solid soil layer. ⢠Fill the empty bags with soil or aggregate, and place the filled bags side by side with their open ends directed toward the cut slope. ⢠Push soil from slope onto the bags and cover them fully. ⢠Place a layer of fresh cuttings on the soil surface with ends directed toward the slope. ⢠Cover the cuttings with another layer of soil from the slope. ⢠Place another layer of soil-filled bags lengthwise over the buried cuttings set back 6 in. (15 cm) from the front of the first layer of bags. ⢠Place another layer of soil over the bags and put down another layer of cuttings, bury with soil, and repeat this process until the wall height is achieved. ⢠Establish proper drainage at the base of the wall. Maintenance may include cutting back or pruning the established plants. Additional Resources for Vegetated Rock Gabions Howell, J., Roadside Bio-engineering: Site Handbook, His Majestyâs Government of Nepal. Ganabahal, Kath- mandu, 1999 [Online]. Available: http://onlinepubs.trb.org/ Onlinepubs/sp/Airport/RoadsideBioengineering.pdf. USDA, Natural Resources Conservation Service, National Engineering Handbook, Part 650, Engineering Field Handbook, Chapter 18, âSoil Bioengineering for Upland Slope Protection and Erosion Reduction,â USDA, Washington, D.C., 1992. VEGETATED ROCK WALLS A vegetated rock wall is a combination of rock and live branch cuttings used to stabilize and protect the toe of steep slopes (USDA 1992) (Figure 32). Vegetated rock walls differ from conventional retaining structures in that they are placed against relatively undisturbed earth and are not intended to resist large lateral pressures. FIGURE 32 Cross section of a vegetated rock wall (Keller and Sherar 2003).
40 Vegetated rock walls are appropriate where a low wall may be needed to stabilize the toe of the slope and reduce its steepness. Vegetated rock walls are useful where space is limited and natural rock is available (USDA 1992). To build a vegetated rock wall, live cuttings should be 0.5â1 in. (1.2â2.5 cm) in diameter and long enough to reach beyond the rock structure into the fill or undisturbed soil behind the structure (USDA 1992). Rocks used should be 8â24 in. (20â60 cm) in diameter, with larger boulders used at the base. To install, start at the lowest point of the slope, and remove loose soil until a stable base is reached, gener- ally 2â3 ft (0.6â1 m) below the ground elevation (USDA 1992). Excavate the back of the stable foundation, closest to the slope, slightly deeper than the front to add stabil- ity to the structure. Excavate the minimum amount from the existing slope to provide a suitable recess for the wall. Well-draining base material needs to be used if deep frost penetration may be an issue. Place rocks with at least three load-bearing points contacting the foundation material or underlying rock course (USDA 1992). They should also be placed so that their center of gravity is as low as pos- sible, with the long axis slanting inward toward the slope if possible. When a rock wall is constructed adjacent to an impervious structure, place a drainage system at the back of the foundation and outside the toe of the wall to provide an appropriate drainage outlet (USDA 1992). The overall height of the rock wall including the excavated base should not exceed 5 ft (1.5 m). A wall can be constructed with a sloping bench behind it to provide a base on which live branch cuttings can be placed during construction (USDA 1992). Live cuttings should be tamped or placed into the openings of the rock wall during or after construction. The base ends of the branches should extend into the backfill or undisturbed soil behind the wall. Live cuttings should be oriented perpendicular to the slope contour with growing tips protruding slightly from the fin- ished wall face (USDA 1992). Additional Resources for Vegetated Rock Walls USDA, Natural Resources Conservation Service, National Engineering Handbook, Part 650, Engineer- ing Field Handbook, Chapter 18, âSoil Bioengineering for Upland Slope Protection and Erosion Reduction,â USDA, Washington, D.C., 1992.
